Archives for 2008

Cooking for a Crowd?

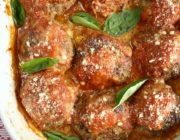
Growing up, Meatball Lasagna was always reserved for special occasions, holiday times, and parties. Often it was served as a side dish along with a roast of some sort, a turkey, or a ham, but just as many times, all on it’s own.

Homemade mini meatballs are key, a little time consuming, but worth it! You can roll, and cook them ahead of time, stick them in a Ziploc bag in the frig, or freezer till ready to assemble. My meatballs will always have garlic, breadcrumbs, fresh parsley, egg, salt, pepper, and lots of grated Romano cheese.
I find that results are best if you use the dried or fresh noodles, not the no-boil type, layering as you go with a light homemade marinara sauce, ricotta cheese mixture, shredded, or fresh mozzarella, the mini meatballs, and more Romano cheese. Who can resist oozing cheese and dripping sauce and a bite of a tiny meatball? A definite crowd pleaser!!

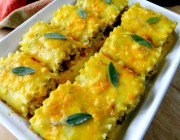
Stuffed Shells are great for a party also, they’re individual and self contained, and easy to serve.
Here I made two different kinds, a meat mixture of ground round, chopped spinach, and grated Romano cheese, and your standard ricotta cheese mixture.

This was served as a side dish to our meal on Christmas day. Packed up and ready to go to my BIL, and SIL’s for dinner! Two huge pans! You think I went a little overboard??? I know, I have issues!!
We also had New York strip steaks on the grill, beer battered shrimp, shrimp scampi, assorted veggies, and way to much other stuff. Needless to say, everyone went home with a huge care package.

Next time you have a party you might want to try these!

Buon Appetito!!!
Signature

Pannetone French Toast

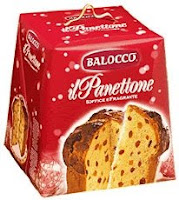
This time of year Pannetone is everywhere! This sweet, almost brioche type dough, tastes like a fluffy bread/fruitcake that is laced with candied fruits and raisins.

The minute you open the box and unwrap it, you’re hit by the most intoxicating smell! I rarely buy these because my hubby could literally eat the whole thing within a day. He tears off piece by piece, and before you know it, it’s all gone!

This time I hid the box from him because I knew I was going to make french toast with it for our breakfast yesterday. If you haven’t tried it this way, I highly suggest that you do, it’s way beyond good!!!! and it’s perfect for a special occasion.
I usually whisk up 1 egg per slice, you’ll find that it really soaks up the egg mixture. Add in some milk and half and half, or cream, pour in some pure vanilla, and maybe a touch of cinnamon. Melt your butter in a large pan, and cook till nice and dark golden brown. Serve with warmed real maple syrup.

Needless to say, the hubby was very happy, and so was I!

Buon Appetito!!!

Signature

https://www.prouditaliancook.com/2008/12/blog-post.html

Signature

Cucidati! (Italian Fig Cookies)

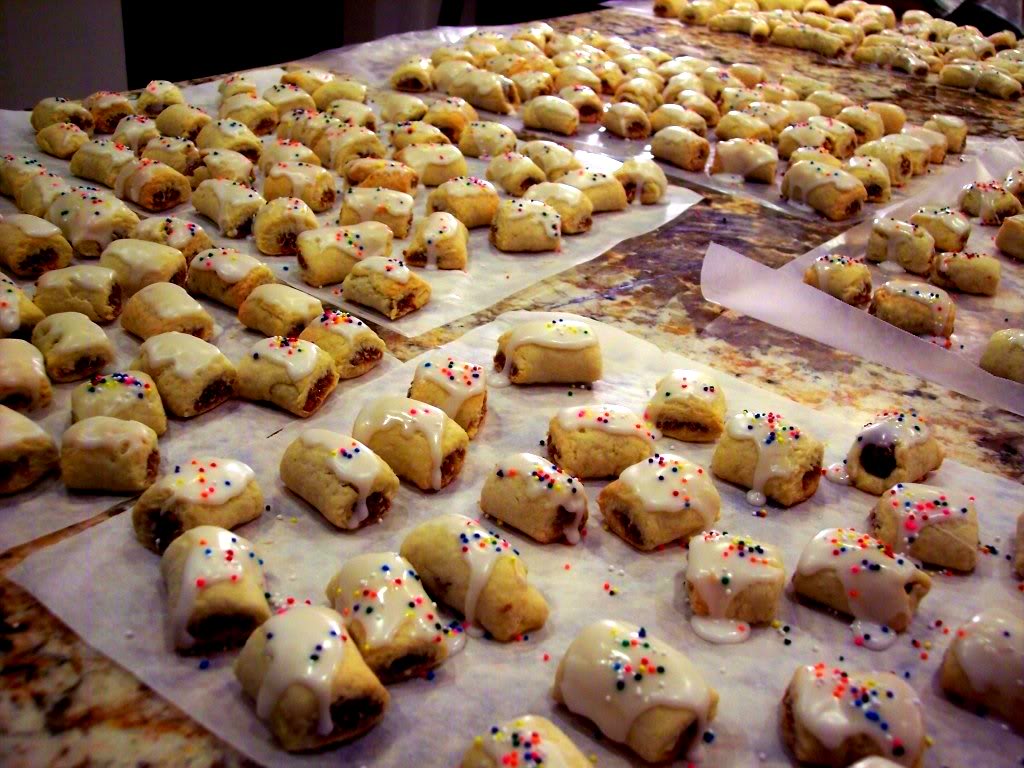
Whether you call them Cucidati, Sicilian X Cookies, or just plain Italian Fig Cookies, the end result is the same. Tender sweet dough, that’s wrapped around a very flavorful spiced fig filling.

This is a favorite in many Italian households, and hands down this is my hubby and his brothers


favorite cookie! I think it’s mostly nostalgic, because it reminds them so much of their mom, in fact they call them “Moms cookies”. Weeks before, my BIL will call me and plead ” Are you gonna make mom’s cookies this year? Let’s make mom’s cookies! What do you need? What should I buy? We’ll help you! Normally their idea of helping is spending 5 minutes in the kitchen then popping a DVD in, and every so often I would hear one of them say, “How’s it going up there? “Got any done yet?” Well this year I decided to call their bluff and said I would make them if they help. I think they now have total appreciation for all the work that goes into it!


To make these, you need to set aside the whole day, it’s very time consuming especially if you triple the recipe, which we did. You can however, make the dough and the filling a day ahead of time which I will do next year.


I decided to use Nick Malgieri’s recipe for the dough using butter instead of shortening as my MIL use to do. As far as the filling goes there are a ton of different versions and the way families make them, some even add chocolate but my MIL never did so I make them without.
You can’t go wrong with all or any of the ingredients incorporated with the figs, I’ve had many friends versions I tasted, all slightly different but still taste amazing.
I always taste to see if I want more or less of anything in the process and you should to.
The dough is tender, and easy to work with, and a breeze to make in the food processor!

For the filling, some of the ingredient’s are, golden raisin’s, candied orange peel, toasted and chopped almonds.

Apricot preserves, dark rum or brandy, instant espresso, cinnamon and cloves.

I made my BIL chop up the figs. Nice job UJ!

All the ingredients get whirled together in the food processor and the end result is a thick and flavorful fig paste!

The dough and fig paste gets divided up equally.

One at a time on a floured surface, you flatten each piece of dough and roll it out into a rectangle. Next, roll your fig paste into a log, lay the log on top of the dough, seal the edges and roll it out into a cylinder. Cut them as big as you want.

Here’s our finished project. just waiting for the frosting to dry. You don’t have to frost them, but we like them that way. Needless to say, the 2 brothers were very happy!!


Happy Baking!


Signature

Fritto Misto of Calamari, Lemon and Scallops!

This popular seafood antipasti is an Italian dish that literally means “fried mixture”. In this case I used calamari and scallops, but you could also add any other seafood you like. The most important thing is to get your oil hot, never overcook your fish, and keep your breading nice and light.

That’s why I love using this recipe because it’s made with cornstarch to bread the fish, using cornstarch gives it such a nice light flavor and the taste of the fish is not buried by gobs of breading.

I adapted the recipe a little by adding slice jalapeño for spice, some green beans for color and crunch along with lemon slices.

Frito Misto is a common dish served on Christmas Eve for The Feast of the Seven Fishes. The feast is an Italian American tradition where at least seven seafood dishes are served, all over you will see family’s preparing and cooking for this traditional feast.

It’s quite special to see how certain foods and traditions connect us all with fond memories and feelings that stay with us throughout our entire lives, no matter what nationality or culture we are a part of.

Buon Appetito!
Fritto Misto of Calamari, Lemon and Scallops!
 
Author:
Ingredients
  • 1 lb. calamari, cleaned and drained and patted dry
  • ½ lb. sea scallops cut in half across the equator
  • 2 lemons, sliced one for frying and the other for garnish
  • Sliced jalapeño and green beans (optional)
  • 2 cups cornstarch
  • 1 tablespoon salt
  • salt and pepper to taste
  • oil for frying
Instructions
  1. Heat oil 360 - 375
  2. In a wide rimmed bowl mix half of the calamari and half of the scallops and half of the lemon slices and half of the optional jalapeño and green beans.
  3. Sprinkle with 1 cup of the cornstarch mixed with salt.
  4. Toss with hands and coat everything, tapping off excess.
  5. Place in hot oil and fry til golden brown, drain on paper towels.
  6. Repeat with remaining seafood, veg and lemon slices same as before with remaining 1 cup of cornstarch mixture.
  7. Fry up and drain the same way.
  8. Serve hot with warm marinara on the side.
Signature

A Limoncello Cosmo, and some Little bites!!

Party time is here, and if you’re a lover of Limoncello like I am, then you’ll love this festive little drink! Vodka, cranberry juice, and the guest of honor… Limoncello!

I would suggest you test out the ratio’s to your liking. Start out for one glass with, 1/2 shot of vodka, 1/2 shot of Limoncello, and a shot of cranberry juice. Fill a shaker 3/4 way with ice, pour everything in, give it a good shake, and pour. Garnish with fresh or frozen cranberries.
Now of course you’ll need something to nibble on while your sipping on these, don’t worry!! I got that taken care of too.

FRIED RAVIOLI’S**** These are delicious, and super easy to make, you don’t need to have homemade ravioli’s either.
Grab a bag of store bought, they cook up so fast and you can feed a crowd. They’re dipped in buttermilk first, a tip I got from Giada, so much better than dipping them into egg. Next, dip them into your favorite flavored breadcrumbs, which have been doctored up of course. Fry them in 2″ of canola oil in a large saute pan. They’ll be done in a few seconds, drain on paper towel, then sprinkle with grated cheese. Serve warm, along with some warm marinara for dipping!

BAKED ZUCCHINI STICKS*** You can make a bunch of these with out even frying. Just cut your zucchini into sticks, these you will be dipping in eggs first, then into your flavored breadcrumbs, I also mixed mine with some panko, adding more chopped parsley, granulated garlic, and grated cheese. Spray your baking sheets with olive oil spray, place your zucchini on, and then spray a little olive oil over them. Bake in a hot 375F oven till golden and crunchy. Maybe 25 min’s. This is fantastic with a lemon aoli for dipping, which I didn’t have time to make, but also good with warm marinara.
Buon Appetito, and Cin Cin!!

Signature

Time To Bake The Cookie’s…

I’ve been doing lots of cookie baking lately, besides making them for friends and family, I also went to a cookie swap that my Italian/American club had this year. Each year I usually make most of my old standbys, but I always try to change things up and make something new and different.

This year I tried these colorful and tasty Pistachio Cranberry Icebox Cookies, the recipe is seen here, on Epicurious. I love the way they look with their square shape and the vibrant colors of the green pistachio’s and red cranberries, that paired with the flavor of a shortbread dough, is a winning combination! They look cute peeping through cellophane bags tied with ribbon too, a great gift idea!

The recipe said they would last 5 days in an airtight container, well mine lasted 2 weeks and tasted just as good as the first day I made them. I kept them in a cool area, and they were perfect.
So you can definitely make these in advance!

The colored sugar I used around the edges is what I had on hand, I tried to find plain white, but after 2 stores I gave up. Solid red, green, or white sugar would be really nice too.

At our cookie swap we had a Mandolin player who was treating us to beautiful Italian music, as we exchanged cookies, and of course sampled some along with our coffee.

Did you know there were different kinds of Mandolins?? I didn’t!

The table was huge, everyone was told to bring 3 dozen each for the swap, along with extra for eating that night, the recipe, and a family story about the cookie if you wanted to, and last but not least a container to take your goodies home in!

We’re in the process of making a club cookbook, so all these cookie recipes will be added into it.

This is peek into my container I brought home. Anyone else do a cookie exchange? It’s really fun, and you end up with tons of variety!
Happy Baking!!

Signature

Veggie Ribbon Pasta

Are you craving some lighter food right about now? I know I am! This pasta dish will satisfy that craving, and you won’t sacrifice any flavor at all!

Thin ribbons of zucchini and carrot, that are lightly sauteed in olive oil along with paper thin sliced garlic, then tossed with fettuccine, grated lemon peel, finely chopped fresh parsley and basil. Finished off with a grating of pecorino romano and a few toasted pinenuts. It’s so good!!!

Just take your vegetable peeler and make ribbons out of your zucchini and carrots, then slice up your garlic paper thin, by using either a knife, or a garlic slicer, (which I used). See all that garlic in the photo? I used it all! 5 or 6 cloves, believe me it makes the dish! I also used 3 nice size carrots and 4 nice size zucchini.
Grab the biggest saute pan you have, drizzle in some olive oil, and saute all of your garlic till it gets limp, which doesn’t take long because it’s so thin. Next, throw in all your veggies and gently keep tossing them with tongs till they become limp and their natural juices come out. Keep them slightly al dente. Have your water boiling for your pasta, I used 1/2 lb of fettuccine cooked al dente, but you could also use tagliatelle, or papadelle.

After you drain your pasta, lightly toss it in with your veggie mixture, be sure to get all the juices from the veggies, and garlic incorporated. Grate the rind of one whole lemon, toss in your chopped fresh basil, and parsley, and freshly grated pecorino romano, additional salt & pepper, and maybe a drizzle more of olive oil. Garnish with some toasted pine nuts if you want.
I make this dish because we love the way it tastes, but then I was thinking, in reality it practically costs nothing to make, and in these hard economic times, this would be a healthy and economical meal to feed a family with. Locally, and world wide, there are many people less fortunate than us.
Raising awareness of world hunger is something going on throughout the blogging community, that’s why I’m sending this dish off to my blogger friends Val, of More Than Burnt Toast, Giz and Psychgrad, of Equal Opportunity Kitchen, and Ivy, of Kopiaste. A group of caring bloggers who have joined forces for this wonderful cause. They started BloggerAid, please click on the link to find out more about their mission, and how we all can help.
Signature

Turkey Day Leftover Solution!

If you’re still wondering what to do with some of your leftovers from Thanksgiving, why not make some soup! Today I took the last of my turkey leftovers and made a pot of Creamy Turkey and Rice soup.

I saved the breast carcass, put it in a pot with some water, celery, onions, carrot, and a splash of white wine. Seasoned with salt, pepper, and thyme, then simmered it for about an hour and a half.

When my stock was finished I strained it of all the veggies, picked the meat off the bone, and also added in some breast meat I had put away in a container. Then in another pot, I sauteed in butter, some celery, carrots, onions, and crimini mushrooms, mixed in 1/2 cup of flour, let that cook till it was all blended, then ladle, by ladle I whisked in the stock and after it thickened up, I threw in some cooked brown rice, and then finished it off with a little half and half for color. Garnish with some parsley.

The salad was just pears, arugula, red onion, blue cheese and walnuts, tossed in a balsamic vinaigrette.

It was perfect for a cold and snowy day we had here today! Yes, it snowed a little already! Yuck!

Signature

Caramel Wannabe’s!!!

It’s Daring Baker time again, and for this months challenge we had the option of making a caramel cake, or caramel candy. I opted for the candy, since I thought it would be a nice gift to give away, and because I never used a candy thermometer, nor have I ever made candy! The recipe… Golden Vanilla Bean Caramels… comes from Alice Medrich’s Pure Dessert.

Well let me tell you, candy making is definitely NOT my forte!!! Yes, I posted my photo with my little caramels all nice and snug in a pretty tin, studded with hazelnuts and pistachio’s, but looks can be very deceiving!!

I got off to a good start, I stuck my new thermometer on my pan and waited for my sugar and syrup to boil, my heated cream was waiting in the wings to be incorporated. Everything was at the correct temperature according to the recipe.

When it was time to pour it all into my pan, my house smelled like a fancy candy shop on Michigan Ave.!! I thought it was the right color, but maybe in reality it was a little to dark, what do you think?

Here is the picture of how my caramels really turned out, like shards of cut glass! TOTALLY INEDIBLE! The first photo above, I practically had to take a sledgehammer to cut them, I had caramel shards flying all over my kitchen floor!
In conclusion, I noticed my candy thermometer said caramels to be done at 240F, but the recipe said 260F. I went with 260F . Maybe that was my problem!

A big “Thanks” goes out to our host Dolores, of Chronicles of Culinary Curiosity, where you will find this recipe, along with her assistants, Alex, of the Blondie and Brownie duo, and Jenny, of Foray into Food, and Natalie, of Gluten-a-go-go.
Be sure to click on the Daring Baker link above to see how the caramels were really suppose to turn out, and to check out all those good looking cakes.
Signature

I’m Thankful for…

Having my dinner turn out scrumptious good, hanging out with family all day,

And the fact that I don’t have to cook today because there’s plenty of leftovers!!!
Hope you’re enjoying all of yours too!
Signature

Roasted Parmesan – Creamed Onions

I’m making a call out to all the onion lovers out there. Are you with me? You have to try this!!
Roasted sliced onions, that are bathed in a white wine and parmesan cream sauce, studded with a hint of fresh sage or thyme! This is a perfect side dish to go along with your turkey day dinner, or any dinner for that matter!

The cream and wine saturate these sweet roasted onions, and gives them such a luxurious flavor. You will be smitten with the first bite!!
Recipe Adapted From: Rick Tramonto’s Osteria
***Take 4 yellow onions, peel and slice them 1/4 inch thick, and carefully place them on a baking sheet, rings intact. Drizzle with olive oil, salt and pepper. Roast them at 375F for about 15 minutes.

***While onions are roasting, place 1 cup of heavy cream and 1/4 cup of white wine in a small saucepan and simmer till it starts to bubble around the edges. Remove from stove.
***After 15 minutes, carefully take the onions off the baking sheet and transfer into a shallow baking dish, still keeping rings intact. Spoon cream sauce over each onion, maybe a little more black pepper, cover with foil and cook another 20-25 min’s.
***Remove from oven, take off foil, and raise temp to 450F. Shave, or grate your parmesan on top of each onion, place back in hot oven till golden brown. About 5 min’s till they caramelize.

Garnish with fresh sage leaves or thyme.
Hope you’re enjoying your weekend,
Buon Appetito Everyone!!!
Signature

Pasta Making Continued…

Pasta Perfection: Tools of the Trade

Recently I received a very nice email from a sweet women named Khara, over at cookware.com. Khara offered for someone to do a guest post for me on the topic of my choice.
Not being too aware of cookware.com, I decided to quickly go over there and check their website out. It’s really a great online source for all of your cooking and baking needs. Go over there and check them out when you get a chance! I even found my ravioli forms there!
Since I’ve been in a pasta making mood lately, obviously from my lasts two posts, I thought a post about pasta machines, and some of the accessories would be very informative. I’ve had questions from readers regarding pasta making, so hopefully this post will answer some.

So here it is… The following was written by guest blogger Jamie Sward. Enjoy!

As the weather starts turning colder, what’s better than a nice hearty bowl of pasta to warm up both body and spirit? Served up on your best Christmas dinnerware, what could be better this holiday season? While there are a great many pre-made pasta options in stores today, nothing beats the uncompromising flavor of fresh, home made pasta. Before you can start making delicious homemade pasta, you need to make sure that your kitchen is adequately stocked with the proper tools. Below, let me break down for you the essential pasta making tools that you need in your kitchen.

  • Pasta Machine: A pasta machine is one tool that anyone looking to make homemade pasta should invest in. Most pasta machines feature rollers, which flatten the pasta, and ribbon cutters that cut the pasta into different widths. Pasta makers either run on an electric motor or are manually operated using a hand crank. Once you have your pasta dough prepared, cut it into smaller chunks and run them through the rollers of your pasta maker. You may need to run these through the rollers several times until they are smooth and flat. The rollers can be adjusted, depending on how thick you want your pasta.

    Once you have achieved your desired thickness, let the strips dry for about 10 minutes. Now you are ready to run the strips of dough through the cutting rollers. Most pasta machines come with 2 settings – spaghetti and fettuccine. Other optional attachments are available to make angel hair pasta, Lasagna, Ravioli and other types of pasta.

  • Chitarra Pasta Maker: A chitarra, while not necessarily an essential pasta tool, is still a very useful pasta making appliance. A chitarra is a wooden frame with steel wires strung across the top. A chitarra shapes and cuts macaroni all chitarra, which is a flat, square spaghetti. You simply place a flat sheet of dough on top of the wires and push downward, using a rolling pin. The pasta then falls through the wires.

  • Raviolamp Ravioli Maker: A raviolamp is a simple tool designed to help you make your own, fresh Ravioli. To use, simply place one sheet of pasta dough on top of the plate, putting your Ravioli filling of choice (meat, cheese, veggies) into the slots. Place another sheet of dough on top and use the rolling pin included to seal your Raviolis up nicely.

  • Other Useful Pasta Making Tools: Here are some other essential pasta making tools that you should add to your kitchenware
    collection.

    • Rolling Pin: A rolling pin is a must-have for getting your pasta dough thin enough to work with (if you don’t have a pasta maker)

    • Pastry Wheel: Perfect for cutting pasta, a pastry wheel is a great way to add an attractive fluted edge on your pasta creations. Use a pastry wheel when making home made Ravioli!

    • Cookie Cutters: A completely versatile kitchenware item, cookie cutters are perfect for making stuffed pasta!

    • Pastry Bags: Another versatile tool, pastry bags are great for adding your desired filling to your pasta creations. Perfect for making Ravioli, Tortellini and Tortelli.

    • Garganelli Maker: Sometimes referred to as a “butter pat,” this device is shaped sort of like a comb and creates grooves in the dough. Its most often used to create gnocchi.

As you can see, a pasta machine isn’t completely necessary. It’s perfectly possible to create some delicious pasta with just a rolling pin, some cookie cutters and pastry cutters. Pasta machines do tend to simplify the job, though – turning pasta making into a fun, family friendly activity. If you want to go a step further, respected kitchenware maker, KitchenAid makes a line of mixers with pasta roller and cutter attachments. When you see how much fun it can be to create your own pasta, perhaps you’ll want to purchase one as a gift for your friends or family members? You can purchase a basic pasta maker for under $30 and add on additional attachments as you need them.

Signature

Time To Make The Ravioli’s!!!

This past Saturday, was our annual ravioli making day, we started at noon and by 4:30, we had finished with a grand total of over 400 ravioli’s, not bad huh? There were 5 of us, and after we figured out who was going to do what job, we grabbed our aprons and got going!

I love the convenience of making the pasta dough in a food processor, when you’re making so many batches, it really goes fast, and every batch comes out perfect! In a matter of seconds it all comes together!

As we made the batches of dough, we would wrap them up so they wouldn’t dry out.

Ahhhh, The convenience of a pasta machine! I remember back in the day when I would roll the dough out all by hand, lot’s of work, and very time consuming! Besides, a pasta machine does a way better job! The dough comes out perfect.
After you figure out your first batch, it goes pretty fast, because you’ll know what numbers you’ll be doing your cranking on.

Back in my younger days, I never used these ravioli forms. I would make mine all by hand, each one having their own individual “look”. But not anymore! I like this so much better!
Just make sure you flour the forms really good. See those zig zags? You have to make sure that you rub the flour into all those grooves, or you won’t be able to flip the ravioli’s out.

So here the rolled out dough is placed on the floured form, and into each indention you place your filling. Here we used a mixture of meat, cheese and spinach, a wonderful recipe from my Daughter- in laws Nana.

Same thing here, only this time we used a mixture of ricotta cheese, grated romano, fresh chopped parsley, salt and pepper.

Now top your filling with another sheet of dough, and take a little rolling pin and roll over those zig zags, doing this is, will actually cut your dough. When that’s all finished, start at a corner and pull up a little, turn the form over, and they all should pop out! Remember, flour is your friend, you don’t want them to stick!

When they come out, they look like this, now just brush off the excess flour.

Close up….Aren’t they pretty? See how the ravioli form cuts them so perfect?

We first freeze them individually on cookie sheets, and then when they’re frozen, we bag them all up. This was when we were only half way through!
If you never made homemade ravioli’s, I would highly recommend you give it a try.
Not only do they taste outstanding, they’re so much fun to make with your family.

Thanks to, Vanessa, Christa, Evelyn, Michele, and (Lena, for your wonderful recipe!)
Signature

Polenta Biscotti

Next time you’re making biscotti, toss a little polenta into the mix, and what you’ll get is a firm and crunchy texture that has a nice rustic flavor, and I have to say, they are ideal for dunking!

Now myself, I’m not really a dunker, I prefer to keep my coffee, free of any crumbs, and I don’t like it when my biscotti gets all mushy! I prefer it crunchy all the way!!

On the other hand, my hubby is a major dunker, and so is his brother, and let me tell you when those two get together and dunk a bunch of biscotti, lets just say, in the end, the inside of their coffee cups are not a pretty sight!

I got this recipe while searching the net, and although I loved the ingredients, I wasn’t crazy with the method of cooking it. They wanted you to cook the log and then refrigerate it for 12 hours!!
That wasn’t going to happen, and besides I never made biscotti where I had to wait for 12 hrs. in between!

So here’s my tweaked version!

INGREDIENTS:

4 Cups of Un-Bleached All purpose Flour
3/4 Cup Polenta
1 1/2 Cups Sugar
1 1/2 Teaspoon Baking Powder
2 Teaspoons Aniseed
3 Eggs
1/2 Cup of Sliced Almonds
10 Tablespoons of Melted Butter
2 Teaspoons of Sambuca or Amaretto Liquor

In a bowl combine the flour, polenta, baking powder, aniseed, and almonds, set aside.

In another bowl, beat sugar with melted butter till light fluffy, blend in eggs one at a time, then add your liquor.

Form a log, or two, that’s slightly flattened and place on a greased, or parchment lined baking sheet. Bake at 350F, for 20 to 30 min’s, depending on your oven. It should have a nice golden color. Cool completely.

When completely cooled, cut slices diagonal, about 1/2 inch thick, place back on the baking sheet cut side down for 6 to 10 min’s, then flip them over for another 5. Ovens do very, and so does a preference for crunchiness, so cook them according to your likeness. They do get cruncher as they cool down. Store in an airtight container.

I dipped some in melted chocolate, but most of them I left plain. I would definitely make these again!

Buon Appetito! and Have A Great Weekend!

I’ll be busy making homemade ravioli’s with the family, which I’ll be sure to post about!

Signature

SILHOUETTE PASTA

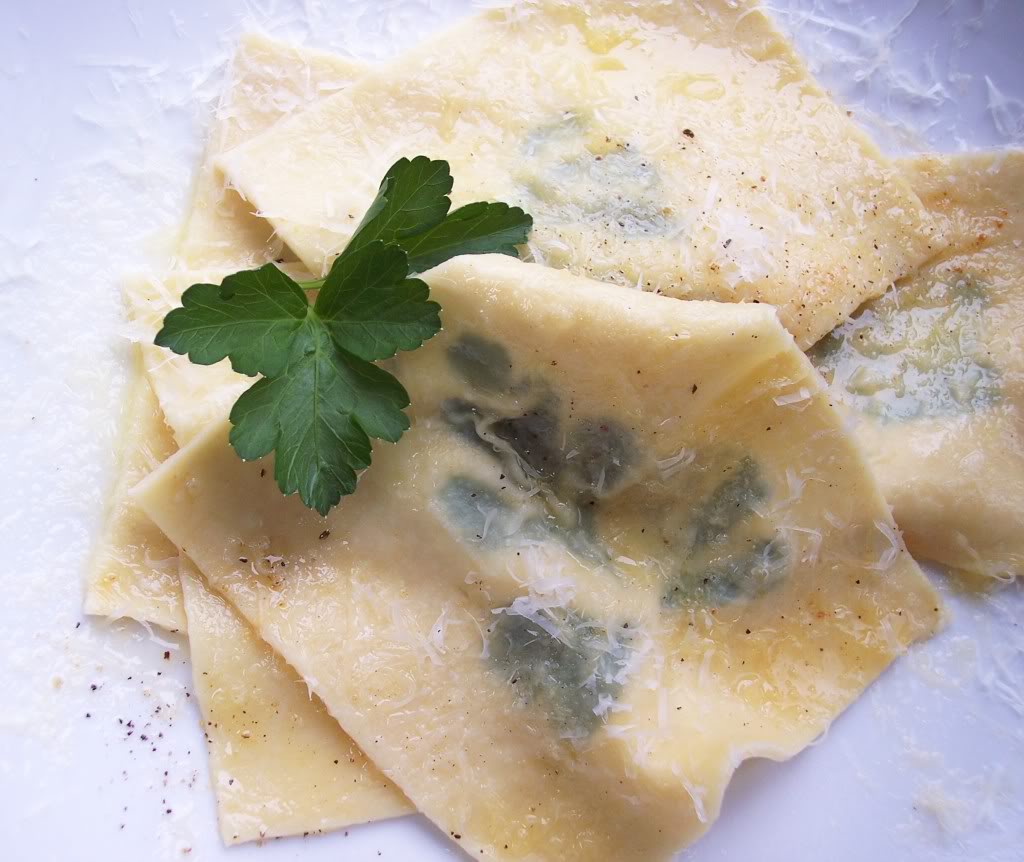
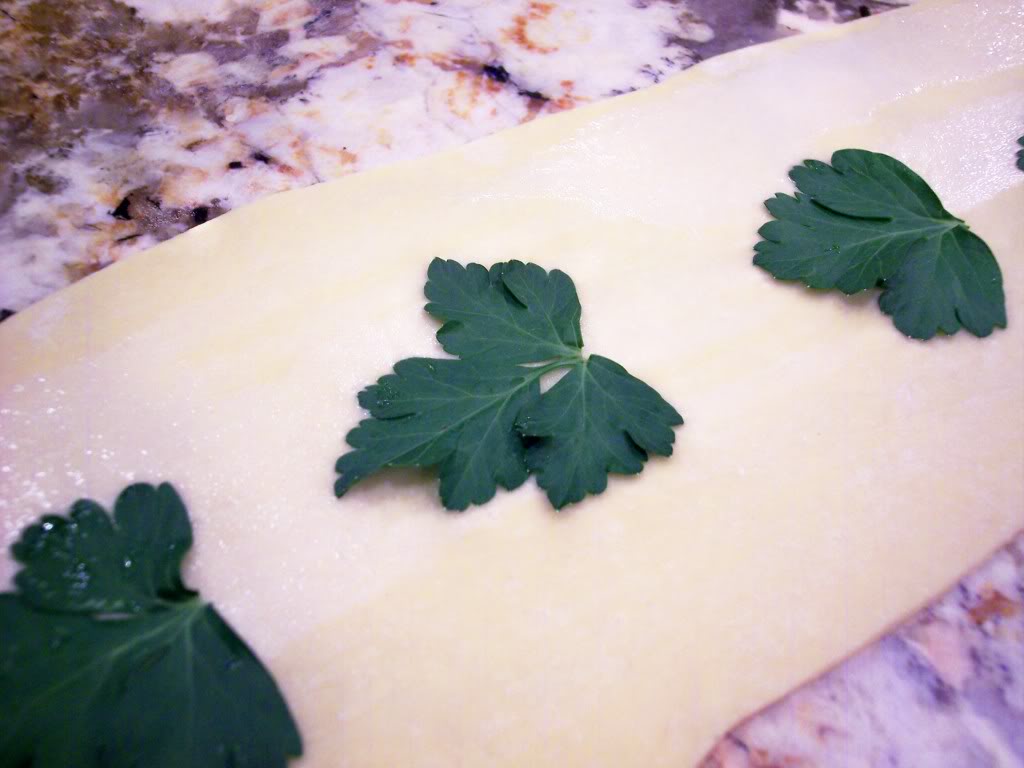
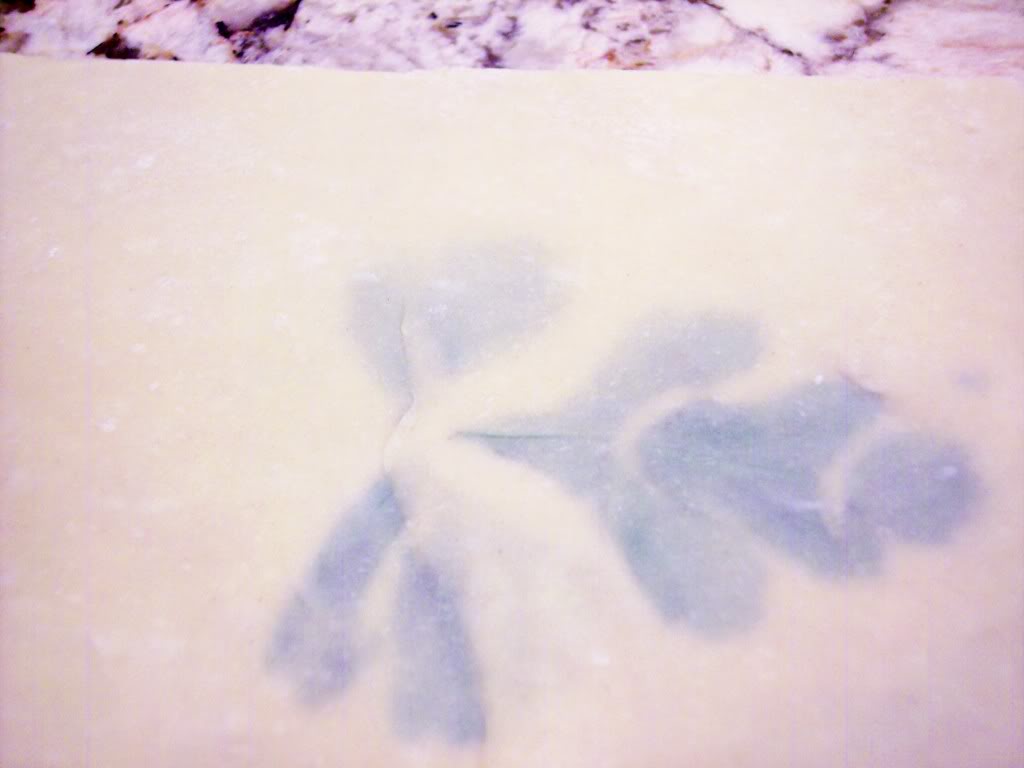
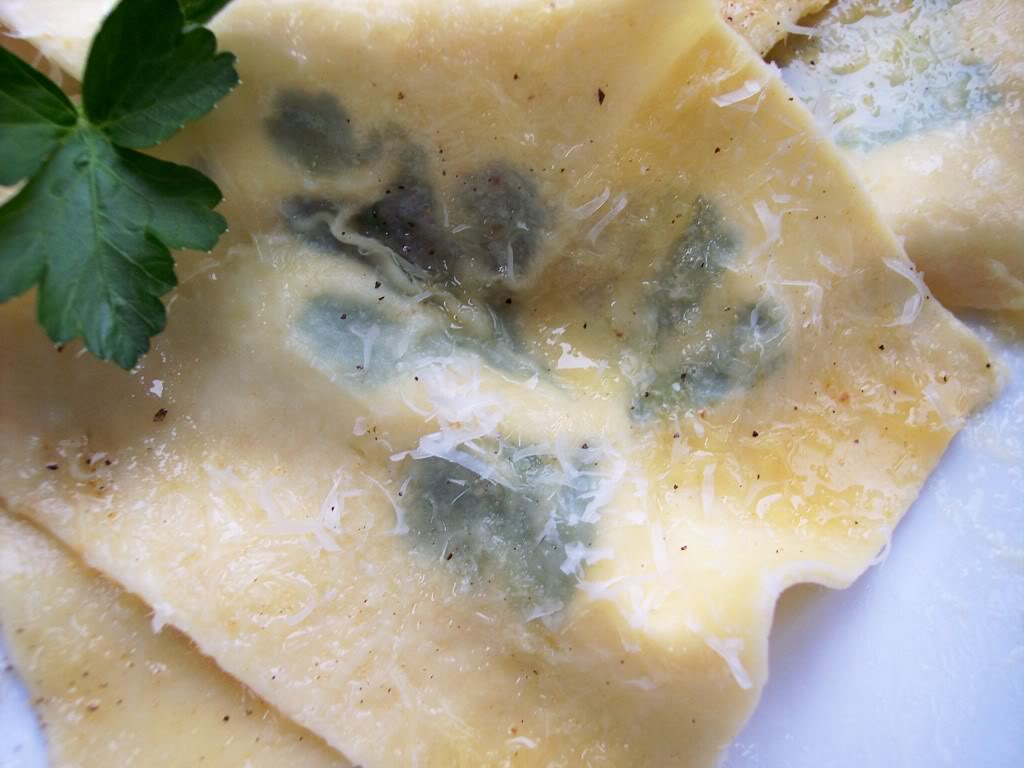
Fresh herbs can be rolled into sheets of pasta for a very “sophisticated” effect. Because the pasta needs to be very thin it’s best if you use a pasta machine. It’s a great look for a special occasion, or if you just want to WOW your guests. It’s a little time consuming, but it looks very fancy, and something out of the ordinary!

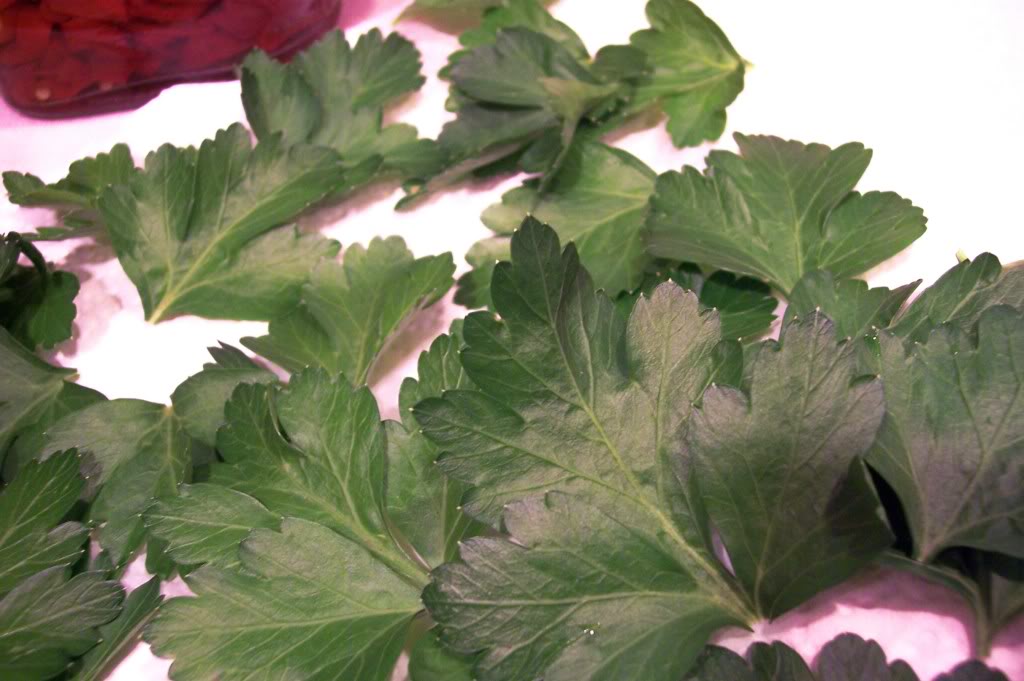
You can pretty much use any kind of herb you want, here I used the last of my garden parsley, which happened to be in perfect condition. And that’s a key point, you want all your herbs to be pristine and unblemished.
Some other herb choices would be, sage, mint, green or purple basil.

Just use a basic egg pasta recipe, or better yet, a family favorite.Take your dough and roll it out in your machine until you have a very thin sheet, the next thing you want to do is take a brush dipped in cool water, and moisten the whole area.
Now scatter your herbs in regular intervals.

Top with another sheet of dough, and now take the sandwiched sheets through your pasta machine a couple more times, till it’s almost transparent.

After that, your pasta is ready to be boiled and sauced.

I chose to serve this with some melted butter, and freshly grated Parmesan cheese, but this also looks and tastes wonderful in a clear soup broth.
A biscuit, or cookie cutter could be used for different shapes, just let your imagination go wild!

Buon Appetito!

Signature

SOOTHING SOUPS!

To me, nothing soothes falling temperature better than a nice warm bowl of soup! Here in Chicagoland we had an amazing streak of warm weather for November. I think on Election day it even got into the 70’s! But now that streak is gone, and we might even be getting some flurries tonight. So since it feels more like fall here again, I thought I’d share some soups I made recently.

All these soups are super quick to make because I used box stocks, and canned beans. I love the convenience of the stocks, and always keep quite a few in my pantry. Gone are the days of the high sodium ones! Although nothing beats a good homemade stock, in a pinch you can have a good quality meal using these, and no one would know that you didn’t simmer it for hours!

Minestrone is a soup where any vegetable of your choice would be good. I always like to start out with my ” soffritto” of garlic, onions, carrots, and celery sauteed in olive oil. Add the herbs of your choice, and then, every thing else. My ingredients here were… 1 1/2 cans of cannellini beans… 1/2 can of chickpeas, all being rinsed and drained…1 14 oz. can of fire roasted tomatoes… 4 0r 5 diced zucchini… 1 diced potato… baby spinach or chard…2 boxes of chicken stock, or veggie, (each box is 1 quart)… 1 cup or more, of parmesan cheese… dried thyme and a little rosemary, salt and pepper to taste, along with a little frozen pesto I had. When everything is all cooked together, in the end I would add your cooked pasta. Here I used ditalini.

Always finish off with a drizzle of olive oil and more grated cheese, a dollop of pesto or fresh basil!

Here you can use some leftover cooked ham, pancetta, or in this case I purchased a cooked ham steak, one that was good quality and not salty. Same “soffritto” as above… dried rosemary, basil, and thyme… 1 small can of fire roasted, or diced tomatoes… 2 boxes of stock… 2 to 3 cans of beans… I used great northern white beans, but navy would be good also… As it simmers the beans thicken the soup. Garnish with grated cheese and basil.

A 12 0z. bag of frozen artichoke hearts were used here, tossed in a pot with garlic and onion…
Seasoned with, salt, pepper and a little basil… Toss in about a box and a half of stock, or a quart and a half… Simmer till tender and soft. Pour everything into your food processor and puree it all till it’s nice and smooth. You can strain it if you want, I didn’t, but I like the texture, and besides it’s quicker!
Garnish with a dollop of pesto, and a reserved artichoke heart.
Have a great weekend, and Buon Appetito!

Signature

AUTUMN SIDES

These are two very easy sides to make, because your oven does all the work! The hardest thing would probably be cutting up the vegetables! Preparing your veggies with a drizzle of olive oil, salt and pepper, and then roasting them at 400F gives a nice carmelization to them all. And if your lucky to have a “convection roast” setting on your stove, that’s even better.

Roasted Sweet Potatoes and Green Beans, Dried Cranberries, Toasted Hazelnuts, all tossed with Brown Butter and Sage. I saw this combination in a magazine and loved it ever since! I think it was shown with whole pecans, which would be equally delicious!

Brown butter and sage, is simply made by melting some butter on medium heat, tossing in some fresh sage, heat until the white milk solids turn brown, and sage is crispy.

Balsamic Glazed Roasted Acorn Squash

Taking balsamic vinegar and simmering it down until it becomes a dark, sweet rich syrup, and then pouring a generous drizzle over your squash, makes it irresistibly good!!!
Have a great day, and Buon Appetito!!

Signature

Antipasto Anyone?

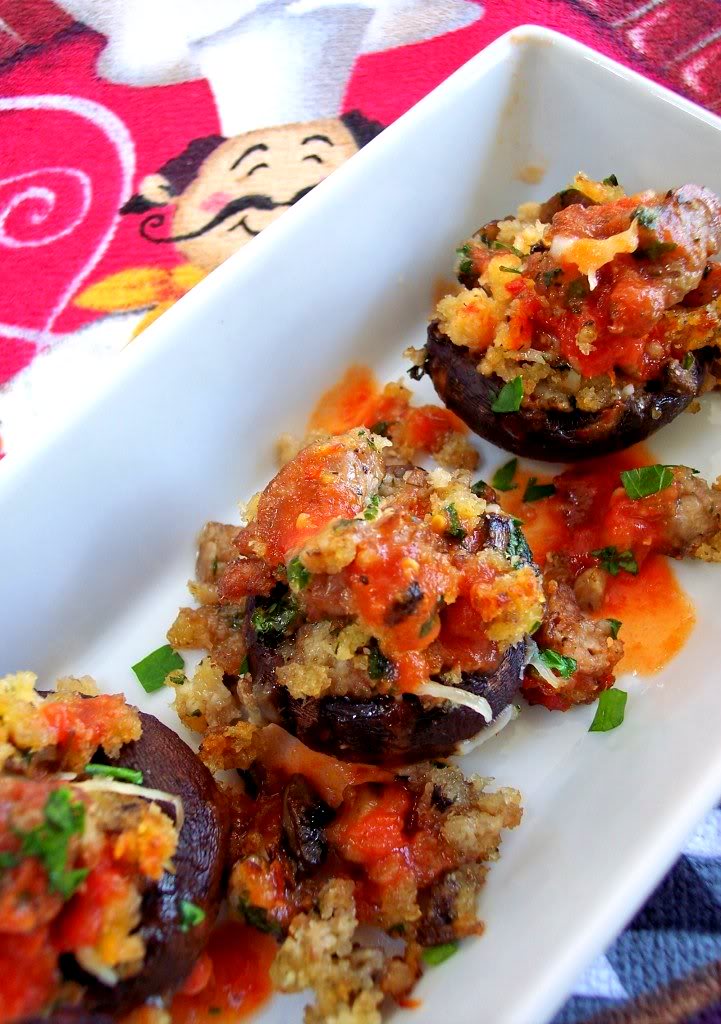
For special occasions, stuffed mushrooms and stuffed artichokes can be the perfect starter! Yes, artichokes can be a little time consuming, with the prepping and all, but that can all be done ahead of time, which makes things alot easier.

In both appetizers I used the same stuffing which consisted of crumbled Italian sausage, sauteed mushrooms, flavored breadcrumbs, fresh herbs and cheese. I love buying crimini mushrooms, if you’re lucky to have a Costco near you, they have a great buy for a huge container of them.

Preparing the Mushrooms:

Wipe them off with a damp paper towel, trim away hard tips, snip off the stems, chop them up, then set aside. Place stem side up in a baking dish that was drizzled with olive oil. I used Crimini mushrooms, but you can use what you like.. Ater you stuff them drizzle olive oil over each mushroom.
Prepping The Artichokes:

This does take a little time, but it all can be done a day ahead if you like. Trim about 1/3 off the top of your artichokes, then take a scissor and trim off all the pointy tips. Slice it half length wise, and place in pot of water with squeezed lemon. Simmer till you can just start to stick the point of a knife through, you don’t want them to be falling apart or mushy. Stoves, and the size of your artichokes will vary so its something you just have to watch.
After they cool a little bit, trim them down to the light green and tender leaves that are all edible, scoop out all the pointy and fuzzy stuff, but be careful to leave the heart in tact! What you’ll have left is all edible, even the stem if you trim that up too. Place in a baking dish drizzled with olive oil. After you stuff them, drizzle olive oil over the top of each one.
For The Sausage And Breadcrumb Stuffing:
Squeeze your Italian sausage out of the casing, or buy it in bulk. Brown it up and get it into small crumbles. Drain on paper towel. Drizzle olive oil in pan, saute your chopped mushroom stems and a clove or two of crushed garlic. Add back your sausage, and mix together then take off the stove, add in Italian style dry breadcrumbs, or panko, or day old Italian bread, fresh grated romano cheese, fresh parsley, salt and pepper, and just a little bit of shredded mozzarella to hold it all together. Measurements don’t have to be exact here, you’ll be able to judge the amounts by the way it looks.
Bake at 400F, 15 or 20 min’s, or until breading on top is nice and crispy. When mushrooms come out of the oven I usually place a little warm marinara on top, the flavors are terrific together! The artichokes are served with lemon wedges.

I guarantee your guests will not be able to resist these!
Buon Appetito!!
Signature

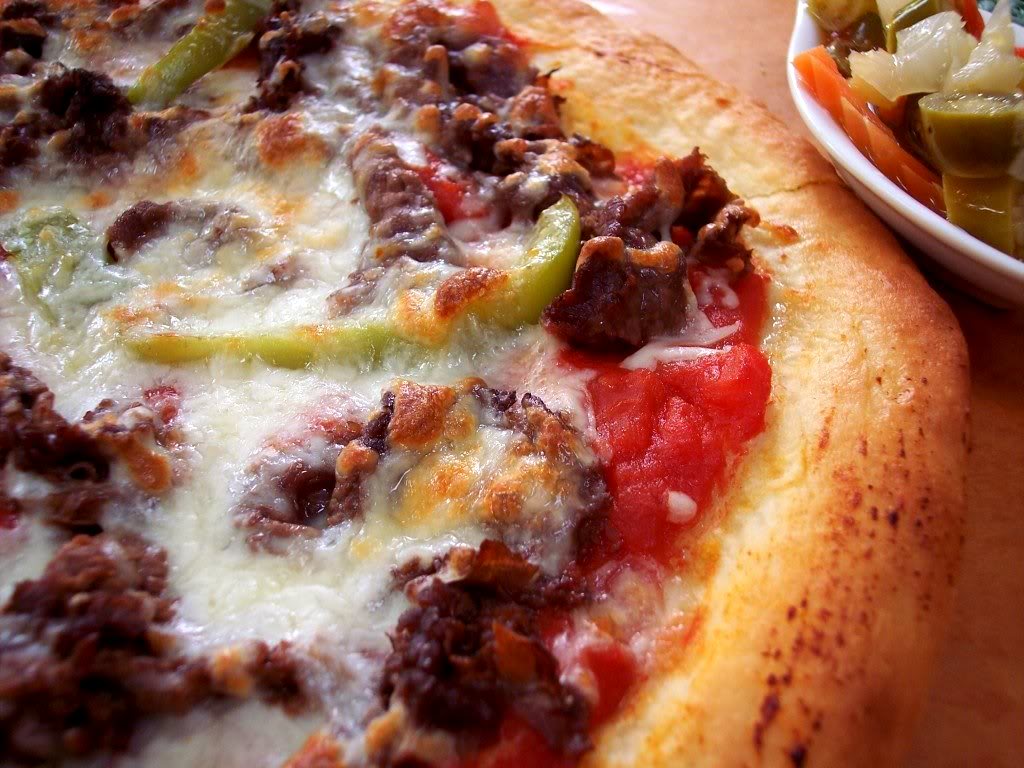
Chicago Style, Italian Beef Pizza!!

I was excited to do this months Daring Baker challenge, ” PIZZA NAPOLETANA” , for one thing, I’m a proud Italian cook! and the other thing is, my family on my Mom’s side is from Naples!

The pizza dough recipe which we had to use, came from Peter Reinharts, “The Bread Bakers Apprentice” other than that, we were free to use any sauce or topping we wanted.

Seeing that I’m a girl born and raised in Chicagoland, I thought it would be fun to base my pizza on one of the foods Chicago is known for, and that is Italian Beef!

Originating in Chicago, this sandwich dates back to the 1930’s. Paper thin slices of lean roast beef, simmered in a beef juice that’s loaded with flavors of garlic, oregano, and depending on where you get it from, many other “secret spices”!

I always order mine with “sweet and hot”( peppers that is). Sweet being, green bell peppers that have been sauteed, and the hot, which is usually a homemade giardiniera.

I picked up a pound of our favorite Italian beef from Portillo’s, a very popular place that is always consistent, and always good.
When you buy it by the pound, they always separate the beef from the juice. When you get it home, instructions are to slowly simmer them together, never heating it on high heat, so that’s what I did to get all the flavors into the beef, but then because I was going to put this on top of a pizza, I drained all the juice from it, otherwise your pizza would be a soggy mess.

My sauce was made by simply opening up a can of good crushed tomatoes, and right into the can I put 1 clove of crushed garlic, about 1 teaspoon of salt, some pepper, a light sprinkling of oregano, and a drizzle of olive oil. Stir it all up, take a spoon, and spread it all over your dough.

Of course I had to add “sweet and hot” to my pizza, along with some shredded mozzarella.
The verdict on the dough: I thought the texture and the chewiness was great, it cooked up golden and crunchy, but I feel it lacked flavor, almost like it needed a little more yeasty taste to it. But thats just my opinion!

A big “Thanks” goes out to our hostess Rosa, of Rosas Yummy Yums who picked this challenge.

Click on her blog to get the complete recipe for the pizza dough.

Also go here, and check out some of the other pizza’s that have been cooked up out in the blogosphere!

Signature

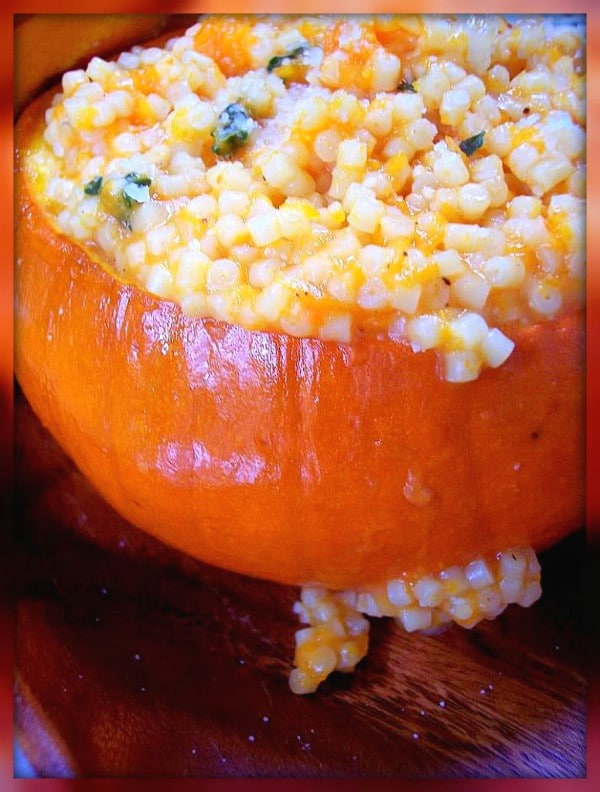
Pumpkin Pastina

pastina In many Italian households children are first introduced to pasta by way of pastina. Pastina literally means “little pasta”. Today you can find shapes of many different forms, from tiny dots to stars, alphabets, and many more. My own kids grew up with pastina, simply made with a little butter, and grated cheese, but this recipe takes it over the top with a beautiful presentation in a pumpkin, hence the name pumpkin pastina.

To this day it’s the kind of comfort food that my family and I still crave today.

When I first saw this recipe in Michael Chiarello’s cookbook…The Tra Vigne… all my fond memories of pastina came rushing back, I just had to make this!

Tiny pastina cooked in a warm broth flavored with onion, & thyme, adding to that, creamy parmesan cheese, and roasted butternut squash.

I can barely describe how good this is, it almost didn’t make it to the table, I’m warning you you’ll be tempted to eat it right over the stove with a spoon!

roasted pumpkin By all means, you don’t have to serve it in a pumpkin like it’s featured here, but the presentation is so eye catching and very festive for this time of year, and besides, you have to roast your butternut squash anyway so why not do it all on the same baking sheet.
This recipe serves four, and the pumpkin I used was on the small side about 6 or 8 inches round. I was going to use the green one in the photo as well but decided against it.
Just cut the top, scoop out the seeds, oil it inside and out, and season with salt and pepper. Place the lids back on the top when baking.
For the butternut squash, I just cut it in half, scoop out the seeds, oil it inside and out add salt and pepper, and then place it cut side down on baking sheet.
Both will cook at 375F for about 40 min’s. You want your pumpkin still firm enough to stand up, so depending on what size you use, you might want to keep checking it.
NOTE: Do all of this earlier in the day to get it out of the way, the pastina cooks up fast.
autumn leaves This has nothing to do with the recipe at all, but I just wanted to show you the beautiful colors that were on these leaves that I saw when I was taking a walk the other day, I just love the fall colors!

pastina Michael added turkey in his recipe and cooked the pastina like risotto, adding the broth little by little. I didn’t do that.
You certainly could add turkey to it if you like, for a more heartier meal. I didn’t do that either. I might however, use his suggestion to chiffonade some chard or spinach into it next time.
FOR THE PASTINA:
In a pot, sauté about 1 cup of onion in olive oil, season with salt and pepper and fresh thyme.
Pour in 4 cups of stock (I used chicken) and bring to a gentle boil.
When stock is boiling pour in 3/4 lb. of your dry pastina or any tiny pasta.
When al dente, fold in about 1 cup of your roasted butternut squash that has been scooped out, and 1/2 cup of good parmesan cheese. Season it to taste with salt and pepper.
The consistency should be loose, so you might want to add more stock to it, so have extra on hand if need be.
Pumpkin pastina is the perfect meal to make this fall.
Buon Appetito!
Signature

Savory Vegetable Ricotta Pie’s


I’ve made many things using ricotta on this blog, obviously we love it here, and I always have some in my frig! Ricotta is such a versatile cheese that works very well in sweet, and savory dishes alike! It bakes wonderful with any kind of veggie or herb that you put with it. I often make these pies for a light dinner, lunch, or brunch.

You can bake them with a crust, or without. Below I used a 10″ pie pan, and above I used a 10″ spring form pan. Basically the ingredients are the same. About 1lb. of ricotta, 1/2 lb or less, of your favorite shredded cheese, here I used a mixture of provolone, asiago, and mozzerella. 1 cup of grated parm or romano, 3 beaten eggs, garlic and onion. After that, you can add in whatever veggies you want!

You can use shredded zucchini which has been squeezed of its moisture, frozen spinach that has been thawed and squeezed of all water, chopped artichoke hearts, roasted red peppers, sun dried tomatoes, various pesto’s and herbs for flavorings. You can get very creative with all your favorite flavors!

Just start out sauteing your onion and garlic in olive oil, then add your veggies. Have your eggs and all your cheese whipped up together in a separate bowl, and then combine it all together. I bake them at 350F, till golden and firm in the middle, not wet. It could take 30 to 50 min’s. It depends how good you get the moisture out of everything, the ricotta included. Cool them down a bit before you cut into them, so everything stays together.
Serve them with a salad or some fruit, for a complete meal thats light, satisfying and full of flavor! You’ll find that the leftovers are just as good as the day you made it!!
Buon Appetito!!!

Signature

He Did It!!!

As promised, I said I was going to share some photo’s of my son Tony running in the Chicago Marathon yesterday. 26.2 miles through the city of Chicago. There were 4500 runners and over
one million people attending the event. This photo was taken right before the race was about to begin.

The horn blew and we cheered him on! He gave us a wave as he took off!

Because the route was 26 miles, we had to jump on the elevated trains, the subways and taxi’s, to get to the different cheering stations, we were walking or riding on public transportation throughout the course. You couldn’t possibly move your car.

He wore a chip, that would give us a text message on our cell phones to tell us what mile he just passed through, so it was easy to figure out when he would be arriving at a certain mile marker, because we all knew how fast he could run a mile. Very high tech stuff!!!

Here he is at the 12 mile marker, my DIL, had two star balloons attached to her backpack so he could spot us as we were all yelling ” TONY!!!” He’s still smiling at 12 miles and looking good!

Here he is at the 21 mile marker, high fiving us all, as we were cheering him on. Still looking good with only 6.2 miles to go!! Needless to say he finished the race! I have no pictures of him crossing the finish line, as you couldn’t even get near it with the mobs of people around. Fortunately he’ll get a professional one taken from the marathon.

This is the shirt my Granddaughter wore, and it really sums up how we all felt! Great job Tony,
You kicked butt!!!
Thanks everyone for your well wishes, it was much appreciated!

Signature

Roasted Carrots and Shallots, w/ Olives and Gremolata!!

This recipe really takes the humble carrot and makes it the star of the show! It’s a perfect autumn side dish, and great for any holiday table. I actually saw this while flipping through some magazines in Border’s one day. What caught my attention, was the use of a parsley, garlic, and lemon zest gremolata, which you use as a garnish. The gremolata gives the carrots and shallots a depth of flavor that makes the whole dish pop!!

Cut your carrots length wise and place on a baking sheet along with your shallots that have been peeled and cut in half. Drizzle it all with olive oil, salt, pepper, and fresh thyme. Bake at 425F for around 30 min’s, they will start to caramelize but still have a little bite to them.

For the GREMOLATA

I used my micro plane to zest my lemon and also my garlic. I just used one clove and it was enough. Chop up some parsley and put it all together with a drizzle of olive oil and pepper.

When the carrots and shallots are finished roasting and all is still warm, toss in the gremolata and some good green olives. That’s it!!

Buon Appetito, and have a great weekend!

I want to take this time to brag a little about my son Tony. You know, us mothers need to do that every now and then. This Sunday morning he is running in the Chicago Marathon, 26.2 miles, he has trained all year for this! This will be his first. The transformation of him has been phenomenal, he is now a lean, mean, running machine!!! This weekend we’re all going to cheer him on in this enormous test of endurance, I’ll be sure to take some photo’s to share with you all. Wish him a great run!

Signature

Rustic Cranberry and Apple Tart!… and a few Scarecrows…

Fall is definitely in the air!! The leaves are beginning to change, I’m starting to put the heat on to take the chill out of the house, and the flannel sheets and heating blankets are ready to go!

I love putting my oven on this time of year, it warms up the house while the aromas are
filling the air!
Having recently bought a bunch of apples, and after seeing numerous apple creations in the blogoshere, I decided on making this free form tart. I love using those dried cranberries with apples, they go so good together. In fact, who was the brilliant person who thought of packaging dried cranberries? Whoever it was, was a genius!

Pastry for the Tart
1 1/4 c. Flour
1/3 c. of Almond Meal Flour
1/4 c. Sugar
1/3 c. of Cold Butter
2 Egg Yolks
2 Tbl. Milk
Mix the flours, and the sugar together. Cut in your cold butter, till it resembles small pea’s. Gradually stir in the yolks. When dough comes together wrap it and refrigerate it for couple of hours. This is key, because the butter needs to get really cold again, otherwise you can’t even roll it out, it will stick. You could even do this the night before, or early in the day.

Peel and slice 3 cups of apples, flavor them with a little cinnamon and sugar according to your sweetness. Sprinkle about 1/2 cup of the cranberries to this.

When ready to bake, line a baking sheet with parchment, and heat your oven to 375.
Take the pastry dough out and divide it in half. You’ll be making 2 tarts from this. Work quickly on a floured surface and roll out the dough, place it on the parchment, and fill with apple mixture leaving a border so you can fold up the sides. Brush on some apricot preserves on top of the apples, and a little milk over the dough to get it nice and golden. Bake for about 25 minutes.
Cool it down a bit before cutting, but serve it warm!

I think the almond flour is what really makes this stand out, so really you have to put it in, otherwise it won’t taste the same.

Over the weekend we went to the Morton Arboretum, they had a Fall Color Festival, and a 5k going on. I thought I’d share with you some nature themed scarecrows that were created by the local Girl Scout troops. They were so cute!

Elvis, with his pumpkin head

Daisy girl

The Count, with all his bats!!

This was so cute, Hannah “Bloomtanna”/ Miley “Cyprus”

And lastly, Pirates of “the Arboretum”!! They did a great job didn’t they?
Buon Appetito!!

Signature

Polenta with Spicy Sausage and Beans, and a Black Pepper Focaccia!!

Comfort food doesn’t have to take all day, this meal was cooked up in no time using just a few staples that I always have stocked in my pantry. With polenta that cooks up in 5 minutes, canned beans, and some good canned tomatoes, this could easily be done in minutes for a nice midweek meal!

Brown up your Italian sausage (either spicy or mild) in a large saute pan in a little olive oil till it’s crispy, add some fresh crushed garlic, cook till golden, now add some good canned tomatoes, I love Carmelina brand for this, they have a San Marzano Italian cherry tomato in juice, that hold their shape, and are so sweet! Simmer with the sausage till cooked through.

Now add some rinsed and drained beans of your choice, along with some fresh snipped herbs. Cook until all the flavors infuse. Start your quick polenta in another pan, and when its done, layer your sausage and beans on top.


For years my family has loved a black pepper focaccia that I would always pick up at my favorite Italian store, that has recently closed after being in business for over 30 years! I’m so sad! We miss you, D’ Andrea’s!

Anyway, this is my quickie version. Take some pizza dough, either store bought or homemade.

Roll it out, but keep it thick, drizzle with olive oil, and put lots of crushed black pepper all over. Make your dimples on top and push the pepper into the dough. You can leave it just like that, or in this case I added Kalamata olives and some snipped rosemary to it. Bake 400, till nice and golden, but still soft like a focaccia.

Buon Appetito, and Have A Great Weekend!!

Signature

Butternut Squash Lasagna w/ Roasted Garlic and Rosemary Bechemal!!

I’m a late bloomer in my love for butternut squash. I never wanted to cut up a big squash like that and bake it, I’d rather have a sweet potato! . But then a couple years ago I had the most amazing soup made of butternut squash, and I was hooked!

I started to see it everywhere in magazines, and on cooking shows. I saw it in souffle’s, gratin’s, ravioli’s, in grain’s, pasta dishes. I saw it roasted, maple glazed, pureed, in tart’s, and even in muffin’s and cakes! Suddenly it seemed it was so in vogue!! How come I never noticed this awesome vegetable before? Whats wrong with me?

And guess what! It’s one of those power foods, high in fiber, vitamins, minerals, and beta carotene. I’m sure by now all of you have tried this versatile vegetable, but in case you haven’t, go out and get some, please! You won’t be disappointed.

Which brings me to this lasagna I made over the weekend. I have to admit Hubby wasn’t all that excited when I told him I was making a butternut squash lasagna. He gave me a look like, “Huh.” He’s typically a lasagna purist with the red sauce, but I knew he would love this, and he did!

After searching on the Internet and picking bits and pieces of different recipes I came up with this. I liked the idea of garlic in the sauce, but I thought roasted garlic would make the flavor even more intense, and as it turned out I think it really made the whole dish!

I roasted the garlic a day ahead, as I knew I was going to make this. It also calls for no -boil lasagna, which I’m still of the old school boil kind, and I’m not convinced I like them yet. They are very convenient and fast though. Here I used the Barilla brand. What are your thoughts on no- boil ??

INGREDIENTS:
About 3lbs. of peeled, seeded, squash in 1/2 in. slices
2 Heads of Roasted Garlic
1 Box of No-Boil Lasagna
Parmesan Cheese around 1 1/2 cups
Bechemal Sauce
First, you need to roast your squash in a hot oven at 425 degrees. till tender. Make sure you drizzle it with olive oil, salt and pepper. It will probably take about 25 mins.
In the meantime make a pot of bechemel by melting 1/4 to 1/2 cup of butter and then mixing in 1/4 to 1/2 cup of flour, keep whisking, then squeeze in your roasted garlic, add salt and black pepper.
Pour about 5 cups of milk in and whisk till thick. When squash is cooked, stir it into the sauce along with the rosemary ( about 1 tbl.) and half of the Parmesan cheese.
IMPORTANT TIP HERE:I would have liked to had a little more sauce, the noodles soaked it up as it cooked, so you might want to make more. Next time I will.
Reduce oven temp to 375F. Layer it like you would any lasagna. Spray your baking dish, layer the noodles, and spread the sauce mixture all over, and sprinkle with cheese. Continue layering till done. Sprinkle more cheese on top. Cover with foil. Bake around 35 to 40 mins. Uncover and cook till golden brown.
The roasted garlic sauce infused with rosemary, complimented the squash so well, it was heavenly!
Buon Appetito!!
Signature

Lavash Crackers w/ Artichoke Salsa! Daring Bakers September Challenge

This month’s challenge was to make Lavash crackers along with a dip, spread, a salsa, or a relish of some sort. Here’s the challenge… the crackers had to be made with an all purpose wheat flour, or a gluten free flour, I choose the wheat flour, because I had it in my house, but the toppings had to be made gluten and vegan free!

Our host’s this month are alternative Daring Bakers, Natalie from Gluten A Go Go, and Shel, from Musings From The Fish Bowl. I want to thank them for picking a savory recipe this time, it was nice for a change. The recipe comes from the book, The Art Of Extraordinary Bread, By Peter Reinhart. Please check out their blogs for the complete recipe’s and instructions on the crackers.

This took no time to get the dough together, I think it took longer to knead it! I probably didn’t roll it thin enough I should have divided the dough in half, and rolled it into 2 pans, but I didn’t!!

I used a dry seasoning I have that is a mixture of rosemary, garlic, lemon peel, and spicy red pepper, to press into the cracker dough. Some stuck, some didn’t!

All in all this was a very easy and fun challenge, and who knew, I’d learn how to make crackers!!

The topping I chose was a very quick “Artichoke Salsa” which by the way is vegan, and gluten free! It’s simply made by opening a jar or two of your favorite marinated artichokes, draining them and pulsing them in your food processor. When finished pulsing, pour into your bowl.

Then chop some red onion, slice up some kalamata olives, 1 clove of smashed garlic, and diced and seeded tomatoes. Finish off with salt, pepper, shredded basil, a hint of lemon peel and a little olive oil to taste.

It actually tasted really good with the crackers, and it was a great appetizer with a glass of wine!

Please check out the ever growing Daring Baker blogroll for all their cracker creations!

Buon Appetito!

Signature

Onion Soup w/ Fontina Garlic Bread! O Foods For Ovarian Cancer Awareness Month!!

September is Ovarian Cancer research and awareness month. The blogosphere is a buzz with many bloggers helping to spread the word! Spear heading this awareness along with having a contest is Sara, of Ms Adventures in Italy, Jenn, of The Leftover Queen, and Michelle, of Bleeding Espresso.
We were asked to spread the word by posting a recipe that either started or ended with the letter O. All details are here.

This is my small part of spreading the word for a cause that’s near and dear to my heart! Ovarian Cancer claimed the life of my mother when I was 9, and a vibrant niece at age 26.

Please click on the link to read about signs and symptoms, and how you can help!

Now on to this warm and satisfying recipe!

Ingredients
5 onions sliced
Thyme
6 Cups of Stock ( Beef or Vegetable) I used Beef
3 Tbl. of Brandy
1 tsp. sugar
A little flour, Olive Oil and Butter

Warm a little butter and olive oil in heavy pan, add onions and cook till soft and a deep golden brown. Don’t rush the cooking time or else onions will become bitter, stir frequently on a medium heat. Add your thyme, salt, pepper, and sugar.
Meanwhile get your stock nice and hot in another pan. Stir about 2 Tbl. of flour over your golden brown onions, and whisk in gently your hot stock. Add your Brandy and simmer for 10 mins.

To make the Fontina garlic bread, simply rub garlic over a nice chunk of bread, something that has some body, like a good crusty baguette. Slice Fontina cheese on top, and stick it under your broiler for a few mins. or place in an oven till golden.

I hope you try this rich and flavorful soup!

Buon Appetito!!

Signature

Artichoke Frittata

If you’re having a busy week, no need to drive threw those tasteless burger places for dinner, you know which ones I’m talking about! Why not go home and whip up a frittata?

Frittata’s are quick and easy to make, you can put just about anything you want in them, and it’s a great way to use up some leftover veggies or meats.

Great for a light dinner or a fancy brunch, frittata’s are pure comfort food for me and the Hubby!

In this recipe all I used was 1 bag of frozen artichokes, ( I’m putting in another plug for Trader Joes, they have the best frozen artichokes, I can’t live without them!) which I quickly defrosted in my microwave. While it was defrosting I turned my broiler on, took out my saute pan quickly drizzled it with olive oil, sauteed some green onion, diced red pepper, and thinly shaved garlic. I also tossed in the artichokes (which were gently squeezed of any water) just to flavor them up.
After they were sauteed in the olive oil a little, I took them them back out of the pan, and set aside.
In the meantime beat some eggs with a little milk, add a generous amount of grated romano cheese, salt, pepper and whatever herbs you want, if any.
Pour egg mixture into the pan, now arrange your artichokes cut side up around the frittata, and slowly let the eggs set, about 10 min’s. When set, sprinkle top with more grated cheese and stick the whole thing under the broiler till golden brown. Garnish with fresh parsley and more cheese if you want.

After it cools off a little I think the flavors really come out, with every bite you’ll taste the cheese, and that hint of the shaved garlic, and lets not forget the star of this dish, the artichokes!
Have a good weekend and Buon Appetito!!
Signature

Mezzanotte!!! (Midnight)

Pure decadence! That’s how I describe this amazing coffee cocktail called, “Mezzanotte”.
This is something you’d would want to make for a very special occasion. Dark chocolate, espresso, vodka, and coffee liqueur, make up this little treat! Who wouldn’t want to sip one of these? It’s like having your espresso and dessert all in one!

Consider making these for a very special occasion, I know I am! In case you haven’t heard, there’s a big bash going on in the blogosphere. Susan, over at Sticky, Gooey, Creamy, Chewy, is celebrating her 1 year blogiversary, and we’re all invited to her virtual cocktail party!! If you haven’t already met Susan, please go over and check out her wonderful blog, It’s full of family stories that will bring tears to your eyes, and snippets of her life that will make you laugh out loud, along with all her glorious food!!

I’ve decided to bring this cocktail as my contribution to her party. It’s going to be a long night, and I figure we will be sipping these well past midnight!!

Mezzanotte Cocktail
2 oz. Vodka
2 Shots of Espresso ( 1 oz. each)
1 oz. simple Sugar
1/2 oz. of Coffee Liqueur ( Kahlua, Godiva, or Starbucks)
Chocolate Syrup
One Stick of Dark Chocolate
Chocolate Shavings
Sugar the rim of a martini glass. Swirl chocolate syrup inside the glass. Pour your Vodka, sugar, espresso, and coffee liqueur, into a shaker with ice. Shake vigorously. Strain. Garnish with chocolate shavings and a chocolate stick.
Cin Cin!!

Signature

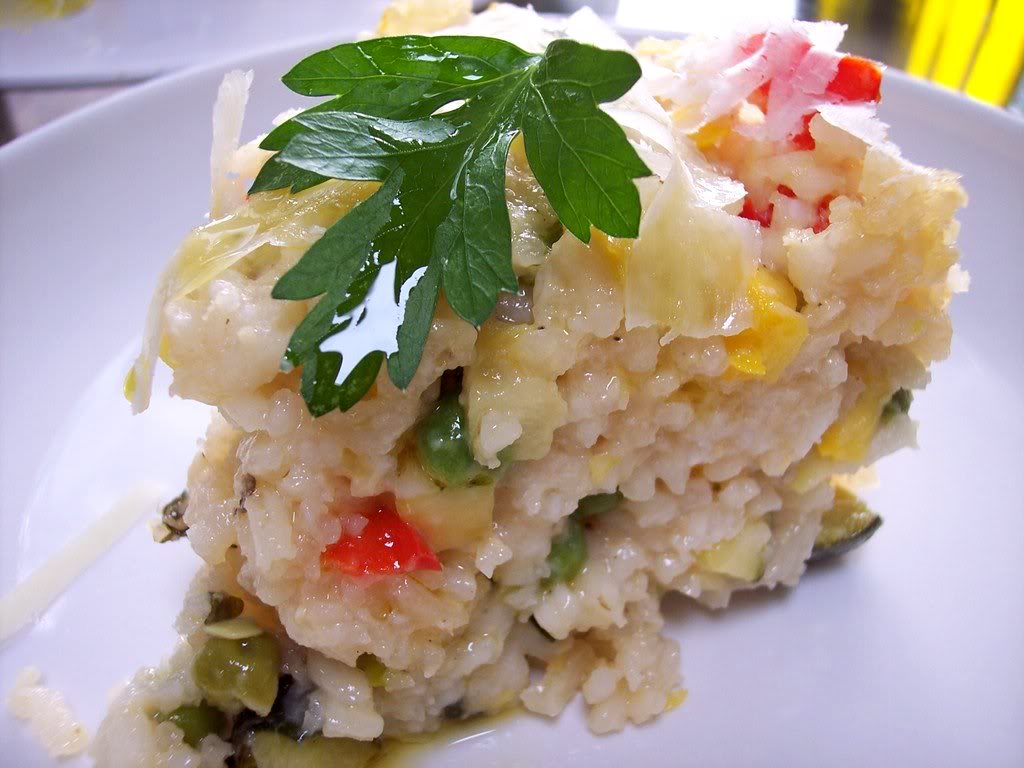
Risotto Primavera Cake!

I’m beginning to see a trend in my cooking. I’ve noticed I have a fondness for molded foods! No really! Check it out! Here, here, here, here, and here. And now I’m adding this one to my list! I must surely have a problem!!!

I started molding risotto about 10 yrs ago in my green Tupperware Jello mold, you know the one with the whole in the center. I read it somewhere in a magazine many years ago and I thought it was the coolest idea, especially for a dinner party as a side dish, I just liked the idea of cutting off a piece that was all contained, it has a nice presentation.
Believe me I don’t do this all the time, we like our risotto the normal way, slathered on our plates too, but for something a little different and out of the ordinary, you might want to give this a try.

The other thing I like about this is the fact that you can make your risotto the day before, have all that stirring done, and your kitchen cleaned up! Use any combination you like, you know risotto’s a personal thing. Put together the ingredients and flavors you enjoy!
I did a primavera, because I had alot of veggies I wanted to use up. In mine I used zucchini, yellow squash, red and green pepper, mushroom, onions, and pea’s. I added to it, fresh parsley and basil, salt, pepper, and grated romano cheese.

The key here is that you use a little less liquid than normal, so it will have a drier consistency, but still be very moist and creamy. The other thing I do is saute my veggies first in another pan and set aside. I don’t like my veggies overcooked and mushy, so when the risotto is finished absorbing all the liquid, thats when I’ll fold my veggies in.
Grease your mold, here I used a springform pan. Pour your risotto mixture into it, make sure you press it down with the back of a spoon, then wrap in foil and refrigerate it! If you’re making it the same day, still keep it in foil, but bake it in a 400 degree oven for about 30 to 35 min. Let it sit for about 5 min’s, then un mold. You can serve this hot, cold, or at room temperature.

The important things to remember are, for every 1 cup of rice use 2 1/2 cups of stock, and don’t forget to deglaze with a shot of wine, finish it off with a little butter, and the cheese. and don’t forget you’re going to bake it for about a half hour.
Other than that you could use any risotto recipe you like.
Any one else seeing a trend in their posts?
Buon Appetito Everyone!!

Signature

Adoring Dolcetti!

There’s still an abundance of peaches out there and this is a great way to use them up. In fact a whole platter of these is a great thing to bring to a party, trust me I’ve done it! You can grill them ahead of time either outdoors, or like I did here right here, on my indoor grill.
Cut them in half, scoop out the pit, grill face down, just till you get some grill marks on.
Put a dollop of mascarpone, chopped pistachio’s, and a good drizzle of honey!

Do you have any banana’s that are starting to look sad? No problem! Wrap them in some tin foil and throw them on the grill, either inside or out.
Let them cook till the skin gets brown and soft in the center, about 20 min’s.
In a small sauce pan melt some butter, about 2 Tbl. Now add 1/2 cup of toasted and chopped hazelnuts, a squeeze of lemon juice, and a few Tbl. of light corn syrup.
Pour the warm sauce over your warm banana’s with a scoop of vanilla ice cream sprinkled with cinnamon!

Both of these desserts are very quick and so, so, easy to make!! They taste very decadent! and your family and friends will adore you for serving these!

Have a nice weekend, and Buon Appetito!

Signature

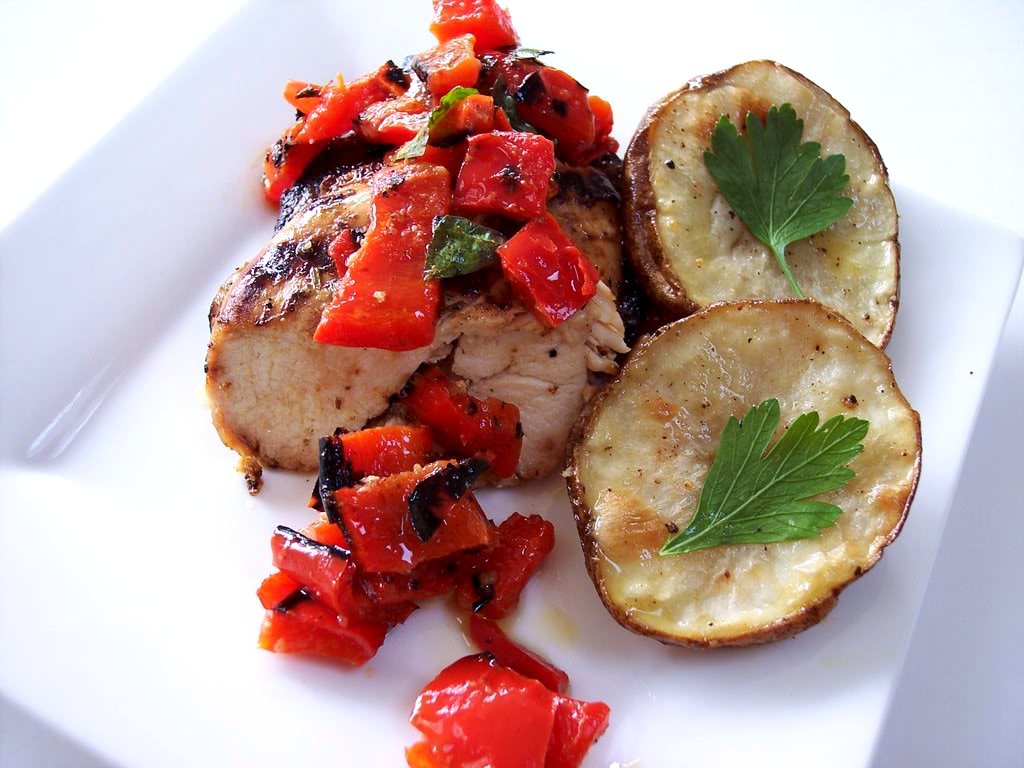
Balsamic and Herb Grilled Chicken Breasts with Roasted Red Pepper and Basil Salsa!!

Even though Labor Day is long gone, there’s still plenty of time left for grilling!
The flavors in this dish go so well together, I hope you’ll give it a try before grilling season is over.
Marinating the chicken is the key here, so you’ll want to do it for at least 2 hours.

In a Ziploc bag place 4 chicken breasts, 2 crushed garlic cloves, herbs of your choice, I used rosemary, oregano, and thyme, you can use fresh or dry. 1 tbl. of Dijon mustard, 3 tbl. of olive oil, 1/4 cup of balsamic vinegar, plus some salt and fresh ground pepper.

When done marinating, place on your grill to cook.

While your chicken is marinating grill your red peppers. Peel, seed, then cut them into a dice.
Place in a bowl along with some crushed garlic, lots of fresh basil, red wine vinegar, olive oil, salt and black pepper. Let everything sit together at room temperature.

When your chicken breasts are done grilling, you’ll want to spoon this roasted red pepper salsa on top. You won’t believe how good these flavors taste together! So please, fire up your grill and give this a try!

Buon Appetito Everyone!

Signature

Cannoli Filled Cream Puffs!! August Daring Bakers Challenge

This months Daring Bakers challenge was taken from a book called, Chocolate Desserts by Pierre Herme’.
I knew I was going to like this the minute I saw the recipe, because it only had 3 elements to it! Choux pastry, or cream puff dough, some kind of pastry cream, and a chocolate glaze.

Then there was the fact that our dear Host’s MeetaK and Tony Tahhan, kindly gave us culinary leeway to choose what ever filling we wanted, along with the size and shape of our choice, which made it even better!!

Of course my choice was to stuff these little mini babies with cannoli filling. The filling consisted of ricotta, which was made smooth by putting it into a food processor, along with some powdered sugar for sweetness, after which I added some rum, grated orange rind, just the slightest hint of cinnamon, and mini chocolate chips.

To make it less dense, I folded in some freshly whipped cream.

After glazing the top with chocolate, I finished it off with some chopped pistachio’s.

The biggest problem I had was working with the pastry bag! Everything was squishing out the top, I think my bag was too small. So after one attempt with it, I quickly switched to a gallon size Ziploc bag. I would appreciate any hints to working neatly with a pastry bag!

Other than that only issue, everything else was a breeze! I would definitely make these again!

For the complete recipe please click on our Host’s link above.

And please go check out some of the other Daring Bakers creations here.

Buon Appetito!!

Signature

Family, Friends, and an Evening with Tony Bennett!!

This past Saturday our family and friends joined together again for our annual trek to Ravinia Festival, for the Tony Bennett concert.

Ravinia is one of the oldest outdoor music festival’s located in Highland Pk. The venue is a gorgeous park like setting with old trees, a sprawling open lawn area, an open air pavilion where Tony Bennett actually performs. Scattered along the grounds there are wine bars, espresso bars, ice cream stands, food areas where you can pick up some gourmet treats and baked goods, and even a sit down restaurant.

If you live in the Chicagoland area and haven’t been to Ravinia, you are missing out on one of the best times!! You just have to go! I repeat!….”Go to Ravinia!” Stealing a quote from my son, “It’s just not summer unless we go to Ravinia at least once!” And it’s so true!

The whole thing about Ravinia is the picnicking that takes place on the lawn. Yes, the lawn seating is the best! But there’s a strategy to it, you have to claim your spot quickly,you must have all your plans thought out ahead of time. And when the gates open, send in your best runners to claim your spot, all you have to do is lay out your tarps and mats, and then the fun begins. We have our “secret ways” and it works every time! Did you check out the crowd?
As far as the picnic fare, you will see a whole spectrum of things, humble eating straight from a pizza takeout box, to a turkey dinner on china with candelabras. It’s fun to walk around and see the different picnic’s going on, We actually saw a small wedding reception picnic there with the bride still in her wedding gown.

This is the Pavilion where the artists perform, it’s open, and there is seating for 3200 people, but you will pay at least $75.oo per ticket. Lawn seats are $15.00 per person and you will hear Tony being piped out from all the speakers they have set up in the trees. We always manage to get near the stage where the sound is great and if we want too, we can walk up to the fence and take a look at Tony performing. Many times you will see couples dancing on the lawn.

By the way, can I just say that Tony Bennett still sounds amazing! You’d never know he was in his 80’s! He’s as sharp as a whistle, and doesn’t miss a beat! He talks to his audience, and makes sure he plays all there favorite songs. Needless to say, “Chicago” was sung!

For our group of 14, we had 3 tables that we put together to make a buffet. We had a separate table that was for our beverages where homemade Sangria was made. The gates opened at 5:00 and Tony performed at 7:30, so we had 2 1/2 hours of ” grazing” before the concert started. Everyone all chipped in a brought something! The only thing we ever buy is coffee at dessert time.
For Appetizers we had:
Brie and fig, Goat cheese with Lavender, Spinach and Artichoke Dip, Olive Salad Dip, Salsa and Chips, Feta Dip, Baba Ganoush, Hummus, and Pita Chips.

Main Courses:
Chicken Kabobs, Falafel, Spinach and Artichoke Quiche, Mini Prosciutto and fresh Mozzarella sandwiches, Breaded Chicken Fingers, Tortellini Pasta Salad skewer’s, Spicy Capicola and Mozzerella skewer’s, Mini Pizza’s of Caprese, and a Gorgonzola and Artichoke one, Stuffed Tomatoes, Roasted Veggies, Cucumber Salad, and, an assortment of Olives.

This is my son Tony, going in for the desserts which consisted of:
Chocolate Dipped Strawberries, Oreo Truffles, Mini Cheesecakes, 2 kinds of Brownies, Banana Bread, Lemon bars, and 2 different Fruit Kabobs!

It truly was a great evening had by all! Thanks everyone!

This is something I made which is great for a party, sort of a deconstructed pasta salad. In this case it is pre-cooked Tortellini that was marinaded with lemon and olive oil for 30 min’s, then skewered with fresh basil, sun-dried tomatoes, artichoke hearts, and fresh mozzarella. Grate some fresh cheese over top. Mmmm!!

And finally, I just want to mention that this post makes it my 100th post!! Woo Hoo, I finally did it!
Buon Appetito Everyone!!
Signature