White Bean Crostini with Frizzled Sage

crostini

Fall has arrived, the temperatures are cooler and holiday entertaining is around the corner. Sometimes you need a little something for lunch or dinner or a nice hearty appetizer to serve your guests, these white bean crostini with frizzled sage will fit the bill!

Crunchy and warm crostini spread with smashed cannellini beans that have been infused with lots of flavor and topped off with a crispy sage leaf.

It’s warm and comforting, quick and easy to make and looks very impressive.


fried sage

You need to frizzle your sage in olive oil, just getting it to the point where it starts to crisp up and doesn’t turn dark brown. The sage infused oil is then the base for starting your beans.

white beans

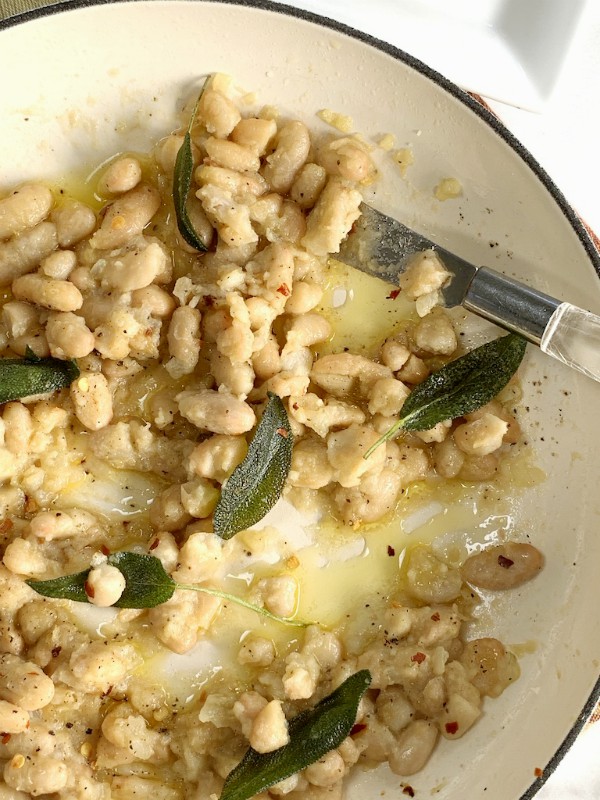
Half of the beans will be smashed and the other half left whole. Canned beans are used in this recipe but you certainly can cook up your own pot of beans if you so desire but remember this is a fuss free recipe, one that you can whip up in no time.

So my advice would be to stock up your pantry with some canned cannellini beans so you’re ready when you need a spur of the moment topping for crostini.

crostini

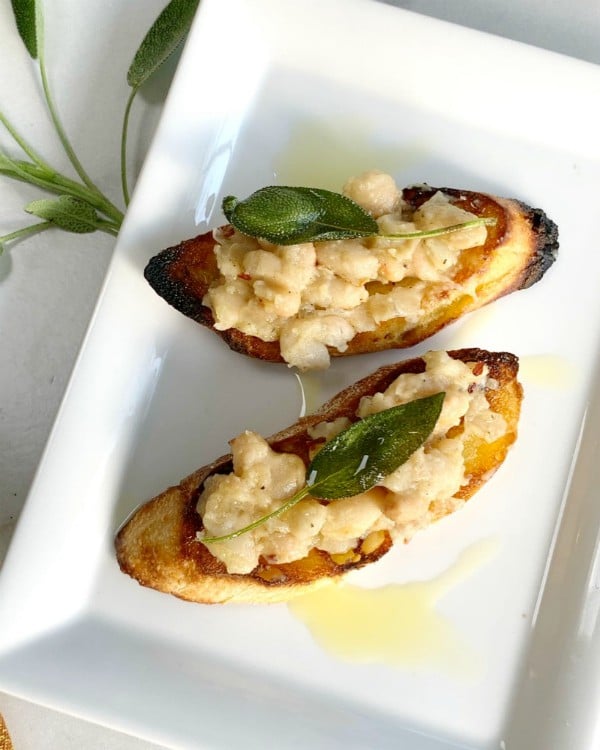
Crispy charred bread that I toasted under the broiler are the perfect crunchy base for these creamy beans, which taste at their peek when warm, then each crostini is crowned with a frizzled sage leaf.

This is the time to take out your best quality olive oil and give each one a good drizzle to finish them off. How is it that something so simple can taste so good?

crostini board

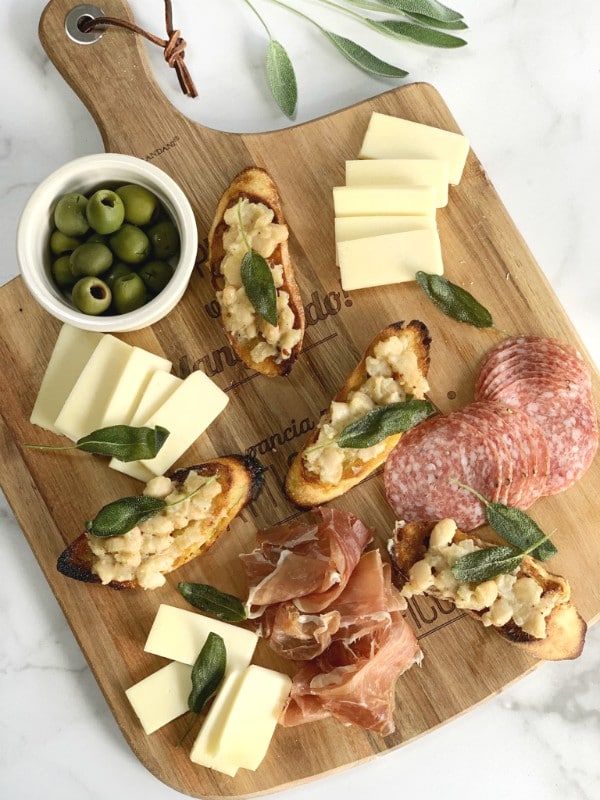
You can eat them on their own with your favorite beverage, or place them onto a charcuterie platter with some other goodies.

crostini board


Deliciously simple, you’ll be a hit and they’ll all be devoured!

Follow me on Instagram to see what else I’m cooking up during the week.

5.0 from 1 reviews
White Bean Crostini with Frizzled Sage
 
Author:
Ingredients
  • 2 cans of cannellini beans, drained
  • 2 cloves of garlic, smashed into a paste
  • ⅓ cup of onion finely minced
  • a pinch or so of red pepper flakes according to your liking
  • salt and pepper to taste
  • every day olive oil
  • a good quality olive oil for finishing
  • horizontally sliced baguette, drizzled with olive oil and put under the broiler to get toasted on each side, it goes fast so keep checking and don't walk away
  • enough fresh sage leaves to top each crostini and garnish the pot of beans
Instructions
  1. Toast your bread first as stated above and set aside.
  2. Depending on how many crostini your're making, first fry up a bunch of fresh sage in your everyday olive oil, enough to cover the bottom of the pan.
  3. You want the sage to be frizzled and not dark golden brown, set aside on paper towels.
  4. In same pan add the garlic and onion and saute until soft.
  5. Add in the drained beans, season with red pepper, salt and pepper.
  6. Cook beans on medium low, turning constantly until all the flavors meld together.
  7. Gently smash half on the beans right in the pan and leave the rest whole.
  8. Toss in some whole sage leaves for garnish right in the pan.
  9. Drizzle with good quality olive oil and taste for seasoning, it should be heavily seasoned.
  10. Spread warm beans onto toasted bread, garnish with one sage leaf, and give it a good drizzle with the quality olive oil.
  11. Enjoy!


Signature

Butternut Squash – Filled Roasted Pork Loin

butternut squash stuffed roast
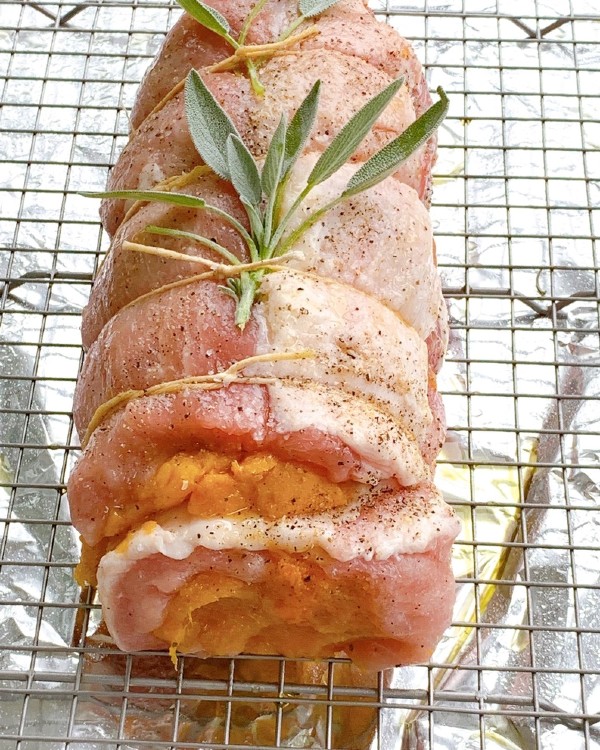
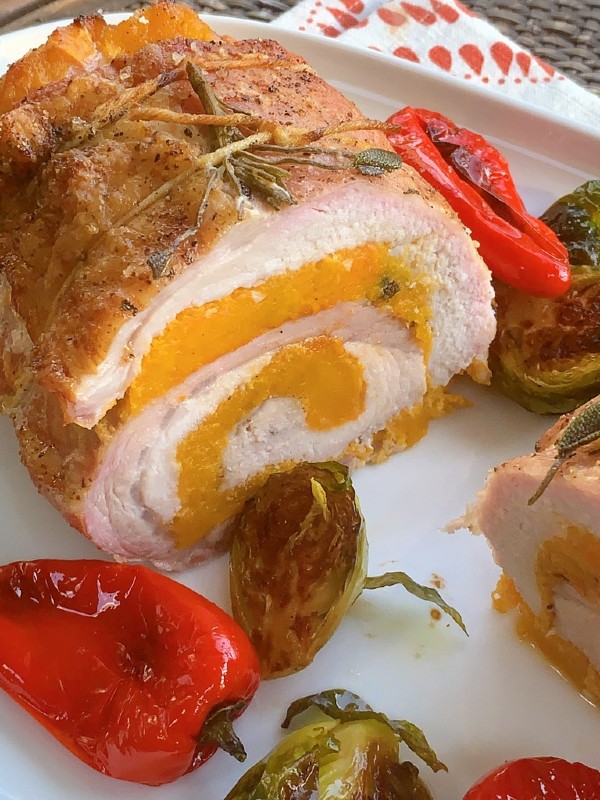
What do you get when you open up a pork loin, rub it down with garlic, olive oil and tuscan herbs, smother it with roasted mashed butternut squash and then tie it back up? I’ll tell you… The most delicious flavor combination with an absolutely beautiful presentation!

Tuscan herbs I saw this recipe in the cookbook Fabio’s Italian Kitchen, the minute I saw the photo I was smitten and couldn’t wait to make it. Swirls of butternut squash between layers of pork, what’s not to like!

This is the second time I’ve made this roast, the first time I followed the original recipe but this time I adapted it a little bit using those Tuscan herbs in that cute little crock above that were gifted to me by family who vacationed in Florence, Italy a few months ago. It’s a combination of sage, rosemary, crushed peppercorns and thyme.

cut and rolled out pork loin The most important thing about this recipe is that you have to cut open your pork loin properly and turn it into a 1/4 inch thick slab. The book explains how to do it but I needed a visual so I found a YouTube that showed me very quickly how to do it. After I opened it up I pounded it down to the thickness I wanted.

pork loin with Tuscan herbsThen all you have to do is rub your herby mixture all over the top which adds to the overall flavor as your end result.

pork loin spread with butternut squashsquash spread

Next, take your pre-roasted and mashed butternut squash and spread that on top of your herb mixture. Feel free to use your favorite mix of herbs, any combination would do. In the book Fabio just used garlic with minced sage which I tried the first time and that was very, very good!

rolled pork roast

Now carefully roll up the loin not pressing down too much as you don’t want that filling to squish out, then tie it up with some butchers twine!

cooked roast

I like roasting it on a rack so that it crisps up all over, make sure you follow the internal temperature posted so that the roast stays moist, you can be adventurous and possibly have a creamy cider sauce to serve along with it.

When it’s finished let it rest about fifteen minutes before cutting into it, I like to cut right through the middle first.

stuffed pork

It’s all about cutting the pork loin correctly, then I promise you’ll have no problem achieving that perfect spiral.

This dish tastes amazing and it’s a pretty spectacular presentation. It’s just perfect for the fall season,Thanksgiving or any holiday get together.

Here’s my adapted version.

Butternut Squash – Filled Roasted Pork Loin
 
Ingredients
  • 1 small butternut squash, cut lengthwise, seeds scooped out and roasted until tender at 375 F.
  • 1 pork loin 2½ lb.
  • 1 large garlic clove, minced finely
  • 3 tablespoons or more of a Tuscan dry herb mixture of sage, rosemary, thyme and cracked black peppercorns
  • 3 tablespoons of olive oil
  • heaping teaspoon of salt
  • butchers twine
Instructions
  1. After the squash is cooked tender and cooled, mash it up.
  2. In a small bowl mix the olive oil, herbs, garlic and salt together and let it sit for a bit.
  3. Open up your pork loin to ¼ inch thickness
  4. Rub oil and herb mixture all over the top.
  5. Spread mashed butternut squash on top and all over herb mixture.
  6. Start at one end and roll up and tie with butchers twine.
  7. Place pork loin in a roasting pan, brush with more oil and herb mixture then roast in the oven at 375 F. until internal temperature reaches 165 F.
  8. Cut into thick slices and present the whole loin at the table for serving.
Signature

Pumpkin Gnocchi

Gnocchi, humble little Italian dumplings, that when made right, taste like soft and fluffy pillows of dough. Tis the season for pumpkins so I got inspired to make Pumpkin Gnocchi!I often make butternut squash gnocchi during the fall season and lately I’ve been making a huge pan as a pasta side for Thanksgiving, and let me tell you, everyone of them gets eaten up!

I made my pumpkin gnocchi exactly the way I make my butternut squash gnocchi, all I did was replace the pumpkin for the butternut squash, so feel free to interchange them.
Here’s a link to a class I taught on making them.

I bought a sweet little pumpkin from Trader Joe’s, the kind you can make a pie with, cut it in half, seeded it and roasted it until tender. After it cools down, scoop out the flesh. You’ll notice that the pumpkin flesh is a little stringy, but that’s ok, because it all gets whirled in a food processor.
The key to a nice dough is not to overwork it too much, you might have to add a little more flour as you go but in the end it should feel semi firm to the touch.
I just love the color, it’s truly the most perfect autumn meal! Every bite is flavored inside with freshly grated parmesan cheese, they’re so addicting!
They’re ridiculously easy to make, no skills required, they don’t have to be perfect looking, in fact all you need is just a little patience!
They take only a few minutes to cook and then they’re ready to be sauced!
Speaking of sauce I wanted to try something different other than the traditional brown butter and sage so I searched and found this sauce inspired by Chef Frank DeCarlo.Saute 2 shallots in 1/2 stick of butter** add 1 bunch of sage and cook until shallots are golden** deglaze with 1/2 cup of chicken stock** whisk in 1/4 cup of pumpkin/ butternut squash puree, and 1/2 cup of cream** finish by adding 1/4 cup of grated parmesan, then season with salt and pepper.**
Luscious!

Ingredients for Gnocchi

  • 2 cups of  pureed butternut/ pumpkin squash
  • ½ cup Parmesan cheese
  • 1 tsp. salt
  • Pepper to taste
  • 2 eggs
  • 2+ cups flour

Instructions

  1. Preheat the oven to 375 degrees. Cut the squash in half. Remove the seeds, drizzle with olive oil, salt and pepper. Lay cut side down on parchment lined baking sheet. Roast the squash until soft—30 minutes or so.
  2. Scoop the flesh of the squash out and place it in the food processor. Puree until completely smooth.
  3. Mix the pureed squash with parmesan cheese, salt, pepper and eggs. Then add the flour into the mixture and work together by hand. It will be very sticky.
  4. Once smooth, flour work surface, Divide dough into 6 pieces and then roll each piece into a long strip, about ½ inch wide. Cut the strip into ¼ to ½ inch pieces.
  5. Using a gnocchi board, a fork, the back of a grater or just as is to create ridges. Place each piece on the floured wax paper and repeat with the rest of the dough.
  6. Bring a large pot of salted water to boil. Boil until all the gnocchi floats—about 5 minutes.
  7. While gnocchi is cooking have your sauces ready so you can toss right in, if not you can freeze them single layer on a baking sheet, when frozen place into bags.
From humble dumpling to mouthwatering perfection!
Signature

Butternut Squash Lasagna, Revisited

I love this time of year it puts me in the mood for butternut squash lasagna. Have you tried it yet? If you haven’t, you must. I love serving this along side a roasted turkey on Thanksgiving, to me it’s the perfect complement and a great pasta side dish.

butternut squash lasagna

Over the years I’ve made it so many different ways with a little tweaking here and there. I updated some of the pictures in this post to reflect that. Time has sure past since I first posted this back in 2009, and now it’s almost 2020 and I’m still making butternut squash lasagna!

butternut squash loasagna

I love adding a bechamel sauce that’s infused with herbs and garlic. In the past I infused the sauce with roasted garlic and rosemary then moved on to roasted garlic and sage. When you infuse those flavors into warm bechamel sauce it takes the whole lasagna to another level of flavor and taste!

Sometimes I’ll add on the layers ricotta cheese mix and some shredded mozzarella, sometimes no ricotta just bechamel, parmesan, the squash and maybe even another cheese like shredded fontina which melts really nice, it’s all good!

I think an important thing to remember is to make enough sauce. When I first started making this four cups of sauce was not enough because the pasta seems to soak it up and also you want a nice layer ending on the top, as well as some for serving.

And if you’re going to use the no-boil pasta, well that tends to need a lot of sauce anyway. So you be the judge, but I would start out with six cups of sauce, it’s better to have more than not enough.

I used one large butternut squash which was perfectly enough for a 13×9 pan.
Peel the squash, slice it, scoop out the seeds and cut it into chunks. Place them onto a baking sheet seasoned with salt and pepper and an olive oil drizzle, roast in the oven at 400F until fork tender but not mushy. In the same oven I roasted 1 small head of garlic wrapped in tin foil.
In the meantime, make your basic bechamel sauce, when finished add in a few of the roasted and smashed garlic gloves, you be the judge on how much you want in there, toss in some fresh sage leaves and a good handful of grated parmesan, salt and pepper.
Let the magic happen and let it infuse for a good 20-30 minutes, give it a taste to see if it meets your flavor standards, if not add more of something.

If you’re going to add ricotta to your layers whisk an egg into it along with a generous helping of grated parmesan, salt and pepper. Start layering with the sauce, then pasta, more sauce, pasta, the squash, ricotta mixture, shredded cheese and more grated cheese.
Then repeat, ending with sauce on top of the last layer of pasta.
Bake covered with tin foil at 375F. for about 30 minutes, take the foil off and stick it under the broiler until golden brown for a few seconds.
Feel free to use any kind of lasagna noodles, boil, no boil, whole wheat or white lasagna noodles, again just make plenty of sauce (which I feel is key).
noodle-less lasagna
I’ve even made a noodle-less version of a butternut squash lasagna which is equally delicious and perfect for those who are gluten free.
Butternut Squash Lasagna, Revisited
 
Author:
Ingredients
  • FOR THE BECHAMEL
  • 6 cups whole milk
  • 12 TBL. butter
  • 12 TBL. flour
  • ¾ cup grated parmesan cheese
  • handful of rosemary or sage
  • roasted garlic cloves, smashed
  • Melt butter in a saucepan, whisk in flour. Cook and stir for around 1 minute to cook off the raw and starchy taste of the flour. Whisk in the milk stirring frequently until it starts to bubble ad thicken.
  • Toss in the smashed roasted garlic, herbs and parmesan to infuse sauce. Let it sit for 20- 30 minutes
  • Taste for salt and pepper and remove herbs.
  • ROASTING THE BUTTERNUT SQUASH
  • 1 large squash, peeled and cut into cubes, drizzled with olive oil, salt and pepper and placed on a sheet pan until tender but not mushy at 400 degrees.
Instructions
  1. Feel free to use any type of pasta noodle, no boil, boil, whole wheat or plain white or even fresh.
  2. You can add a ricotta mixture as stated in the post along with shredded fontina or mozzarella, the squash and bechamel.
  3. You can make it without ricotta by just using the butternut squash, shredded cheese and bechamel.
  4. You can make it noodle-less as shown in the post with a link by slicing planks of squash into . "pasta noodles".
Signature

Pumpkin Pastina

pastina In many Italian households children are first introduced to pasta by way of pastina. Pastina literally means “little pasta”. Today you can find shapes of many different forms, from tiny dots to stars, alphabets, and many more. My own kids grew up with pastina, simply made with a little butter, and grated cheese, but this recipe takes it over the top with a beautiful presentation in a pumpkin, hence the name pumpkin pastina.

To this day it’s the kind of comfort food that my family and I still crave today.

When I first saw this recipe in Michael Chiarello’s cookbook…The Tra Vigne… all my fond memories of pastina came rushing back, I just had to make this!

Tiny pastina cooked in a warm broth flavored with onion, & thyme, adding to that, creamy parmesan cheese, and roasted butternut squash.

I can barely describe how good this is, it almost didn’t make it to the table, I’m warning you you’ll be tempted to eat it right over the stove with a spoon!

roasted pumpkin By all means, you don’t have to serve it in a pumpkin like it’s featured here, but the presentation is so eye catching and very festive for this time of year, and besides, you have to roast your butternut squash anyway so why not do it all on the same baking sheet.
This recipe serves four, and the pumpkin I used was on the small side about 6 or 8 inches round. I was going to use the green one in the photo as well but decided against it.
Just cut the top, scoop out the seeds, oil it inside and out, and season with salt and pepper. Place the lids back on the top when baking.
For the butternut squash, I just cut it in half, scoop out the seeds, oil it inside and out add salt and pepper, and then place it cut side down on baking sheet.
Both will cook at 375F for about 40 min’s. You want your pumpkin still firm enough to stand up, so depending on what size you use, you might want to keep checking it.
NOTE: Do all of this earlier in the day to get it out of the way, the pastina cooks up fast.
autumn leaves This has nothing to do with the recipe at all, but I just wanted to show you the beautiful colors that were on these leaves that I saw when I was taking a walk the other day, I just love the fall colors!

pastina Michael added turkey in his recipe and cooked the pastina like risotto, adding the broth little by little. I didn’t do that.
You certainly could add turkey to it if you like, for a more heartier meal. I didn’t do that either. I might however, use his suggestion to chiffonade some chard or spinach into it next time.
FOR THE PASTINA:
In a pot, sauté about 1 cup of onion in olive oil, season with salt and pepper and fresh thyme.
Pour in 4 cups of stock (I used chicken) and bring to a gentle boil.
When stock is boiling pour in 3/4 lb. of your dry pastina or any tiny pasta.
When al dente, fold in about 1 cup of your roasted butternut squash that has been scooped out, and 1/2 cup of good parmesan cheese. Season it to taste with salt and pepper.
The consistency should be loose, so you might want to add more stock to it, so have extra on hand if need be.
Pumpkin pastina is the perfect meal to make this fall.
Buon Appetito!
Signature