Layered Roasted Vegetable Torte

layered roasted vegetable torte

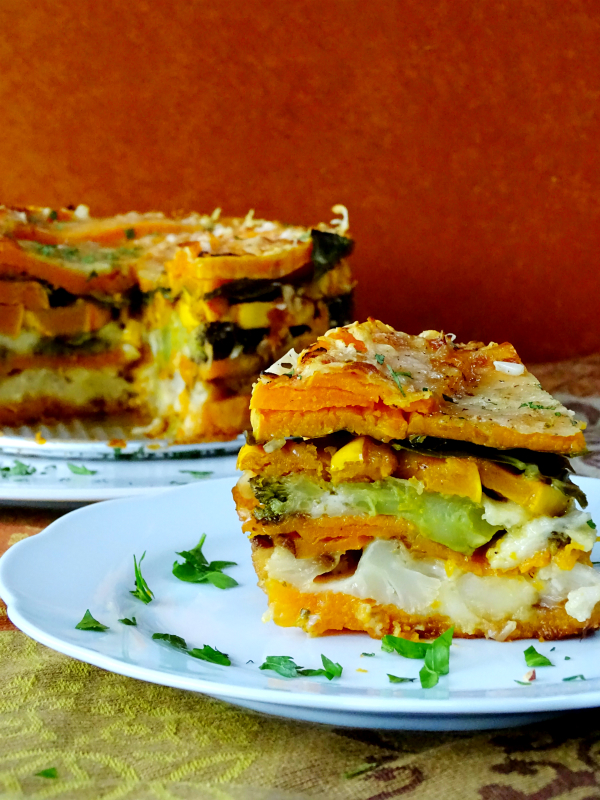
If you’re a fan of vegetables then you’re going to love this recipe! Layers of your favorite veggies stacked into a springform pan and “glued” together by tasty shredded cheese, it’s a show stopper and it could work very well as a side dish to your holiday table.

The only thing you’ll need to do ahead of time is pre-roast your veggies, then it’s all about the assembly, which is really quite simple.

layered roasted vegetable torte

I used a 9 inch spring form pan which would give you six nice sized wedge portions. If you want to go for a bigger spring form pan, don’t be afraid, I’ve done it and it works great, just roast more veggies, add more cheese and you’ll be fine.

layered roasted vegetable torte

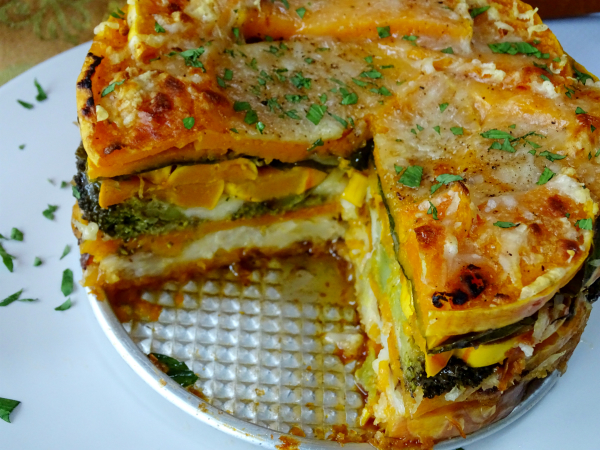
The key to a successful un-molding is to let it rest for at the very least 30 minutes, but an hour would be better, you could even make it the day before then take it out hours ahead of serving and allow it to reach room temperature.

layered roasted vegetable torte

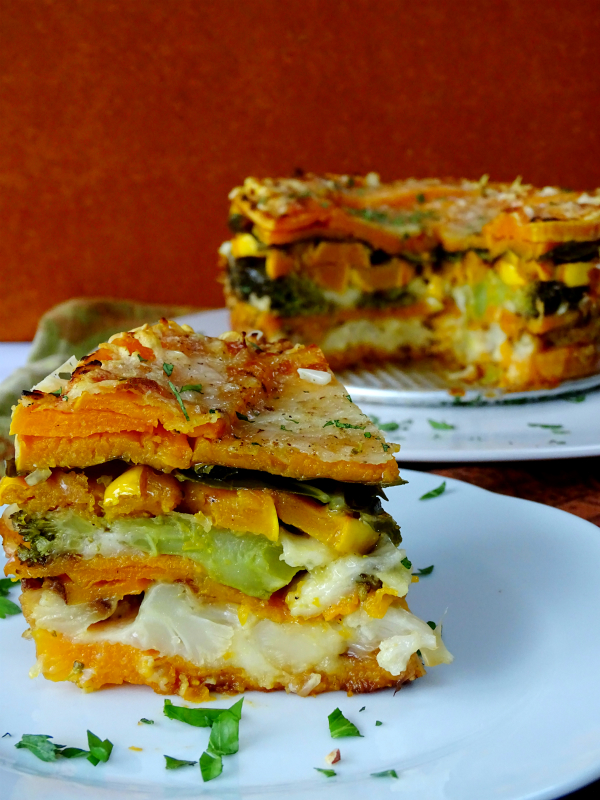
By letting it rest properly you’ll be able to cut it into perfect wedges and everything will stay in tact.

layered roasted vegetable torte

I made a different version here, a few years ago, you can check it out to get an idea of other veggies you might want to use, but really just use your imagination!

I’m also on Instagram where you can follow me and see what else I’m cooking up!

4.8 from 4 reviews
Layered Roasted Vegetable Torte
 
Colorful layers of roasted veggies stacked into a torte, a great presentation for your table.
Author:
Ingredients
  • For this recipe I used a 9" spring form pan, that I brushed inside with olive oil
  • 1 butternut squash with a long neck, remove skin and slice thin. ( I only used the neck of the squash so I could get flat slices) you could also use the bulb part just slice thin also
  • 1 medium head of cauliflower, which I take my knife to and make slices
  • 1 head of broccoli, just the crown, sliced like the cauliflower
  • 1 delicata squash cut into half rings
  • a few collard green leaves, which I just happen to have, but you could use spinach or kale
  • grated asiago, grated mozzarella and grated romano for "glue"
Instructions
  1. Have all your veggies pre-roasted at 400 degrees until golden on each side. Depending on the size of your veggies and the size of your pan you might have some left over, but that's a good thing!
  2. Then take your oiled pan and place it on a foil lined baking sheet that's rimmed, it's going to leak a bit at the bottom and this will be such easy clean up.
  3. Start layering, I like to put something substantial on the bottom and top so I started with the slices of butternut squash, fill the whole bottom of the pan, try to have no gaping spaces.
  4. After each layer, sprinkle some of each cheese all around.
  5. Next layer, the cauliflower, place it all around filling all the open sides and spaces.
  6. Repeat with sprinkling of all cheeses.
  7. Another layer of butternut squash, then more cheese.
  8. Next layer the broccoli, more cheese, at this point gently press down the torte with the back of a tablespoon to make sure the layers are nice and compact.
  9. Next will be the delicata squash rings, then repeat with cheese.
  10. Next will be your something green, kale, spinach or collard leaves. ( you might want to wilt those in the microwave for a minute before) repeat with cheese.
  11. Last layer for the top I used butternut squash again, but you could also used roasted sweet potato.
  12. Top with cheese and place foil on top to cover.
  13. Bake in a 400 degree oven for 20 minutes, then take foil off and bake another 15.
  14. Remove and let it rest for at least 30 minutes at the very least, an hour even better, very important so everything sets and you'll be able to cut into nice wedges.
  15. Then go around the edge of pan with a knife making sure nothing is sticking, then release spring on pan and remove and place on a platter with bottom of pan still in tact.
  16. You can make this the day before, just take it out several hours before serving to reach room temperature.


Signature

Sage Embossed Fingerling Potatoes

sage embossed potatoes

Ok, I just want to say that I’m absolutely giddy about this recipe, well honestly it’s not a recipe but more like a simple how to, but imagine how gorgeous a platter of these pretty sage embossed potatoes would look on your holiday table!

I saw this in a BHG magazine on party foods, and I think this would be the perfect side dish to one of your holiday parties, it’s so eye catching!

fresh sage

First, get some fresh sage, I still have a ton growing in my garden, so I just went out and grabbed some.

fingerling potatoes

Next, buy a bunch of those cute fingerling potatoes, wash them, pat dry, then cut in half lengthwise.

Toss them into a bowl and coat with olive oil, a little pepper and some good flaky salt like Maldon.

I had sixteen potatoes, thirty two halves and I used 2 tablespoons of olive oil.

fingerling potatoes with sage

Take a baking sheet and line it with parchment paper, very important, you must line with parchment, now place one sage leaf on each potato half then quickly flip it over onto the parchment, the sage leaf will stick as it cooks.

Bake at 425 degrees for 15- 20 minutes, depending on your oven.

sage embossed potatoes

You’re looking for tender and golden, so lift a few up and check for that nice color just to make sure.

sage embossed potatoes

I’m in love with these beauties, they taste delicious and they’re insanely simple to make!

sage embossed potatoes

If I need to bring a dish to someones house, guess what? I’m bringing these!

sage embossed potatoes

Make them, you’ll be a rock star!

( The holidays are around the corner, follow me on Instagram to see what I’ll be making in my kitchen!)

Signature

Savory Squash and Brussels Sprout Flatbread

brussels sprout and squash flatbread

I can’t tell you how much I love making making flatbread pizzas, every body seems to love them and when I’m pressed for time I can whip one up in a few minutes. What I like about flatbread pizza is that you can make them so many different ways, actually using whatever you have on hand in your fridge. They bake up with a nice crispy crust that’s able to hold up to whatever you place on top, think leftover chicken, veggies, cheese, you don’t need much of each, actually less is more. Here’s some other ones I’ve made in the past.

I use lavash bread, there’s many different brands and you can find them at almost any large grocery store, I keep a couple of packages in my freezer at all times. Honestly, even if you take them straight out of the freezer they only take a few minutes to defrost, which is great for busy days and unexpected guests.

making squash puree

Last week I bought a butterkin squash at my farmers market, which is now officially closed for the season, sniff sniff.  They told me I should try it, that it was creamy and delicious, a cross between butternut squash and pumpkin. I loved it and would buy it again, to me it tasted like a more intense butternut squash and it had an amazing orange color, so fall like!

I decided to make a puree from it by first roasting it then scooping out the cooked pulp and smoothing it all out in my food processor, you could actually do this with any type winter squash, it’s nice to have on hand and I’ve been using it in a bunch of different things all week.

brussels sprouts and squash flatbread

For instance, I used some of the puree for the base of my flatbread, I put a couple of tablespoons into a little ricotta and spread it on as my first layer, it was a nice little twist and enhanced all the flavors of the other ingredients that I used on top.

My next layer was shredded mozzarella, then pre-roasted delicata squash rings, ending with shaved, pre- roasted brussels sprouts that were tossed in olive oil and parmesan cheese, both were leftovers in my fridge and when all put together it was out of this world good!

A few tips for the flatbread, brush olive oil on both sides, place on a baking sheet, top with ingredients and bake at 400 degrees for no more then 10 minutes, that’s it!

Want to see what I’m cooking up during the week? Follow me on Instagram here.

Signature