Summer Entertaining with Grilled Whole Fish

grilled red snapper Are you intimidated by the thought of grilling a whole fish? Don’t be, the entire process is actually very simple! The most important thing you can do is to buy your fish from a reputable source and become friends with your fish monger. I trust the guys at my Whole Foods, in fact I told them that I wanted to grill a whole fish and they gave me a couple of suggestions, on the day I was there it was either sea bass or red snapper, to which they highly recommended the snapper, so that’s what I went with.

Your fish monger is your friend, he will do all the dirty work for you, he’ll scale, gut and remove the gills and all you have to do is take it home, stuff it, and stick it on the grill! I told you it was easy!

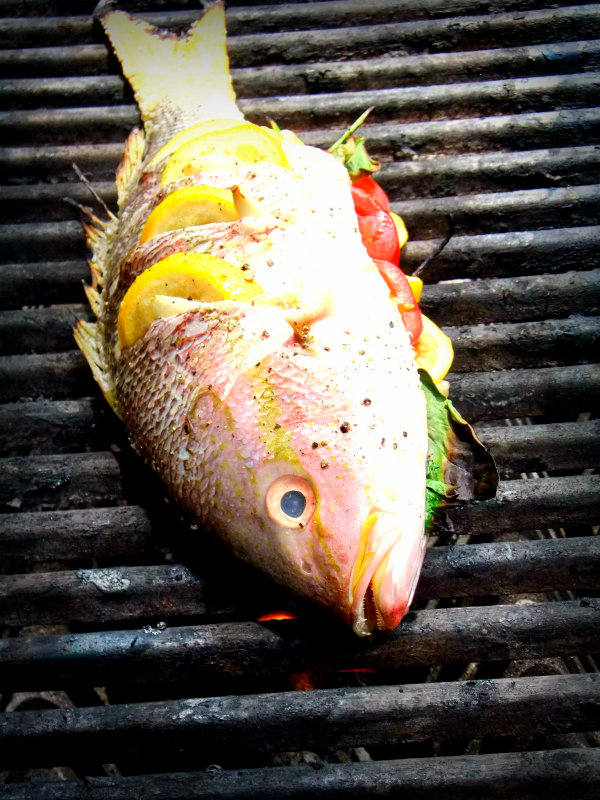
When you get it home make three or four diagonal cuts on the top of both sides straight down to the back bone, not only will it ensure even cooking but you’ll be able to tuck  lemon slices and shaved garlic inside the slits like I did. Open up the cavity and drizzle good olive oil inside, salt and pepper then stuff it with your favorite herbs, more lemon and a few tomato slices, finish by rubbing the whole fish with olive oil, both sides. It’s that easy, no measuring, just go for it!


grilled red snapper Place your fish on a hot oiled grill on low direct heat, flipping only once and cooking until completely opaque, about ten or so minutes per side. (my 2 lb. fish took about 25 minutes). Some of the skin might stick to the grill and peel off when you flip it over but for the most part it will stay intact and the skin will hold everything together and protect the meat from the flame.

grilled red snapper 
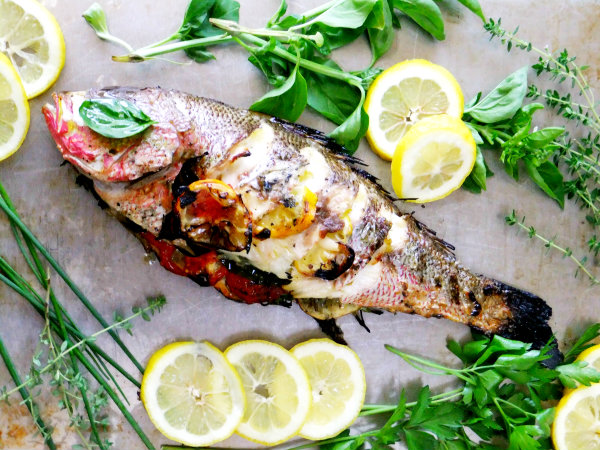
The end result is so delicious, a slightly smoky, moist but yet firm, sweet subtle flavor infused with herbs, lemon, tomato and garlic. So good!

Feel free to drizzle more olive oil on top to finish it off. Oh and if the eye creeps you out like it did me, cover it with a basil leaf!

red, white and blue potato salad Keep your side dishes simple because the fish is really the show stopper. Since it’s 4th of July weekend how about my Red, White and Blue Potato Salad? (recipe below).

red, white and blue potato salad 
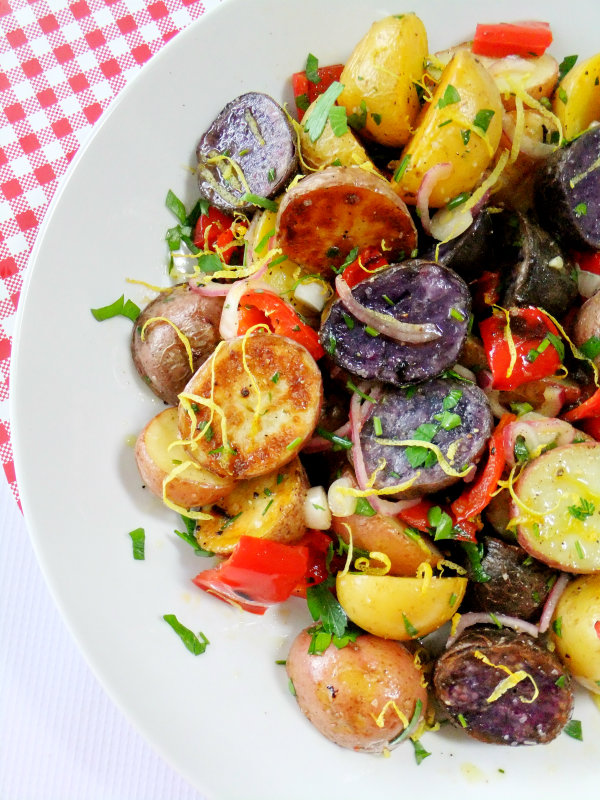
This would go really nice with the fish. Roasted small red, white and blue potatoes along with roasted red pepper chunks, onions, parsley and lots of lemon zest all tossed while it’s warm in an olive oil and lemon dressing.

quinoa tabbouleh with kale 
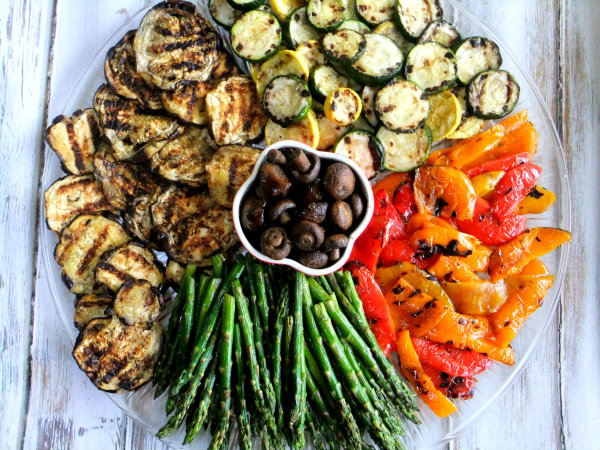
Or how about a colorful healthy Quinoa Tabbouleh with Kale and Grilled Vegetables this would be a wonderful side as well plus can make it the day before, and that’s a good thing!

Cook 1 cup of rinsed quinoa with 2 cups of water, cool it down, then add any grilled veggies you want, I used red and yellow pepper, zucchini, yellow squash, eggplant, then to that I added red onion, 1/2 can of chick peas rinsed, sliced grape tomatoes, lots of curly kale and parsley, all tossed in a lemon and olive oil dressing.  Sorry, no exact amounts, just add in as much as you want, you’ll know when to stop.


tomato, avocado and mozzarella salad Or you just might want to keep it real simple by making a layered Tomato, Avocado and Fresh Mozzarella Salad, just be sure to top it off with some good quality olive oil and fresh chopped fragrant basil, a summer staple for sure!

Have a Happy, Healthy 4th!

Red, White and Blue Potato Salad
 
Ingredients
  • 2 lbs. assorted small red, white and blue potatoes cut in half
  • 1 large red bell pepper cut into 1 inch dice
  • ½ red onion sliced thin
  • 4 scallion, sliced
  • handfull each of chopped parsley and chives
  • zest of 2 lemons
  • lemon and olive oil dressing
Instructions
  1. Coat potatoes with olive oil, salt and pepper and roast at 425 F. until fork tender.
  2. Roast the chopped red pepper at same temp in a separate pan while potatoes are roasting, until tender.
  3. When potatoes and peppers are done, toss into a bowl and add the rest of the ingredients, parsley, chives, scallions, red onion and zest, toss well and season with salt and pepper.
  4. Drizzle on desired amount of lemon and olive oil dressing.
  5. LEMON AND OLIVE OIL DRESSING
  6. Start with fresh squeezed lemon juice, about 3 tablespoons, a small smashed garlic clove, whisk in good olive oil, salt and pepper. Taste it as you go along checking for the right balance of juice vs olive oil, you’ll know when you get it just right!


Signature

Summer Crostini with Garden Pestos

crostini with garden pestos Now that summer is in full swing there’s usually always something to harvest daily from our veggie garden, some days it’s just a few stalks of kale or swiss chard, a tiny bunch of broccolini or a few cherry tomatoes. Nothing yet to make a huge meal from, but perfect for making small bites!

garden basil One thing I do have an abundance of right now are fresh herbs, the rain just exploded their growth. Basil, mint, thyme, rosemary, parsley, sage and tarragon are growing all over the place and I feel so guilty if I don’t use them all!

garden herbs I was recently gifted with some garlic scapes, (thanks Julie and Ken) so I thought making a few different pestos would be the perfect way to start using up all my bounty.

homemade garden pestos So I made my trusty Basil Pesto, and tried out two new ones, Pea and Mint, and Garlic Scape and Kale Pesto. If you use your food processor you can whip these up in no time! Pesto’s are so versatile you can put them in and on just about anything, pastas, grilled meats, soups, pizzas, veggies, fish, omelettes, I could go on and on, I even throw some in when making egg salad!

crostini with garden pestos Another fun way to eat up your pestos is to slather some on top of  crostini. Crostini are thin slices of toasted bread drizzled with olive oil and garnished with  endless possibilities. By adding  in your favorite charcuterie, grilled veggies, various cheeses, good olives, fresh fruit, etc. you can create an elegant antipasti, lunch or dinner, just don’t forget the wine!

crostini with garden pestos I was in love with this recipe the minute I saw it, a crusty piece of bread topped with pea and mint pesto, creamy Burrata cheese and a slice of prosciutto, this is to die for, it’s a meal in itself! The only thing I changed up in the recipe was the cheese, I used grated parmesan for mine.

If you don’t want to use meat try some thinly sliced grilled zucchini to replace it.   Again, I repeat, to die for!

crostini with garden harvest Here are some other ideas for crostini using up whatever you might have growing in your gardens.

crostini with garden harvest Roasted tomato slices topped with basil pesto***** Mascarpone cheese topped with garlic scape and kale pesto, roasted mushrooms, leeks and thyme*****

Ricotta topped with garlic and red pepper sauteed broccolini***** Goat cheese topped with garlic and red pepper sauteed swiss chard*****

crostini with garden harvest It’s all good! Small bites, big flavor, simple and sophisticated!

Garlic Scape and Kale Pesto
 
Ingredients
  • 2 garlic scapes cut in chunks
  • 2 cups kale, stems removed
  • ⅓ cup toasted almonds or walnuts
  • ⅓ cup grated romano cheese
  • pinch of red pepper flakes
  • salt and pepper to taste
  • olive oil
Instructions
  1. In a food processor add garlic scapes, nuts and kale, pulsing until chopped up fine.
  2. Add in cheese, red pepper and salt and pepper, process until incorporated.
  3. While machine is running, pour olive oil down the tube until you get a loose consistency.
  4. Cover and refrigerate.


Signature

Celebrating with Timpano!

timpano It’s Timpano time again! If you’re a regular reader of my blog you know I previously featured Timpano a few times already in the course of my almost seven years here on Proud Italian Cook. I can’t help it, it’s such a celebratory meal, like making homemade ravioli.

I don’t make it that often but when I do it’s for a celebration or special occasion.

Many years ago I watched the movie Big Night, which by the way I think is one of the best “foodie” movies ever made, two brothers own a restaurant that’s not doing so well so they try and impress there guests by making a Timpano.

Stanley Tucci is in the movie and the actual Timpano recipe comes from his own personal family. To me the highlight of the movie was the  Timpano scene. It will be forever embedded in my mind,  here’s a You Tube clip, and the minute I saw it I knew I would be making this spectacular meal.

Making a timpano is a big event but it actually consists of very common ingredients, nothing much out of the ordinary, but the presentation is extraordinary and definitely celebration worthy!

ingredients for making timpano When making Timpano you’ll find that it’s all about using the correct pan which so happens to be  made of enamelware, you have to have the right size and shaped pan to hold three pounds of pasta, provolone, eggs, mini meatballs, Genoa salami, sauce and grated cheese and it has to be deep enough so you can make several layers before it gets nicely wrapped into the dough and when you finely un-mold it, there’s a nice dome like shape to it, here’s what I use.  This recipe feeds at least 16 people!

I’m not going to kid you, it’s a labor of love, but isn’t that what we all do for special occasions, we go all out.  What I really like about making Timpano is that everything can be prepped way ahead of time. I make all my sauce and mini meatballs a week before and stick them in the freezer until the day before, then a couple of days before the party I boil and peel my hard boiled eggs, dice up the provolone and Genoa salami, and make sure I have plenty of romano cheese grated.

Over the years I’ve adapted the recipe a little, I don’t make the heavy ragu that the original recipe calls for, I personally don’t think you need it, there’s so much meat that goes into the layers anyway, to me a nice light marinara made with olive oil, fresh basil, garlic and good San Marzano tomatoes is just right, of course I always make plenty of extra sauce because you’ll want to spoon some on each piece.

The recipe gives you the exact amounts of cheese, salami and meatballs you should use but I always throw in extra, the only thing I do exact is the hardboiled egg amount.  I will post the link to the original recipe at the end of this post.

rolled out timpano dough I can’t tell you how much I love this dough, it comes out perfect every time. I make it the night before, wrap it good in plastic wrap then refrigerate it, just bring it to room temperature before you start to roll it.  Be patient when rolling, let it rest, then roll, it needs to be thin, you should be able to see the counter coming through the dough.

rolled out timpano dough The dough circle needs to be big enough to drape the bowl like in the photo above because once you start adding all the ingredients the sides will rise up a bit, plus you need enough to be able to cover and wrap all the ingredients inside.

steps in making timpano Then all the layering begins! See the bottom picture of the pan? look at the edge, you can see the pan design coming through, that’s how thin your dough has to be otherwise your Timpano will be too heavy and crusty and you don’t want that!

making timpano Layered up to the top, almost done with the filling!

topping off the timpano Add the last layer of sauce and a drizzle of beaten eggs all over the top to seal everything in.

wrapped timpano ready for the oven Wrap it, trim it, and stick it in the oven!

My advice is to read, read, read the recipe, I even printed it out and highlighted the important steps so I wouldn’t forget, at one point you have to take it out of the oven and put foil over the top and then back in, if you forget this step with the foil it can ruin the whole thing, my poor friend did that once, so please use a timer and pay attention when it dings.

finished baking timpano Every oven is different but the Timpano should be golden brown with an internal temperature of 120 degrees.

Timpano When you un-mold it you can’t just cut into it, a very important step is to let it rest, I repeat, let it rest! If you don’t you’ll have a gloppy mess, and that would be so sad after all that work. Go pour some drinks and mingle with your guests, give it about an hour, believe me it will still be hot.

cut open timpano Then you’ll be able to cut it into sharp clean wedges for everyone, see how nice and thin that dough is?

grilled vegetable platter You might wonder what to serve with Timpano, well since it’s summertime I decided to make a platter of grilled veggies and a nice big Italian salad, that’s it, that’s all you’ll need, trust me.

plated timpano slice Cut your wedges which are nicely held together and spoon warm marinara on top, you’re ready to dig in!

a wedge of timpano If you’re lucky enough there might be a piece leftover for the next day…

celebrating with timpano We had a lot to celebrate, with a ton of hard work and endurance my daughter received her yoga teacher training certificate, it was also my sons birthday, and my niece and a good family friend just completed a triathlon. We’re very proud of them all, they work extremely hard but they sure know how to party!

Here is a link to the original recipe, within that recipe you’ll find another link to the Family Tucci ragu.


Signature