Eight Years of Blogging and a Limoncello Tart

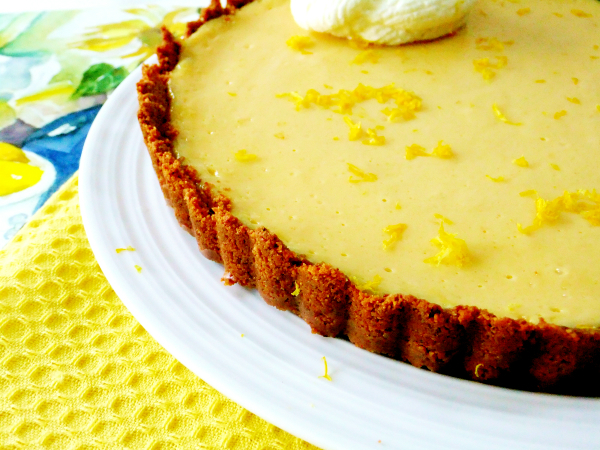
limoncello tart

It’s my blogiversary today, 8 years, I can hardly believe it! So I’m celebrating with a limoncello tart.

It’s been quite a while since I’ve made this tart, I think it’s been about three years. It’s crazy good and so easy to make, my kind of baking, nothing complicated about it.

limoncello

Recently I was lucky enough to receive two bottles of limoncello liqueur from Mama Agata’s Cooking School on the Amalfi Coast, ( it’s on my bucket list) to try out, of course I readily accepted!

We are huge fans of limoncello in my family, every holiday, special occasion and celebration includes some icy cold limoncello for toasting, my daughter likes to make a huge batch every year to give away for gifts, it’s a big undertaking, but so worth it.

limoncello tart ingredients

I knew as soon as it arrived I was going to make this tart to celebrate my eight year milestone, after all, it’s made from the beautiful lemons that grow on the Amalfi Coast, how special is that!

limoncello tart

Let’s talk a little bit about my eight years of blogging. Back in 2007 I asked my daughter to help me set up a blog, I was reading a bunch of blogs at the time and thought it would be fun to document my own recipes, it took her 15 minutes to get me up and running, the hardest part was me coming up with a name.

She set me up then walked out the door and said, ” you’ll be fine mom, just take a picture and talk about it” . Oh boy what a learning process it has been, especially with all the technical stuff that goes on behind the scenes.

My photos were hideous in the beginning, shooting with the flash on and under yellow lighting, what was I thinking? I often thought of changing them out now, but I never will, it is who I am, the good, the bad and the ugly, besides it’s nice to see a little progression over the years.

I thought by now I would get tired of blogging, but honestly I’m not, it still remains one of the best things I’ve ever done, I love the creative process and I’m always learning something new.

If you were to ask me what my favorite part of the process is I would have to say everything except writing out the actual recipe, I loathe that part! ( ha ha).  Sometimes I just stare at the computer and avoid writing out the recipe diverting my attention elsewhere.

I never was any good in math, my family and friends could attest to that, and don’t ask me to figure out a tip either!

Thanks for putting up with all my terms like, a pinch, a drizzle, a healthy dose, ovens vary so keep checking, taste it, add more or less, use whatever veggies you have on hand, I know it’s not very precise.

Today there are so many social media platforms, too many for this old girl, but I have to say, a new one that I do enjoy is Instagram, sharing some of your life with a series of pictures, it’s different than this blog, it’s more day to day. You can follow me there if you’re interested.

But over and above everything else, the fringe benefit of blogging all these years has been the friendships I’ve made, friendships with other bloggers and even readers of my blog, I appreciate all of you and in addition my family and close friends, and I just want to say thank you to each and every one of you!

So I’m still hanging around for a while.

blueberry sauce

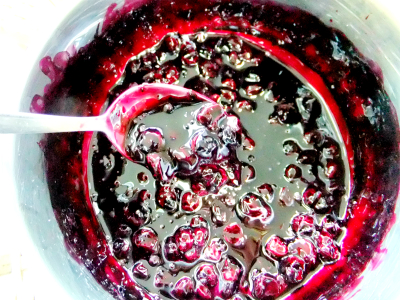
Now lets get back to that dreamy limoncello tart… You have to make this blueberry sauce to serve along side it so you can swipe each bite into it, it takes it over the top!

limoncello tart

Salute!

4.6 from 5 reviews
Eight Years of Blogging and a Limoncello Tart
 
Grab a bottle of limoncello and make this while you're sipping a little on the side.
Author:
Ingredients
  • 1 - 9" tart pan with removable bottom
  • 1-7 oz. bag of amaretto cookies, (for the crust)
  • 6 tablespoons of melted butter
  • 2 egg yolks
  • 1 can sweetened condensed milk
  • ¼ cup plus 2 tablespoons of limoncello liqueur
  • 2 tablespoons of lemon juice
  • 1 tablespoon of lemon zest
  • 1 pint of fresh blueberries
  • ¼ cup of sugar
  • a little limoncello to flavor berries when finish cooking down
Instructions
  1. Heat oven to 350 degrees.
  2. Melt butter
  3. In a food processor, whirl the package of amaretto cookies then pour in the melted butter and process until it all comes together.
  4. Pat crust into tart pan, place on a baking sheet and pre-cook crust for 5 minutes, then let it cool down.
  5. While crust is cooling, mix together the egg yolks, condensed milk, lemon juice, limoncello and the zest, blend with a hand mixer until creamy.
  6. Pour into prepared crust and bake 15 to 20 minutes more, it should be firmed up but not overcooked.
  7. While tart is baking pour berries into a small saucepan along with the sugar, keep stirring and cook down until it becomes a sauce, nice and thick.
  8. Add a little zest and limoncello to flavor it up a bit.
  9. Completely cool down the tart and the sauce and refrigerate both, both should be nice and chilled before eating, it needs to cool several hours so it cuts nice, or you can even make it the day before eating it.


Signature

Zoodle Pasta Pie

zoodle pasta pie

There’s not one strand of real spaghetti in this pie, it’s all made with zoodles, zucchini noodles, which are still all the rage, have you tried them yet?

Leftover veggies, strands of zucchini pasta, a couple of eggs, herbs and cheese form this savory pie, cut it into wedges, serve it alongside a salad and it becomes a satisfying and healthy meal!

pizza pasta pie

Just for comparison I wanted to show you my Pasta Pizza Pie,  in the photo above it’s made with real spaghetti strands and leftover veggies, each of these dishes are made similar, except this time I just switched out the pasta for zoodles.

zucchini zoodles

Zucchini season is peaking right now and this is just another fun way you can use some of it.

zoodle gadgets

One of the ways that you can make zoodles is with a spiralizer, I love using  it because it makes continual strands that are nice and curly, this is the one I use, but sometimes I just don’t feel like taking out a big gadget and then having to clean it, so I’ll use my julienne peeler instead.

The strands aren’t as long and you don’t get that continuous curl, but when wilted down a bit you can’t tell much difference, check out this older post of mine, titled Faux Spaghetti, and see what I’m talking about..

zoodle pasta pie ingredients

Just use whatever veggies and herbs you might have on hand, you don’t need much, I used an eggplant, some mini red pepper rings, artichoke hearts, peas, broccoli tops and onion, again it was just small amounts.

zoodle pasta pie

The cheese will bind it all together and form the perfect zoodle pasta pie!

Follow me on Instagram!

zoodle pasta pie

Zoodle Pasta Pie
 
This is a take on a pasta pizza pie I made by just replacing the pasta with zucchini noodles or "zoodles" it's healthy, low carb and gluten free and it tastes amazing!
Author:
Ingredients
  • I used a 12" oven proof skillet
  • 4 or 5 zucchini, or a mixture of yellow squash and zucchini, turned into zoodles
  • leftover veggies of your choice, diced medium and pre-cooked or roasted
  • fresh basil and parsley
  • 2 beaten eggs
  • 2 small garlic cloves, minced
  • ½ small onion
  • parmesan or romano cheese, grated
  • 1 cup, mozzarella cheese, shredded
  • olive oil, salt and pepper to taste
Instructions
  1. Create your zoodles first, then place in a big bowl, add your beaten eggs, a generous handful of grated cheese, the mozzarella, herbs and cooked vegetables, gently toss and combine everything.
  2. Drizzle some olive oil on the bottom of skillet, saute onion and garlic
  3. Add the zoodle mixture and let the bottom set a bit until you see a golden color.
  4. Finish it off in a 400 degree oven, until cheeses melt and bind everything, convection roast if you have it.
  5. Let it rest before cutting it, I cut my wedges with a pizza cutter.


Signature

Creamy Lemon Kale Salad

creamy lemon kale salad

Sometimes you just want a good hearty salad to eat in the hot summer heat, especially when it’s made with some of your own fresh garden produce, in this case it’s a kale salad.

Yes, we over did it again with the kale, we grew too much this year!

My freezer is now stocked with kale leaves that I can break off and put into soups and stews in the dead of winter, I’ve given some away, made pestos, smoothies, you name it.

For salads, I like to pick the leaves when they’re nice and tender, wash it real good, remove the tough stems and then spin it dry, I then store a bunch in a big zip bag and keep it nice and cold in my fridge, ready to use when ever I want.

creamy lemon kale salad

There’s no real recipe for this salad but the colorful, combo of ingredients I used were;

A mixture of curly and tuscan kale, chopped into bite size pieces, red and orange pepper strips, sliced cucumbers and radishes, olives, red onion, green onion, avocado, feta cheese, cherry tomatoes, toasted sliced almonds and roasted garbanzo beans.

creamy lemon kale salad

For the roasted garbanzo beans, just open up a can, drain well, toss with olive oil, granulated garlic, paprika, oregano, salt and pepper, then onto a rimmed baking sheet in a 400 degree oven, roast until crunchy and crispy, around 30 minutes.

creamy lemon kale salad

The creamy lemon dressing is so easy to make, I’m almost embarrassed to tell you…

Take a few heaping tablespoons of good mayo, add in 1 small garlic clove that has been grated on a micro plane, whisk in some real fresh lemon juice to thin it out and get a nice consistency, add salt and pepper to taste.

Spoon the dressing on top, toss and enjoy, that’s it!

Signature