Spaghetti Squash Egg-in-a Hole

spaghetti squash nest

Spaghetti squash egg in a hole can be an easy and healthy breakfast, brunch, lunch or even dinner. It’s also low carb, gluten free and packed with protein, something we’re all thinking about post holiday celebrations.

flaked spaghetti squash

I love spaghetti squash, I make it quite often it’s so versatile and really fills you up, in a good way. This recipe comes together fast if you roast your squash ahead of time and have your “spaghetti strands” read to go.

Here are a couple of my other favorite ways to use spaghetti squash.

spaghetti squash nests

Then all you do is grab a handful of your spaghetti squash and form it into a circle making a hole in the center.

cheese in nests

Then you’re going to fill that hole with some grated mozzarella so that the egg can sit right in there.

uncooked eggs in squash. nests

Carefully crack your egg into the center and adorn it with some pre-cooked toppings like bacon or some sautéed peppers, you can also use some sliced cherry tomatoes as well.

cooked squash egg in a hole

Bake it until the whites are set and you’ll have a very delicious, satisfying and fun to eat meal!

Enjoy!
5.0 from 1 reviews
Spaghetti Squash Egg-in-a Hole
 
A healthy and protein packed meal using versatile spaghetti squash, that's so delicious and fun to eat.
Author:
Ingredients
  • 1 spaghetti squash , medium to large size. Cut lengthwise with seeds scooped out
  • eggs, depending on how many "nests" you get from your squash, I got 5, one for each
  • No need for precise measuring here.
  • grated mozzarella to fill in the holes
  • grated parmesan
  • olive oil, salt and pepper
  • pre-cooked toppings like half pieces of cooked bacon, or some sautéed colored peppers with additional sliced cherry tomatoes
  • chopped parsley
Instructions
  1. You can roast your spaghetti squash ahead of time if you wish, which I usually do.
  2. Take your squash that has been cut with all the seeds. scooped out, drizzle with olive oil, salt and pepper. Place the squash cut side down on parchment paper and roast in an oven at 360 degrees until a knife goes through with a little resistance. The key is you don't want the squash overcooked, it can become mushy and watery, which you don't want. I like the squash cooked al'dente.
  3. Mine took about 25 minutes, but keep checking it all depends on the size of your squash.
  4. Then let the squash cool down flake the inside all over to get your spaghetti strands.
  5. Place the strands in a bowl and season it with a handful of grated parmesan, salt, pepper and a drizzle of olive oil.
  6. Place another sheet of parchment on a baking sheet, turn your oven up to 425F.
  7. Grab a handful of the spaghetti squash and place it on the parchment forming a circle with a hole in the center. Make sure the edges are high enough to hold in the egg, but the grated mozzarella will help with that as well.
  8. After you have your nests made, sprinkle each center with the grated mozzarella cheese, then place the cracked egg on top.
  9. Arrange the toppings of your choice right on top of the spaghetti nests.
  10. Drizzle the tops with olive oil and sprinkle each with grated parmesan cheese.
  11. Carefully place the sheet pan into the hot 425F oven and bake til the whites are set, around 15 minutes, but keep checking.
  12. Remove from the oven. and garnish with more parmesan and chopped parsley.
  13. Enjoy!


Signature

Italian Style Beef Stuffed Peppers with Cauliflower Rice

stuffed peppers

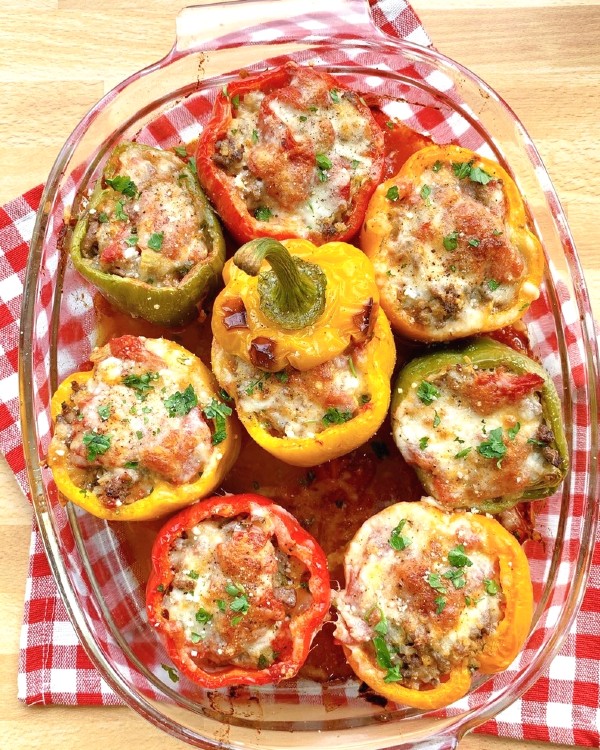
Stuffed peppers will never go out of style, they’re a special kind of comfort food, but not in the sense of the heavy, stick to your ribs kind. These beef stuffed peppers are a whole meal contained in a colorful pepper vessel with Italian flavors throughout each bite.

They can be served for lunch or dinner with a nice green salad on the side to complete the meal.

bell peppers

I often find the colorful, sweet bell peppers on sale and when I do I always grab a bunch.

raw bell peppers

In preparing this dish you can either cut each pepper in half or keep them whole as I did here, it’s amazing how much stuffing you can fit into each one.

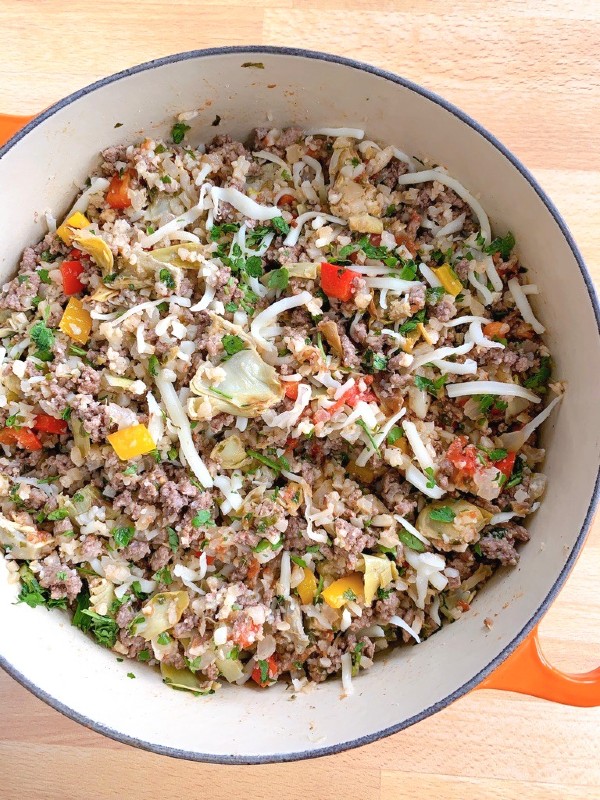
ground beef stuffing

For this recipe I used a good quality, lean ground beef, 90 percent lean, 10 percent fat. In the past I’ve used Italian sausage featured in this post.

That’s what I like about stuffed peppers, they’re so versatile. You can use a favorite meat of your choice or even no meat at all. You can use a variety of different cheese and vegetable combinations as well as beans.

Also you can use cooked rice, white, brown, wild and even quinoa but I’m loving the lightness that riced cauliflower gives to the peppers, so that’s what I chose for this, plus it’s great if you’re watching carbs or on a keto diet.

prepped peppers

Of course my beef stuffed peppers are made with Italian flavors both in and out, they can be prepared ahead of time, which is a good thing and if you happen to have leftovers they’re just as delicious heated up the next day!

cooked peppers

I promise these will be a hit with your family, I stuck some artichoke hearts in mine, if you’re an artichoke lover put them in, if not you can even sub in some mushrooms, that would be delicious as well.

stuffed bell pepper

If someone you know needs a meal cooked for them, something they could easily heat up, this is the one to make and give to them.

cut open pepper

Next time you see those sweet, colorful peppers displayed in the grocery store, grab a few and make this!

Italian Style Beef Stuffed Peppers with Cauliflower Rice
 
Author:
Ingredients
  • 8 colored bell peppers, left whole, tops cut off with seeds and membranes removed inside. Dice up some of the tops to place into the filling as well for added color and taste
  • 1 lb. lean ground beef, 90% lean 10% fat
  • 1 -12oz. bag of frozen cauliflower rice, defrosted
  • 1 -12 oz. bag frozen artichoke hearts, defrosted
  • 1 -28 oz. can of whole San Marzano tomatoes, squished by hand leaving nice size chunks, 1 cup goes into the filling and the rest will be for the bottom of the baking dish, no need to cook it ahead of time
  • 1 onion, chopped
  • 3 large garlic cloves, diced small
  • a handful of both parsley and basil
  • 1 cup of pecorino romano
  • 2 cups of shredded mozzarella, 1½ cups to go inside filling and reserving the ½ to sprinkle on the tops
  • olive oil
Instructions
  1. Heat oven to 375F.
  2. Reserve a cup of the squished tomatoes for the filling and put the rest onto the bottom of a 9x12 baking dish that has been sprayed with olive oil.
  3. Place the 8 raw, cleaned peppers into the baking dish.
  4. Brown the beef in a large skillet until you no longer see pink, then remove and drain on paper towel if need be.
  5. Wipe out the pan and drizzle with olive oil and cook up the cauliflower rice until dry with no liquid in the "rice" doing the same with the artichoke hearts, doing one at a time if need be, set aside to cool.
  6. Quickly saute the onion and garlic and chopped pepper tops as well.
  7. When cool, transfer all the precooked ingredients into a large bowl, the beef, onions, garlic, chopped pepper tops, cauliflower rice and artichoke hearts ( chop the artichoke hearts up before adding).
  8. Now add in your basil, parsley, romano cheeese and a 1- ½ cups of shredded mozzarella and also a cup of the squished san marzano tomatoes.
  9. Gently mix everything together and add salt and pepper to taste.
  10. Fill each raw pepper with the filling, packing it in.
  11. Cover the pan tightly with foil and bake for 35 minutes.
  12. Remove pan and foil, they should be nice and steamy.
  13. Sprinkle remaining shredded mozzarella on each pepper, a little romano and some of the tomato juice from the bottom of the pan and a drizzle of olive oil on each one.
  14. Bake into the oven for another 30 minutes or until the tip of a knife goes easily through the sides.
  15. Enjoy!


Signature

Cauliflower and Sausage Stuffing

cauliflower stuffing

Thanksgiving is only a couple of weeks away so it’s time to start talking and planning the big meal and side dishes. Do you have anyone you might be serving this Thanksgiving who is gluten free, keto or doing low carb, if so this is a great option.

Last year I made this cauliflower and sausage stuffing for a gluten free family member, not only she enjoyed it but everyone that tried it loved it, it definitely satisfies your stuffing desire.

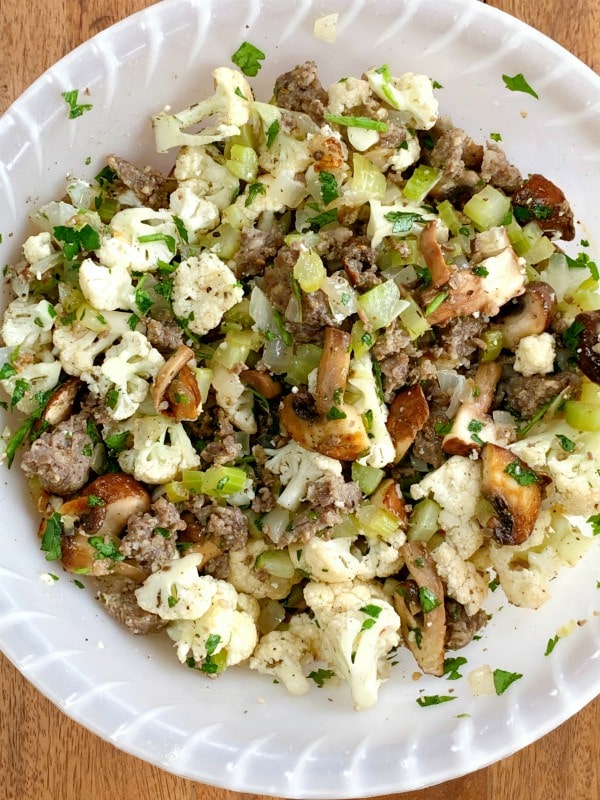
It’s made similar to my traditional stuffing with all the same flavors going on except cauliflower florets replace the bread, but the nice thing is you’ll still get crispy bits along the edges ( my favorite part), with fresh and dried herbs mingled between the sausage and all the veggies.

low carb stuffing

I’ve always added breakfast sausage to our stuffing, preferably one flavored with extra sage, it’s tradition over here, so that’s what I’ve added in this cauliflower stuffing.

Feel free to add your favorite type of sausage or eliminate it all together. I do however suggest that you add in some mushrooms as I did to punch up the flavor and give it more bulk.


gluten free stuffing

There’s a little bit of prep before like browning the sausage and a quick saute of the veggies, but as far as the cauliflower goes you can toss it in raw as long as the florets are in bite size pieces.

Everything then goes into as buttered casserole dish, like a traditional bread stuffing. This can all be prepped a day or two ahead then popped into the oven with the rest of the other sides on the day your serving it.

cauliflower and sausage stuffing

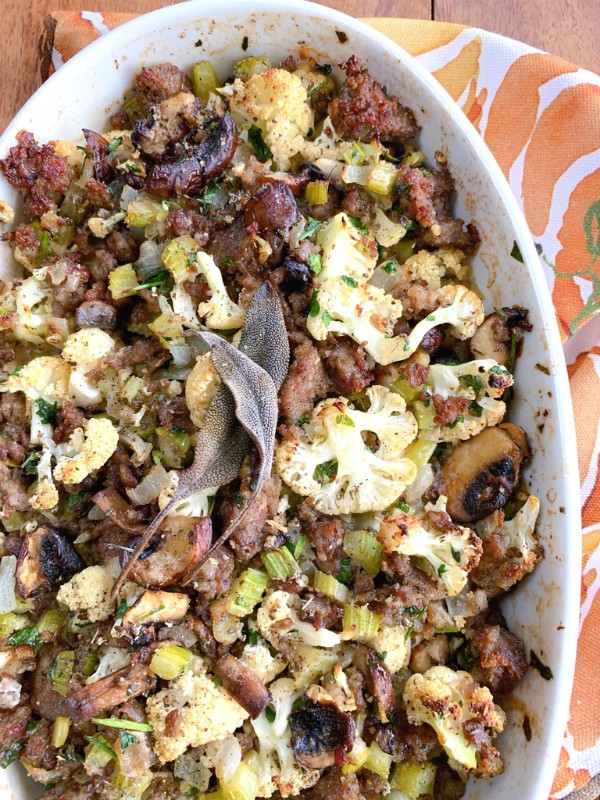
When it comes out it looks like this, crispy and golden. The cauliflower takes on all the traditional flavors of a bread stuffing but without any bread!

A delicious option for all to enjoy!

Cauliflower and Sausage Stuffing
 
A nice option for those who are gluten free and those preferring to eat less carbs.
Author:
Ingredients
  • 1 good size medium cauliflower cut into bite size florets
  • 1 lb. breakfast sausage like Jimmy Dean or Bob Evans, in bulk
  • 1 large onion, diced
  • 4 or 5 celery stalks, diced
  • 8 oz. baby bella mushrooms, sliced
  • 3 garlic cloves, crushed
  • 1 stick of butter
  • ½ to ¾ cup of chicken stock
  • handful of chopped parsley
  • dried sage, thyme, poultry seasoning (optional) salt and pepper to taste
  • Fresh sage leaves for garnish
Instructions
  1. Butter the inside of the casserole role dish you'll be using
  2. In a large skillet place remaining butter until it melts then saute the onions, garlic and celery until soft, then add the sliced mushrooms for a couple of minutes.
  3. Place all the sautéed veggies into a large bowl.
  4. Next brown up the sausage in the pan, breaking it up with a wooden spoon and cooking it until you see no pink.
  5. Drain the sausage on paper towels then toss it into the bowl with the sautéed veggies.
  6. Fold into the bowl the bite size cauliflower, raw. If you think its to big you can toss it into the skillet for a couple of minutes to take the rawness away.
  7. Add in the chopped parsley.
  8. Add in the spices, dried sage and thyme and poultry seasoning if using into the mix. Start with 1 teaspoon each and then taste for your preference, adding more if you like plus the salt and pepper.
  9. Place everything into the buttered casserole dish, then distribute the broth all around.
  10. Top with a few fresh sage leaves for garnish.
  11. At this point it's all prepped and you can refrigerate it 1 to 2 days ahead.
  12. When you’re ready to serve, heat oven to 400 degrees.
  13. lightly foil the dish for 15 minutes then remove the foil and continue roasting until cauliflower is tender, golden, the sausage edges have crispy bits.
  14. Ovens do vary so keep checking every 15 minutes or so, you can also stick it under the broiler for a few minutes at the end to get desired golden look if needed.


Signature

Reuben Wraps

reuben wraps

If you wind up having leftover corned beef from your St. Patricks Day dinner here’s a fun way to repurpose some of the extra you might have, make reuben wraps!

These delicious reuben wraps have all the flavors of a hearty reuben sandwich, corned beef, Swiss cheese, sauerkraut, Russian dressing for dipping and cabbage leaves to wrap it all up in.

This is perfect to serve for lunch or light dinner, which is what I did.

reuben ingredients

All you need to do is get a pot of water boiling together then dip your cabbage leaves in there for just 30 seconds, remove with tongs and lay them on a kitchen towel to dry off. I bought a bag of sauerkraut and a bottle of Russian dressing, you could make your own dressing if you prefer.

reuben wrap

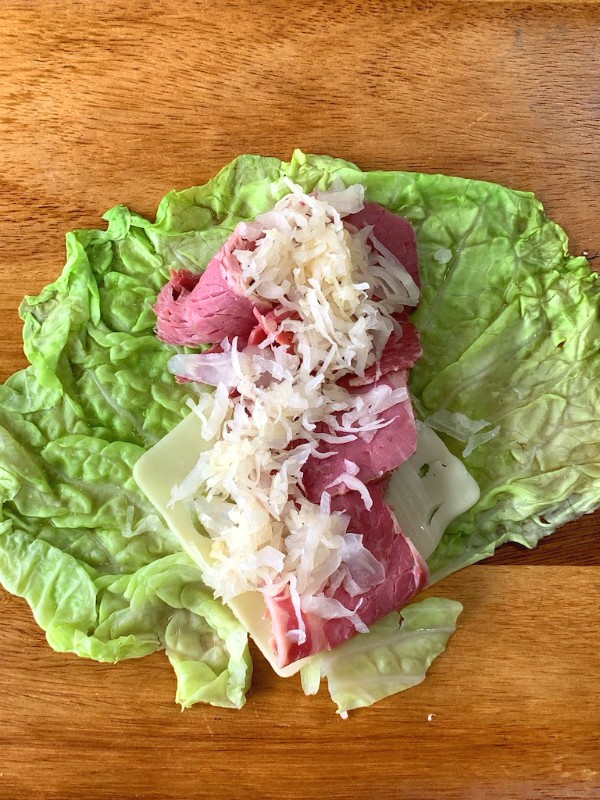
Then it’s like layering a burrito, first the cabbage leaf, then the Swiss cheese, one or two slices, a few slices of the corned beef and then top it with a sprinkling of sauerkraut.

reuben wrap

Then just roll it up burrito style, how easy is that!

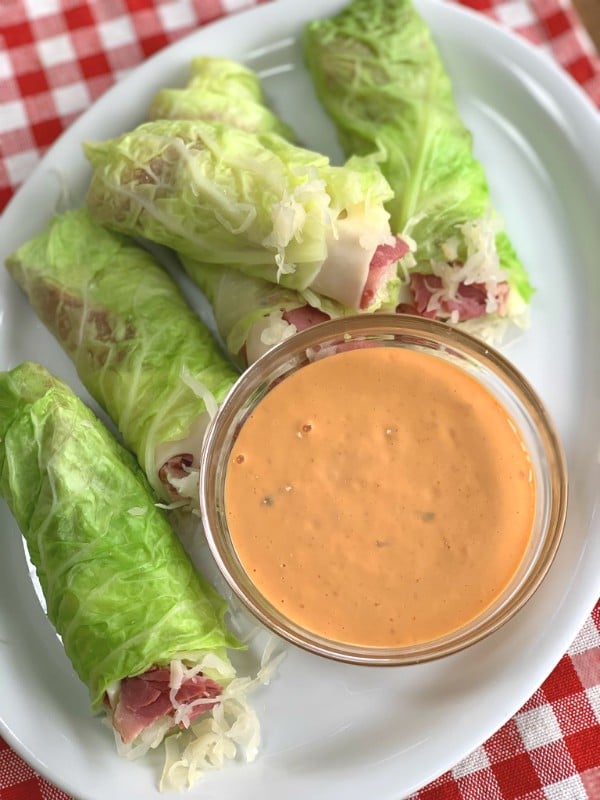
reuben wraps

Grab a wrap and then use the Russian dressing for dipping, so delish! Which reminds me, this recipe comes courtesy of delish, I saw this on one of their quick video’s and couldn’t wait to make it, these reuben wraps did not disappoint!

reuben wraps

This may not be “traditional” but I promise you that you won’t miss out on a bit of flavor, and besides they’re fun to eat!

Follow prouditaliancook on Instagram to see what else I’m cooking up during the week!

Signature

Noodle-less Loaf Pan Butternut Squash Lasagna

noodle-less butternut squash lasagna

Butternut Squash is hands down my favorite winter squash, come fall I can’t get enough of it and you’ll always see one or two sitting on my kitchen counter. Butternut squash is so versatile, you can put it in just about everything and believe me I have!

If you look through my blog you’ll see different ways that I’ve used it over the years, and one of the ways is in a lasagna. Butternut squash has a slightly sweet, buttery nutty flavor and it goes wonderful with creamy ricotta and a béchamel sauce, it’s so decadent and delicious. 
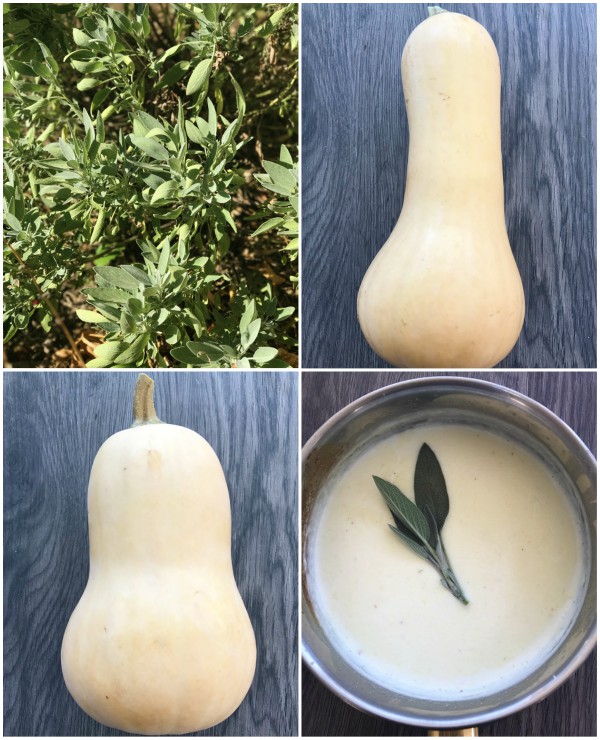
butternut squash

This is the time of year when my garden is full of sage and butternut squash and sage make a perfect pairing together, I especially love to infuse my béchamel sauce with garlic and sage, it’s dreamy.loaf pan lasagna

If you search my archives you’ll see that I once made individual butternut squash lasagna’s minus the noodles in a free form manner.  For this time I wanted to try making it in a loaf pan which allowed me to get many layers and some nice height, and this version is minus the noodles as well. The loaf pan holds everything nicely together and gives the lasagna a little more structure since the pasta is not there to give it more body.

I lined my loaf pan with parchment, (which is optional) because honestly I wanted to un-mold it and take a nice photo to show you, but you have to really cool it down to be able to remove the parchment without destroying your lasagna, so I would suggest make it the day before or early in the morning if you want to do the same, chilling it for an easy removal, then just warm it and serve it with warm béchamel, otherwise make it without the parchment.

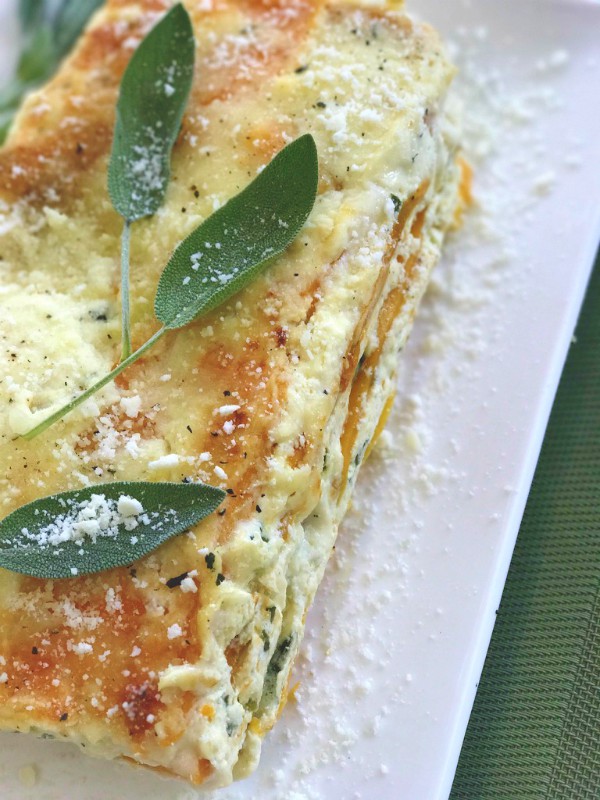
noodle-less butternut squash lasagna

Either way it’s magical and tastes like a dream and trust me you won’t miss the pasta at all, in fact I prefer it without because all the flavors are true and not soaked up by the pasta.noodle-less butternut squash lasagna

The loaf pan makes you able to create multiple layers of goodness,  just remember to let it set before cutting into it so all the creaminess can tighten up a bit, just like a traditional lasagna it’s a mess if you cut into it hot, the layers get lost.noodle-less butternut squash lasagna

I hope you try my noodle-less, loaf pan butternut squash lasagna, I promise you won’t miss the pasta one bit!

Follow along with me on Instagram to see what else I’m making during the week.

5.0 from 1 reviews
Noodle-less Loaf Pan Butternut Squash Lasagna
 
Author:
Ingredients
  • 1 loaf pan, buttered, lined with parchment which is an optional step for removal of whole loaf
  • NOTE; If you don't want to remove whole lasagna out of the pan, omit parchment.
  • 2 butternut squash, peeled and sliced lengthwise (as much as possible, then into lengthwise pieces) roasted at 375 on a rimmed baking sheet at 375 until softened up a bit but still al'dente
  • 3 cups, ricotta cheese
  • ½ cup grated pecorino cheese, plus extra for garnish
  • 1½ cups fresh baby spinach, chopped
  • 1 cup shredded mozzarella
  • 1 egg
  • salt and pepper to taste
  • BECHAMEL SAUCE
  • 2 cups, whole milk
  • 4 tablespoons, flour
  • 4 tablespoons, butter
  • sprig of sage, plus extra for garnish
  • 1 garlic clove, smashed
  • salt and pepper to taste
Instructions
  1. Roast sliced squash a head of time so it can cool down. Set aside.
  2. Mix up the ricotta mixture with the chopped spinach, egg, grated cheese's, both pecorino and mozzarella, salt and pepper. Set aside.
  3. TO MAKE THE BECHAMEL SAUCE;
  4. In a saucepan, melt butter, add garlic then whisk in flour until it incorporates and turns golden, not dark brown.
  5. Pour in a few tablespoons of the milk, whisking until moistened.
  6. Add the remaining milk whisking vigorously until it starts to thicken and right before it starts to bubble on the sides, take it off the heat.
  7. Now the layering process begins, add a couple of tablespoons of bechamel to the bottom of pan, then a layer of squash, enough to fit all the edges and middle of the pan. Spread ricotta layer on top, smooth with the back of a spoon or an off set spatula, add two more tablespoons of sauce and repeat layers until you reach the top of the loaf pan, reserving the prettiest looking pieces of squash for the very top.
  8. Spread the top with bechamel and sprinkle with pecorino and top with some sage leaves before baking.
  9. Bake 350- 375 uncovered until cheese is melted and heated through, and golden on top, ovens vary with time, check after 30 minutes.
  10. Let it set up before cutting, mine set for 2 hours.
  11. You should have extra sauce to serve with it, if you want more bechamel just double the recipe.
  12. Enjoy!


Signature

Zucchini Noodle Pasta with Roasted Tomatoes and Burrata

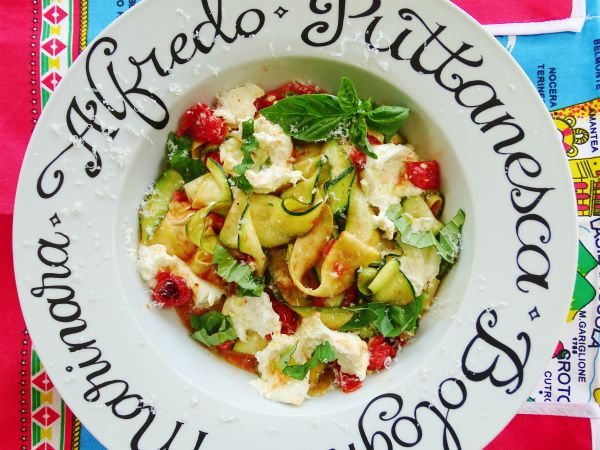
zucchini noodle pasta Zucchini noodle “pasta” may be light on the carbs but certainly not light on taste, add in some garlicky roasted tomatoes, fresh basil and dreamy burrata cheese and it’s a flavor explosion!

zucchini pasta ingredients Fresh zucchini ribbons shaped like wide pappardelle pasta get tossed into hot roasted tomatoes with all that precious juice, no need to cook or soften the zucchini beforehand because it wilts down to the perfect al’dente bite from the warm tomatoes.

It’s a fun summer meal, easy to make plus it’s fresh and light.

zucchini noodle pasta Can we just talk about Burrata cheese for a minute, if you’re not familiar with it, it’s an Italian cheese, a beautiful knotted ball of fresh mozzarella on the outside with a surprise on the inside when you tear it open. Inside you’ll find it stuffed with milky, creamy mozzarella curds, it’s so dreamy and everything you use it for will surely elevate your dish.

Tomatoes, burrata and pasta of any kind are a match made in heaven.

zucchini noodle pasta

Gently rip it open and let all that creaminess mingle with the fresh basil and ribbons of zucchini, you might be making it all summer long.

Follow along with me on Instagram where you can see what I’m cooking up daily.

Zucchini Noodle Pasta with Roasted Tomatoes and Burrata
 
I usually roast a whole quarter sheet pan of tomatoes, two or three pints, if you have extra that's fine.
Author:
Ingredients
  • 3 or 4 medium zucchini
  • 3 pints of cherry tomatoes
  • 3 cloves garlic, shaved thin
  • 3 - 2 oz. balls of burrata cheese or 6 oz.
  • a large handful of fresh basil, chopped
  • ⅓ cup or so of EVOO
  • grated parmesan
  • salt and pepper
Instructions
  1. Preheat oven to 400F.
  2. Line a quarter sheet pan with foil, add the oil, tomatoes, shaved garlic, half of the basil, salt and pepper.
  3. Roast tomatoes until they burst open and juices mingle with the oil and garlic.
  4. While tomatoes are roasting, trim the top and bottom off of the zucchini and with a vegetable peeler make your ribbons, when you get to the seeds turn the zucchini, keep turning and peeling until you go all around the zucchini leaving the seeded center in tact. ( save it for an omelette).
  5. Place your raw zucchini ribbons right into your serving bowl and when the tomatoes are finished roasting pour them right over, juice and all and gently toss.
  6. Take your burrata and tear it open all over the top so all the flavors can mingle together.
  7. Garnish with the remaining chopped basil and freshly grated parmesan cheese.
  8. Eat immediately


Signature

Cauliflower Rice Pilaf

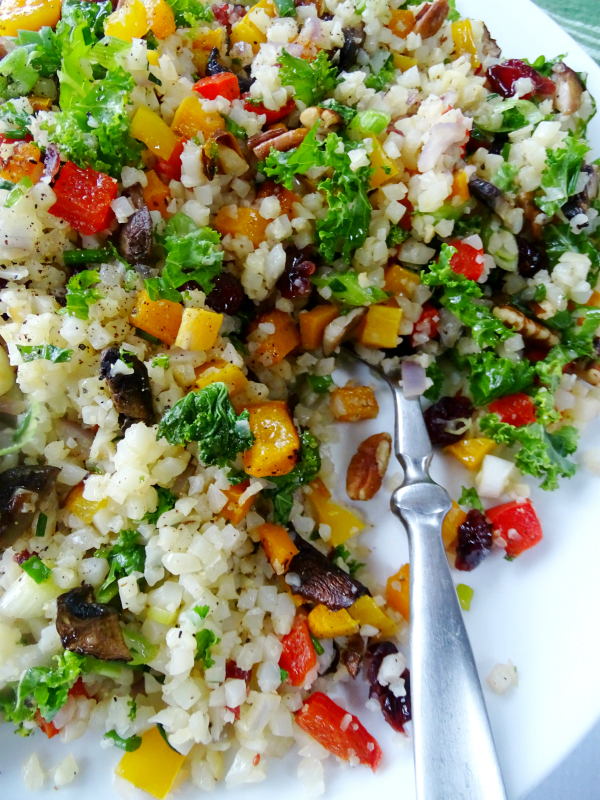
cauliflower rice pilaf Who ever came up with the idea of ricing cauliflower was brilliant! It’s so versatile and healthy and if you’re trying to stay away from carbs it’s a nice substitute. Can I be honest, I like this recipe for cauliflower rice pilaf better than the real deal which you won’t even miss, plus you’ll feel really good about eating it.

riced cauliflower Let’s talk about cauliflower rice. In the past when it first became popular I made my own with a large head of fresh cauliflower that I riced in my own food processor, but it was a production, I made a mess and usually had cauliflower all over. Now it seems that you can find it riced and ready to go almost everywhere either fresh or frozen and that makes me very happy.

Can I just tell you in all honesty, I prefer the frozen over the fresh. I love the convenience of having it stashed away in my freezer to use whenever I feel like it, it won’t spoil and the taste and texture is the same. My favorite brand is the one shown above it’s delicious, and I love the consistency in the size of the “rice”.

cauliflower rice pilaf This cauliflower rice pilaf is a wonderful side dish to have along with fish, chicken or meats. It’s even great for lunch all week just on it’s own and you don’t even need to heat it up, I’ve eaten it straight out of the fridge like a salad. A bowl of this pilaf is very satisfying.

cauliflower rice pilaf

You can combine any veggies you like, but for me I found this combo to be excellent. Along with the cauliflower rice it has mushrooms, butternut squash, curly kale, red and yellow pepper, red onion, garlic, green onions, cranberries and some salty pecans.

I tried to give you approximate amounts so you could get some idea but I always go over, in my opinion the more veggies the better, so don’t be skimpy, enjoy, it’s all good!

Follow me on Instagram to see what else I’m cooking up during the week.

5.0 from 3 reviews
Cauliflower Rice Pilaf
 
Author:
Ingredients
  • 12 oz. of fresh or frozen cauliflower rice ( I prefer frozen for convenience)
  • 1 small pack of cremini mushrooms, sliced
  • 1 small red pepper and yellow pepper, small dice
  • 1 small butternut squash, peeled and diced small (you'll have extra)
  • 4 thin green onions or 2 larger, cut in small slices
  • 1 packed cup of curly kale, cut into thin strips
  • ¼ cup of red onion, diced small
  • a handful of dried cranberries
  • a handful of salted pecans ( you could use unsalted but I prefer the salted)
  • 1 large clove, garlic grated on a micro-plane or diced very finely
  • a handful of chopped fresh parsley
  • salt and pepper to taste
Instructions
  1. In two separate pans roast the sliced mushrooms and the small diced butternut squash, both drizzled with a little olive oil, salt and pepper and roasted at 425 until moisture leaves the mushrooms and the squash gets lightly golden. Set aside and let them cool.
  2. In a large saute pan add the garlic clove, red onion,the kale and both peppers and saute in olive oil for just a couple of seconds to soften slightly, basically until the garlic turns golden, then scoop out and set aside so it can cool down.
  3. Add the cauliflower rice into the large saute pan with more olive oil, season with salt and pepper and cook it until it's tender, do not overcook it! If it's frozen it just takes a few minutes. Let it cool down.
  4. Into a bowl add the cooked cauliflower rice, garlic, red onion, peppers and kale, mix well.
  5. Dump in the cooked mushrooms and also the butternut squash (you probably won't use it all).
  6. Toss into the bowl your green onions, parsley, cranberries and pecans, incorporating everything, mixing well adding more or less according to your liking.
  7. Taste for salt and pepper and drizzling more olive oil if necessary.


Signature

Veggie Ricotta Pie with Spaghetti Squash Crust

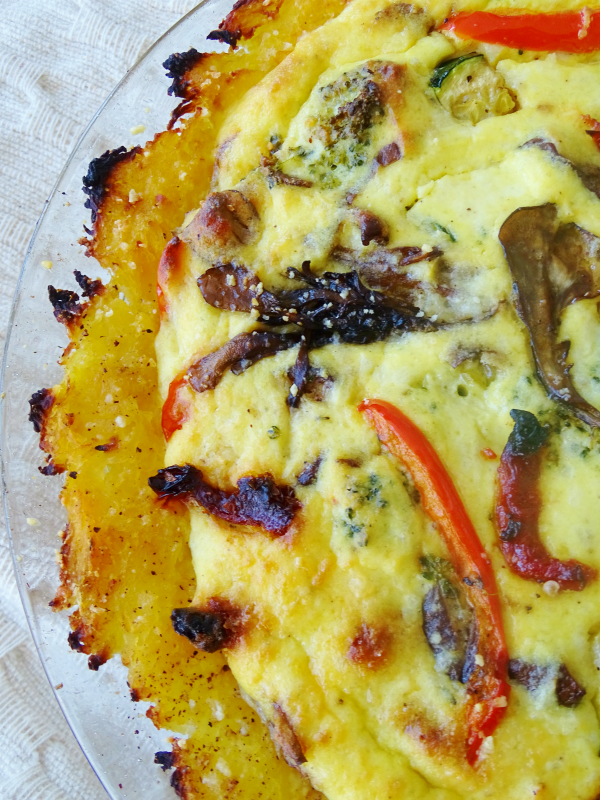
spaghetti squash crusted tart

Yes, you read that right, spaghetti squash crust, now who would have thought? It works like a charm and it’s a great alternative to a flour crust for a quiche, tart, or in this case a savory ricotta pie.

This is such a nice, healthy vegetarian dinner, especially if you’re still working on your New Years resolution to eating better in 2016, but even if your not it doesn’t matter, this is still a delicious meal you can serve up  at anytime.

spaghetti squash crusted tart

Basically you cook your spaghetti squash, let it cool, then scrape out the strands with a fork. You can season your squash as you wish, I tossed in a little thyme, salt and pepper then pressed it into my greased pie plate with a sprinkling of grated romano cheese on top for added flavor.

spaghetti squash crusted tart

Spread your filling all over the top of the crust, this has ricotta, herbs and a variety of veggies I had leftover in my fridge. I folded some zucchini, red pepper, wild mushrooms, broccoli and a few sundried tomatoes into the ricotta, it’s that simple!

spaghetti squash crusted tart

Let it cool down a bit then slice into wedges and serve with a nice green salad on the side and you’ll have a completely satisfying, healthy and delicious dinner for all.

5.0 from 3 reviews
Veggie Ricotta Pie with Spaghetti Squash Crust
 
Author:
Ingredients
  • 1 medium spaghetti squash
  • 2 cups of well drained ricotta
  • 1 garlic clove
  • fresh herbs
  • ¼ cup grated romano cheese, additional for sprinkling
  • ¼ to ½ cup of grated asiago cheese
  • 3 beaten eggs
  • assorted sauted veggies
  • salt and pepper to taste
Instructions
  1. Cut your squash in half, scoop out the seeds, drizzle each side with olive oil, salt and pepper. Place cut side down on foil lined baking sheet and roast til tender and slightly firm in a 375 degree oven, do not over cook it, it will have too much moisture, don't forget it's still going to bake in the oven again.
  2. After the squash cools down pull the strands out with a fork and season with fresh herbs of your choice.
  3. Press squash on the bottom and up the sides of a greased 9 inch pie plate, sprinkle with romano then set aside. while you make your filling.
  4. As far as veggies go, use what you have or your favorites. In my case I used a handful of mushrooms, red pepper strips, 1 zucchini, a handful of cooked broccoli florets and a couple of sundried tomatoes in oil.
  5. I sauteed the zucchini and pepper strips before I added them, the other veggies I used were precooked already.
  6. In a bowl add the ricotta, garlic, fresh herbs salt and pepper and cheeses, taste for seasoning.
  7. Beat the eggs by hand then pour into the ricotta mixture mixing until all incorporated, then fold in all your veggies.
  8. Pour the filling on top of your spaghetti squash crust and bake at 400 degrees until tip of knife comes out clean in the center, mine took about 40 minutes or so, but keep checking, everyone's oven is different.
  9. Let it cool down before cutting into wedges.


Signature

Zoodle Pasta Pie

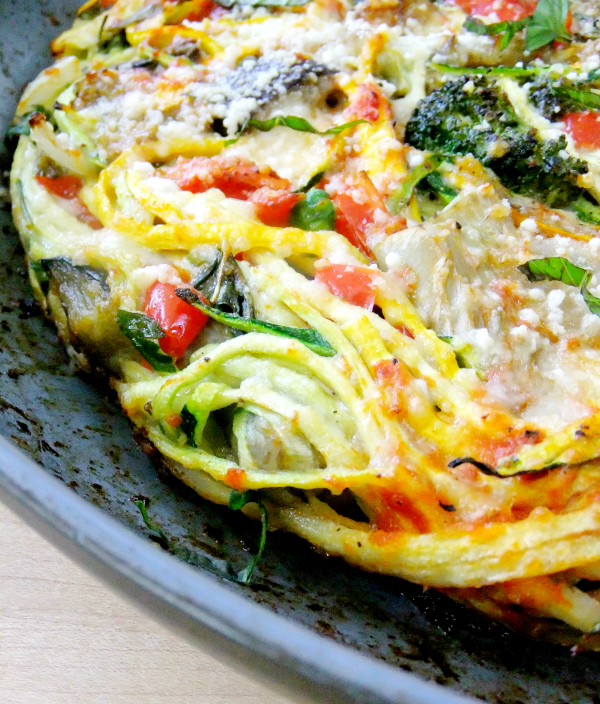
zoodle pasta pie

There’s not one strand of real spaghetti in this pie, it’s all made with zoodles, zucchini noodles, which are still all the rage, have you tried them yet?

Leftover veggies, strands of zucchini pasta, a couple of eggs, herbs and cheese form this savory pie, cut it into wedges, serve it alongside a salad and it becomes a satisfying and healthy meal!

pizza pasta pie

Just for comparison I wanted to show you my Pasta Pizza Pie,  in the photo above it’s made with real spaghetti strands and leftover veggies, each of these dishes are made similar, except this time I just switched out the pasta for zoodles.

zucchini zoodles

Zucchini season is peaking right now and this is just another fun way you can use some of it.

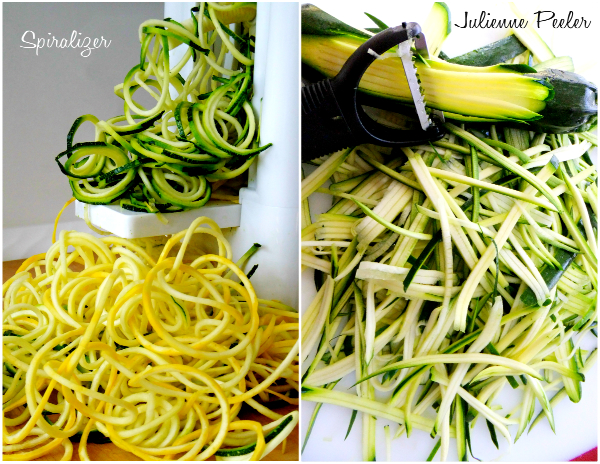
zoodle gadgets

One of the ways that you can make zoodles is with a spiralizer, I love using  it because it makes continual strands that are nice and curly, this is the one I use, but sometimes I just don’t feel like taking out a big gadget and then having to clean it, so I’ll use my julienne peeler instead.

The strands aren’t as long and you don’t get that continuous curl, but when wilted down a bit you can’t tell much difference, check out this older post of mine, titled Faux Spaghetti, and see what I’m talking about..

zoodle pasta pie ingredients

Just use whatever veggies and herbs you might have on hand, you don’t need much, I used an eggplant, some mini red pepper rings, artichoke hearts, peas, broccoli tops and onion, again it was just small amounts.

zoodle pasta pie

The cheese will bind it all together and form the perfect zoodle pasta pie!

Follow me on Instagram!

zoodle pasta pie

Zoodle Pasta Pie
 
This is a take on a pasta pizza pie I made by just replacing the pasta with zucchini noodles or "zoodles" it's healthy, low carb and gluten free and it tastes amazing!
Author:
Ingredients
  • I used a 12" oven proof skillet
  • 4 or 5 zucchini, or a mixture of yellow squash and zucchini, turned into zoodles
  • leftover veggies of your choice, diced medium and pre-cooked or roasted
  • fresh basil and parsley
  • 2 beaten eggs
  • 2 small garlic cloves, minced
  • ½ small onion
  • parmesan or romano cheese, grated
  • 1 cup, mozzarella cheese, shredded
  • olive oil, salt and pepper to taste
Instructions
  1. Create your zoodles first, then place in a big bowl, add your beaten eggs, a generous handful of grated cheese, the mozzarella, herbs and cooked vegetables, gently toss and combine everything.
  2. Drizzle some olive oil on the bottom of skillet, saute onion and garlic
  3. Add the zoodle mixture and let the bottom set a bit until you see a golden color.
  4. Finish it off in a 400 degree oven, until cheeses melt and bind everything, convection roast if you have it.
  5. Let it rest before cutting it, I cut my wedges with a pizza cutter.


Signature

Zucchini Noodles with Slow-Roasted Cherry Tomatoes and Cream

zucchini noodles with tomatoes and cream Zucchini noodles have been all the rage for quite a while now, I’ve even made them my self and posted it here on my blog. In the past I’ve used my handy julienne slicer to create my “pasta” noodles but recently I bought a Spiralizer to see what all the hype was about.

I’m really not a person who has lots of big gadgets, quite frankly I don’t like cleaning all the different parts, but I’m going to make an exception with this one, I loved it!

What I like about it is that you get long continuous noodles that really look like pasta, it’s super healthy and light, a pasta alternative when you want one, it’s low carb, gluten free and you can create a million different recipes with it just like you can with regular pasta, and just like I did with this dreamy sauce, more on that below!

So far I’ve only tried it with zucchini and yellow squash but it’s also good with potatoes, butternut squash, onions, carrots, cucumbers, the list goes on and on and it comes with three different blades.

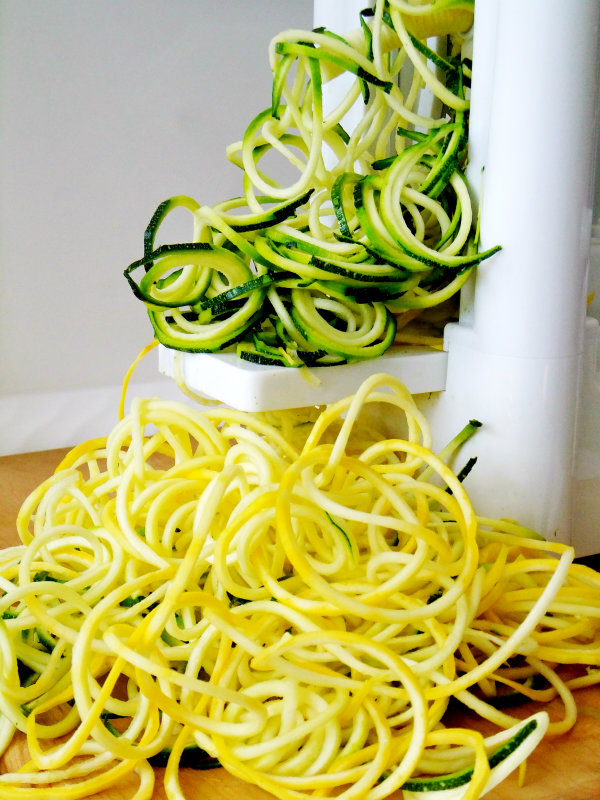
zucchini noodles I was surprised how easy it was to use, just cut the tip and bottom off your zucchini, then slice it right in half and attach the big hunk to the slicer, now turn the handle and watch your noodles appear.  I couldn’t stop, I was out of control I used five zucchini and two yellow squash, I had a ton when I was done and it all came out perfectly, nice and curly and long.

zucchini noodleszucchini noodlesspiral vegetable slicer The feature I really love about this is that it actually cores your squash, see the picture above, all the seeds are contained which makes for a nice dry “pasta” and you know how wet zucchini can be. In fact I had so much leftover that I put it into zip bags and two days later the “pasta” was still dry, no moisture at all in the bag which is so typical of cut zucchini, that was a big plus for me!

slow roasted cherry tomatoes Now for that dreamy sauce I paired it with, it came straight out of this book, by Domenica Marchetti. I’m always roasting cherry tomatoes, I’ve done it a zillion times, but never have I placed them into heavy cream and parmesan afterwards. Brilliant!

slow roasted cherry tomatoes and cream

Wow!  I knew I would love this recipe the minute I saw it in her book, it’s decadent and oh so flavorful and actually a little goes a long way. But what’s not to love about slow roasted tomatoes, cream, parmesan, basil and thyme, it’s a match made in heaven!

zucchini noodles with tomatoes and cream And you might not feel as guilty spooning it over healthy zucchini pasta noodles, I didn’t!

Zucchini Noodles with Slow-Roasted Cherry Tomatoes and Cream
 
Ingredients
  • 3 zucchini
  • 1 yellow squash made into zucchini noodles by using either a Spiralizer or a julienne slicer.
  • For the Slow Roasted Cherry Tomatoes and Cream Sauce, adapted from Domenica Marchetti's, (The Glorious Vegetables of Italy)
  • I used a mixture of both yellow and red cherry tomatoes for added color
  • 1 pint of yellow cherry tomatoes, cut in half
  • 1 pint of red cherry tomatoes, cut in half
  • 2 tablespoons unsalted butter
  • 1 shallot, minced
  • 2 or 3 fresh thyme sprigs
  • small handful, chopped fresh basil
  • ¾ cup heavy cream
  • ¾ cup of freshly grated Parmigiano Reggiano cheese
  • olive oil
  • salt and pepper to taste
Instructions
  1. Arrange the cherry tomatoes cut side up on a rimmed baking sheet. Drizzle all over with olive oil, salt and pepper. Roast at 275 degrees F for 1½ hours until puckered but still juicy.
  2. Heat the butter in a saute pan over medium low heat, when the butter is melted and starts to foam add the shallot, cook until softened.
  3. Scrape in the tomatoes and any juices that collected on the baking sheet.Add the thyme sprigs and pour in the cream, I added half of the cheese by sprinkling it around the tomatoes and into the cream.
  4. Heat gently on low until it simmers. Turn off the heat and stir in basil.
  5. In a larger saute pan, drizzle with oilve oil and place your zucchini noodles on top, gently cooking and carefully tossing until just slightly wilted and still al dente, just a few minutes.
  6. Place zucchini noodles onto a serving platter and spoon the sauce right over the top, adding more parmesan cheese.


Signature

Faux Spaghetti

If you’re going easy on the carbs right now but have a craving for spaghetti, I have the perfect solution for you!
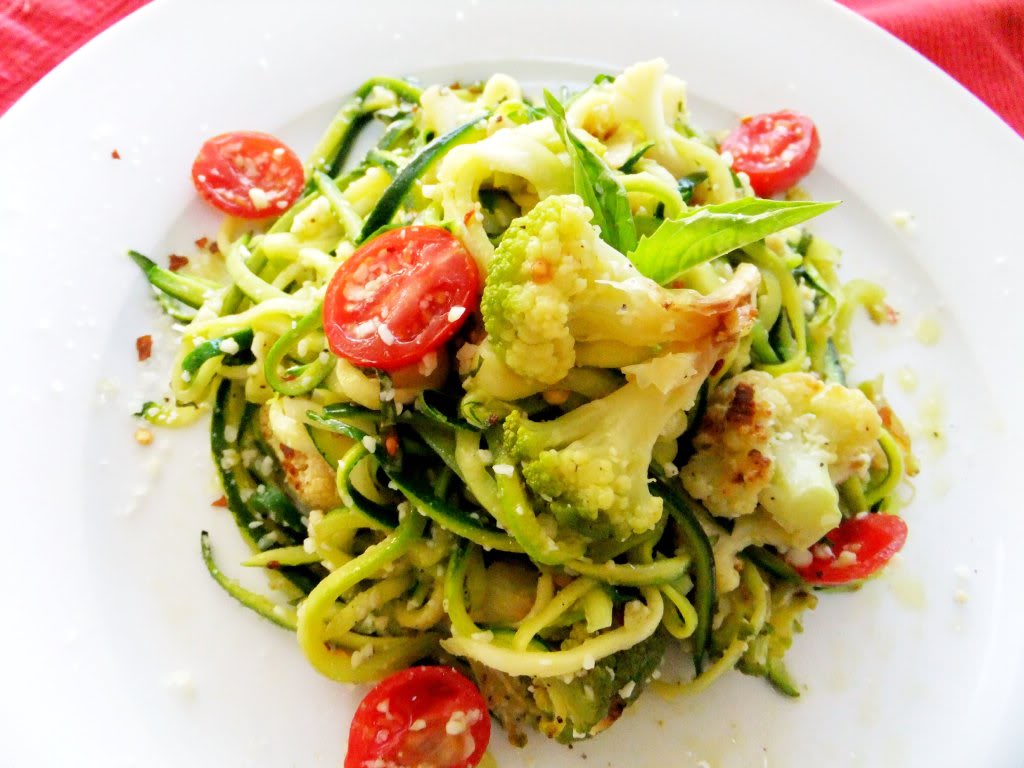
 Al’ dente strands of julienned zucchini tossed with roasted veggies of your choice flavored with shaved garlic, olive oil, basil, red pepper flakes and generous amounts of grated romano cheese.

You’ll love the flavor and texture and even if you’re not watching your carbs it can be the perfect meatless meal along with a salad.

I love my handy julienne slicer it works so fast, before you know it you’ll have a pile of zucchini “pasta” right before your eyes, just work the sides and when you reach the seeds, give it a turn.
 The core of the zucchini will be left which I then dice and roast up for future use.
I roasted two different color cauliflower for mine and added some cherry tomatoes, next time I’ll roast those too, I forgot, but it didn’t matter, it was so yummy anyway!
Here’s what you do:

First, roast off the veggies of your choice in a 425 degree oven tossed with olive oil, salt and pepper, then set aside.
Have your zucchini “pasta” all ready to go then heat up a large saute pan drizzled with olive oil, add shaved garlic and red pepper flakes, saute until garlic is light golden. Next, add zucchini and cook for only about 2 minutes tossing with some tongs just until wilted and still al’ dente. Remove pan from heat, add the roasted veggies, fresh basil, lots of grated romano cheese and of course another drizzle of olive oil!

Signature

Vegetable Egg in a Hole

Traditional Egg in the Hole is made by cutting a hole in the middle of some bread then cracking an egg inside the hole and then simply frying it all together. Do you remember the famous breakfast scene in Moonstruck between Olivia Dukakis and Cher? I once did a post on the famous “Moonstruck Eggs”.

Well this is the low carb veggie version. I love how acorn squash looks when you slice it into rings a perfect ready made hole for your egg! Don’t bother to peel it, just carefully slice the squash into rings, take out the seeds, toss in olive oil, salt and pepper and roast in an oven at 400F for about 20 minutes, you can do this all the day before.

egg in vegetableegg in vegetable When you’re ready to cook it drizzle some olive oil in the bottom of your pan, place the squash rings inside then gently crack your egg in the middle. Cook on low heat partially covered then snip fresh rosemary on top along with freshly grated parmesan cheese, it’s a perfect flavor combination with the squash and a beautiful presentation for a special breakfast, and it’s so easy to do! Don’t worry about the peel it slips right off.
Also you can be creative and add in some pretty spinach leaves to give it some color and added deliciousness, I think you will love this!

Another great vegetable that works well is peppers of all different colors, here I used red peppers which I sliced into rings then sauteed in olive oil until tender right in the pan it only takes a few minutes, then finish cooking the egg as I did above, this was garnished with a dry Tuscan style herb mix that I have.

Everything stays contained in it’s own neat little package, and again such great flavor combinations going on here, sweet red pepper, creamy egg, olive oil and herbs!

Here’s more of a free form method I do when I have leftover veggies, put them in a pan, make a hole in the center and crack an egg right in the middle,just be careful when you slide it on to your plate you might want to add some cheese to the veggies so they stay together or better yet use individual casserole dishes so everything is contained.
Acorn squash and red peppers are everywhere right now so pick some up and give this a try I think you’re going to love it!
Have a great weekend, and Buon Appetito!
Signature