Summer Tomato and Corn Tart

summer tomato and corn tart

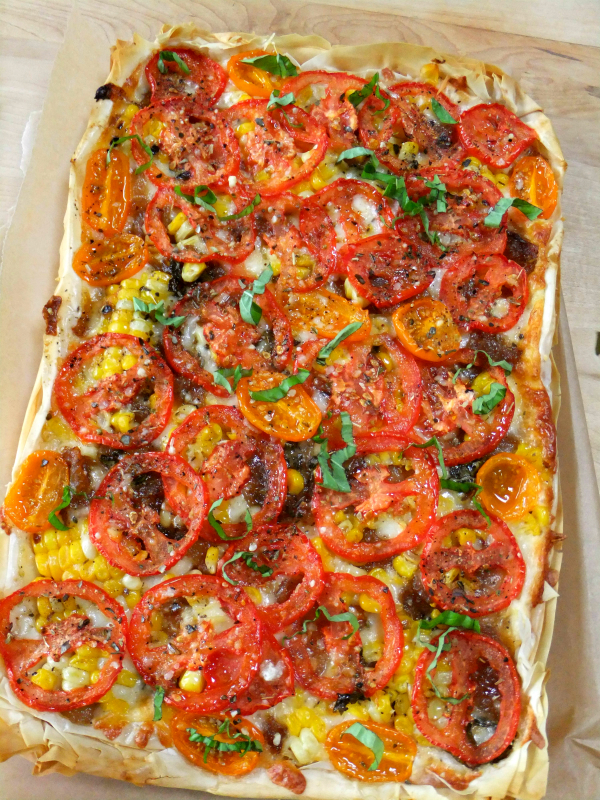
Tomato season is finally here, and nothing compares to the taste of a summertime vine ripened tomato! We have such a short season here in Chicago and I look forward to making this tart each year when the tomatoes are at their peak!

summer tomato and corn tart

The base of this tart is made with phyllo dough, I like using a phyllo crust because it’s light, flaky and gives you a nice crunch with every bite, it’s also very easy to work with because it’s so forgiving, you could put a ripped piece down and no one would know the difference. I always have a box handy in my freezer, just follow the directions for defrosting before you want to use it.

Like I said, I prefer using phyllo dough for this tart, it seems to even lighten it up a bit, but in the past I’ve even used a pie crust and it was just as good, so feel free to use whatever kind of crust you like.

tomato and corn tart ingredients

Because really, it’s all about the other delicious ingredients. Along with some juicy ripe tomatoes I added caramelized onions, shredded mozzarella, fresh basil and planks of corn.

summer tomato and corn tart

This is the perfect summertime meal, add a green salad and you’re all set!

summer tomato and corn tart

I’ve made this twice already and intend to make it a few more times this summer, I hope you give it a try!

You can follow me now on Instagram for more cooking in my kitchen!

5.0 from 1 reviews
Summer Tomato and Corn Tart
 
Make this delicious tart when tomatoes and fresh corn are at their peak in the summer
Author:
Ingredients
  • tart pan with removable bottom, sprayed or brushed with olive oil, I used a 7 x 11, but you can use any size, just adjust the ingredients accordingly
  • 6 layers of phyllo dough adjusted to fit in the tart pan
  • 3 sweet onions, sliced, cooked down to a nice carmelization
  • tomatoes, sliced thin, preferably done on a mandoline, enough so you can overlap each piece, you can also use some cherry tomatoes cut in half to place in between the sliced tomatoes
  • shredded mozzarella,not the wet kind, enough to cover the bottom of the tart pan you use
  • 2 or 3 ears of steamed or grilled fresh corn, cooled and cut into planks
  • olive oil
  • dried oregano
  • fresh basil
  • grated romano or parmesan cheese
Instructions
  1. Prep all the ingredients first, cook down the sliced onions in a skillet drizzled in olive oil, low and slow until a deep caramelization happens, could take around 30- 40 minutes. Set aside.
  2. Have your tomatoes thinly sliced.
  3. Have your corn cut into planks and set aside.
  4. Have your mozzarella shredded and ready to go.
  5. When every thing is prepped, open up the box of phyllo and start to layer tart pan using one sheet at a time, spraying or brushing each layer all over with olive oil making sure to fit it into the pan placing the phyllo up the sides as well.
  6. When the 6 layers are complete, spread shredded mozzarella all over the bottom covering completely, sprinkle with grated romano or parmesan and some chopped fresh basil all around.
  7. Take a fork and place the caramelized onions all over the shredded mozzarella, you will probably have some extra.
  8. Place the corn planks all around.
  9. Top with the sliced tomatoes, overlapping each to cover the whole tart, you can also add some sliced cherry tomatoes if you desire.
  10. Drizzle the whole thing with olive oil and sprinkle dried oregano all over as well, plus salt and pepper.
  11. Place tart in a pre-heated 400 degree oven for around 30 minutes or until phyllo is nicely golden brown and you can see the mozzarella all melted down.
  12. Let it rest before removing the bottom and cutting, I use a pizza cutter to cut through the phyllo.
  13. Garnish with more fresh basil.


Signature

Plank Grilling with Fish

oak planked white fish

When you fire up the grill this summer don’t forget to throw on some fish, it makes for a nice light and healthy meal. I recently grilled a beautiful White Fish Filet on a Red Oak Plank.

oak planked whitefish

I’m a big fan of plank grilling, the wood infuses the fish with a delicious smoky flavor and it also keeps the fish nice and moist. The main thing to remember is to soak your planks at least two hours beforehand submerged in water to ensure there won’t be any flair ups on the grill.

I always grill my planked fish on indirect heat and cook it until opaque.

oak planked whitefish

There’s no real recipe, just keep everything simple. I brushed my filet with melted garlic butter, sprinkled it with paprika, then placed whole chives and fresh parsley leaves from my garden right on top, of course any herb combination would work as well, use whatever you like.

Take a few garden tomatoes, dice them up small, place in a bowl and add a few chopped herbs of your choice, add in some olive oil, salt and pepper and spoon it over the top while it’s cooking.

oak planked whitefish

All the juices mingle together along with the infused wood and create an amazing flavor!

salmon wrapped jumbo scallops

Here’s a brilliant idea that I can’t take credit for, Salmon Wrapped Jumbo Scallops, isn’t it pretty? I actually bought it like this, but it’s so easy to create yourself, which I’ll be doing  next time, or you might even want to ask your fishmonger to do it for you.

Three jumbo scallops with a strip of salmon wrapped between them and stuck on a skewer.

If you don’t want to stick them on a skewer, think about individually wrapping a strip of salmon all the way around each scallop, you can even use some thinner smoked salmon, why not?

This would be perfect for a nice intimate dinner party or special dinner, I think it’s really a pretty presentation.

salmon wrapped jumbo scallops

I cooked it on a cedar plank the exact same way I did the white fish, brushed with garlic butter, (no paprika) and then the tomato and herb topping. The slightly smoky cedar taste infused the salmon and scallops and it was a match made in heaven!

salmon wrapped jumbo scallops

Everything was so juicy and moist, I can’t wait to make it again, I hope you try it too!

Follow Proud Italian Cook on Instagram now!


Signature

Gnocchi with Brown Butter, Basil and Blistered Tomatoes

gnocchi with brown butter, basil and tomato

This is a summertime version of a brown butter sauce, no sage leaves used here, I’ll save that for the fall, instead I’m using fresh basil leaves tossed into hot, nutty tasting browned butter, just until crisp, then blistered cherry tomatoes complete with their juice get stirred in and around to complete the sauce.

It’s a killer combination, so quick and easy to make and the perfect flavor profile to top off your summertime pasta dishes.

frozen ricotta gnocchi

I for one love it with gnocchi, I’m partial to ricotta gnocchi, it’s my favorite, little fluffy pillows of cheese that melt in your mouth!

I normally make my own (just omit the kale if you want them plain in the link I’ve given you)  but once in a while I’ll buy some from my favorite Italian market and keep a few bags handy in the freezer, it makes for a very quick dinner that I can whip up in no time.

This sauce is also amazing spooned over cheese ravioli, if you’re not a gnocchi fan.

gnocchi with brown butter, basil and tomato

Very simple components, the only thing you have to do is roast the cherry tomatoes ahead of time and have them ready to go.

brown butter and basil

The basil leaves get frizzled and the juice of the tomatoes mingle nicely with the browned butter.

brown butter, basil and blistered tomatoesgnocchi brown butter, basil and tomatoes

Top it off with freshly grated Parmigiano Reggiano, I’m serious, every bite is to die for!

Proud Italian Cook is also on Instagram now, you can follow me here.

Gnocchi with Brown Butter, Basil and Blistered Tomatoes
 
The perfect summertime brown butter sauce to spoon over your pasta, using basil and blistered tomatoes!
Author:
Ingredients
  • 12 oz.to 1 lb of cooked ricotta gnocchi, with or without spinach, kale, or swiss chard added to the recipe,or just straight up plain or even cooked ravioli
  • 1 pint of colored cherry tomatoes, sliced in half and pre-roasted plus olive oil
  • ½ stick of unsalted butter
  • a good handful of fresh basil leaves
  • Grated parmesan for finishing
Instructions
  1. Roast the tomatoes beforehand, you can even do it a few days ahead and leave them in the fridge.
  2. Place sliced cherry tomatoes on a foil rimmed sheet pan, drizzle generously with olive oil, sprinkle with salt and pepper and roast at 375 until they blister and juices start to flow.
  3. Remove tomatoes and place into a bowl making sure to save and scrape all juices off the foil.
  4. Get your water boiling for the pasta, gnocchi takes only about 3 minutes, In the meantime start making your sauce.
  5. In a large skillet on top of stove heat butter on medium high until golden and starts to foam, toss in the basil leaves, let them frizzle for a second or two then stir in tomatoes and shut off the heat.
  6. Get your pasta into the pot, when gnocchi rise to the top gently scoop them out with a hand strainer and place them carefully into the skillet, spoon and make sure the sauce is all over them.
  7. Finish with the grated Parmigiano Reggiano.


Signature