Baked Crab Cakes with Meyer Lemon Aioli

baked crab cakes Have you ever gotten really excited about a recipe before? Well I sure have with these luscious baked crab cakes.

Before I go on I must confess this is the first time I attempted to make homemade crab cakes. I normally order them in restaurants but I’ve been disappointed so many times because they’re usually fried and somewhat greasy or you barely taste any crab at all because of the breading and fillers packed inside.

baked crab cakes 
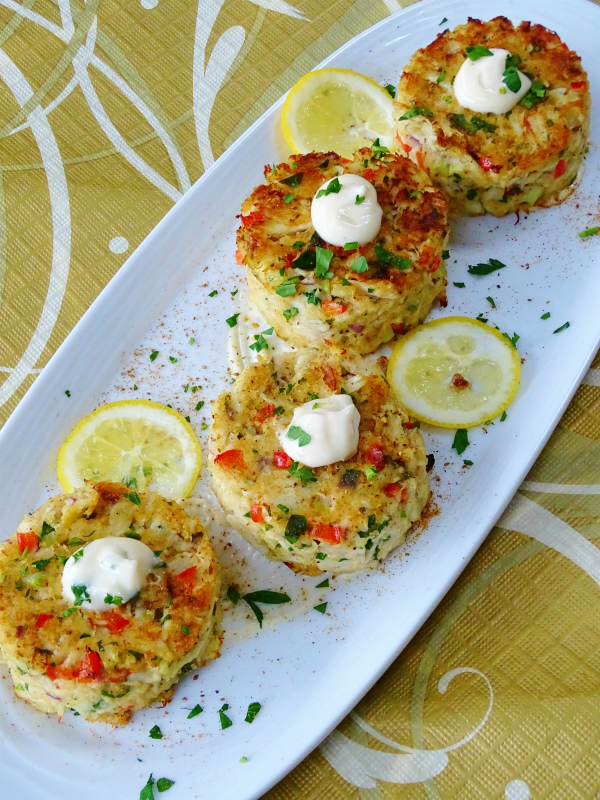
Have no fear, these are the real deal! Jumbo lump crab cakes that are delicate and light with no breading or frying just baked to perfection in a very hot oven.

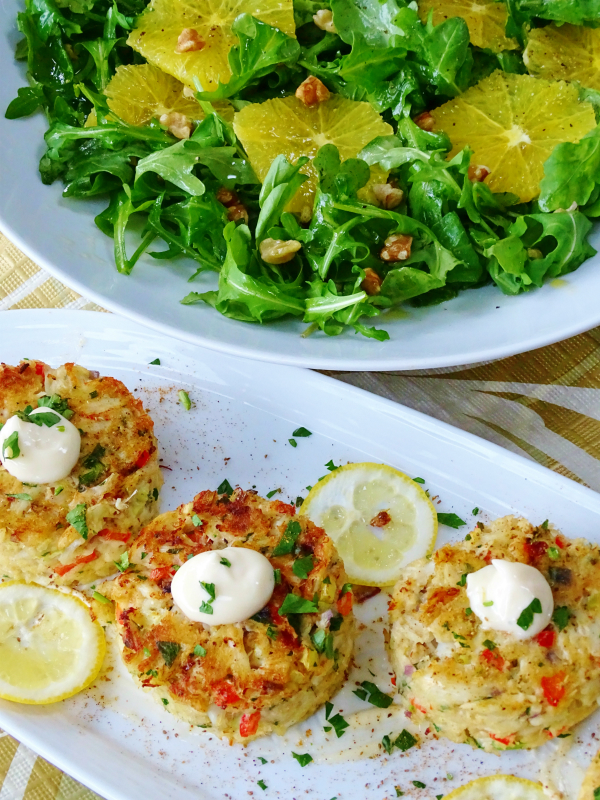
These are perfect for a special occasion like New Years Eve this weekend, a romantic dinner for two, a special birthday or anniversary dinner, a light and healthy main course or even served as appetizers. The best part is they’re so scrumptious and so easy to make!

jumbo lump crab for crab cakes 
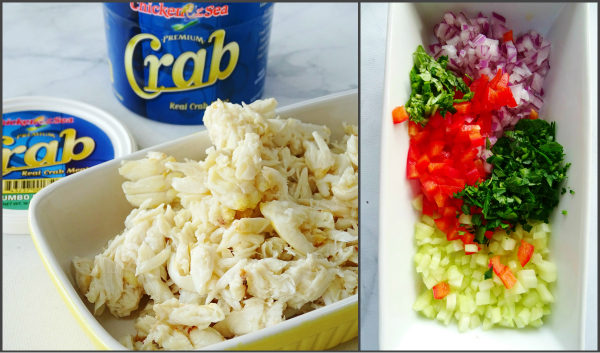
You’ll need real jumbo lump crab meat so ask your fish monger where it’s located in the store. Many places sell it, It’s even available at Trader Joes but I happened to buy this at my Costco which always has it during the holidays. I added a little chopped red onion, red pepper, celery, parsley, basil and some spice for the other ingredients.

making crab cakes You must get a ring mold or a biscuit cutter like I used, or make your own with a can, it makes all the difference in looks and texture.

baked crab cakes What really makes these crab cakes so magical is the technique in which they’re cooked. I watched a You Tube of a chef in Napa and I just loved how he cooked them using high heat in the oven for just eight minutes.

The ingredients were a mix of a few different recipes I found on the web. I served them with a meyer lemon aioli that paired perfectly with all the flavors but a nice remoulade would work just as well.

baked crab cakes Don’t be afraid to make your own crab cakes, once you try these you’ll be hooked forever.

baked crab cake I can’t wait to make them again!

baked crab cakes

Follow me on Instagram to see what else I’m cooking up during the week.

5.0 from 2 reviews
Baked Crab Cakes with Meyer Lemon Aioli
 
Author:
Ingredients
  • Makes 4 generous crab cakes
  • ½ lb. of cooked jumbo lump crab
  • ¼ cup each, or even less ( you be the judge) of finely chopped celery, red onion, red pepper
  • 2 tablespoons fresh chopped parsley
  • 1 tablespoon of fresh chopped basil
  • ¼ teaspoon of Dijon mustard
  • ¼ cup of panko breadcrumbs
  • zest of a ½ lemon
  • 3 tablespoons of real mayo for the filling,plus extra for aioli
  • Old Bay seasoning to taste, or creole if you want it spicier
  • FOR THE AIOLI
  • 1 cup of good quality mayo
  • meyer lemon juice or regular lemon juice, fresh. Mix well til you get a nice consistency, add some salt and pepper.
Instructions
  1. Pre- heat oven to 500 degrees
  2. Spray a small baking sheet or pie tin with olive oil spray, no parchment or foil.
  3. Take a mixing bowl then add the mayo, zest and old bay, mix well.
  4. Fold in the celery, red pepper, red onion, parsley and basil and panko.
  5. Gently fold in the lump crab meat and combine everything. At this point you can taste for seasoning as you like it, adding salt and pepper to taste or more spice.
  6. Place bowl into the freezer for 10 minutes or fridge for 20 minutes, no longer! This allows the panko to set up and hold everything together.
  7. Take a ring mold, the one I used was around 3" and fill it almost to the top, packing it down as your filling it.
  8. Gently push it out onto your greased baking sheet.
  9. Place them into the hot 500 degree oven for 8 minutes and do not touch or flip them over.
  10. Take them out after 8 minutes and let them sit on the baking sheet for a minute before removing.
  11. Swipe your platter or serving dish with some of the aioli then carefully take a fish spatula and lift the crab cake gently off the pan and actually flip it over with your hand so the deeper golden side that was on the bottom is now facing up.
  12. Garnish with more aioli, some parsley and a sprinkle of Old Bay seasoning.


Signature

Ice Cream Stuffed Panettone

ice cream stuffed panettone Here’s a fun way to transform a traditional panettone into a spectacular dessert with no baking required. Panettone is an Italian Christmas cake that has a sweet buttery dough filled candied fruits and nuts, just the smell alone when you open the box will drive you wild!

Today we’re going a little over the top and using the pannetone for an Italian version of an ice cream cake. Basically you’re going to hollow out your favorite panettone and then stuff it with some ice cream or gelato.

ice cream stuffed panettone I decided to do a mix of vanilla and chocolate this time, plus I added some frozen dark sweet cherries, because why not?

hollowed out panettone Leave the paper rim on for stability then either slice off the bottom or the top part right under the dome. Take a serrated knife and cut into the panettone leaving a border around the edges and bottom, scooping out the interior.

At this point you can brush the sides and bottom with some liqueur, but to me the panettone has so much flavor itself that it’s not necessary, but it certainly is an option.

ice cream stuffed panettone Make sure your ice cream is softened but not runny then just fill up the cavity to the top. I did the vanilla layer first, added some frozen cherries then ended with the chocolate layer.

ice cream stuffed panettone When the panettone is filled to the rim with the ice cream re-attach the lid or bottom back on then wrap the whole thing in  plastic wrap and stick it into the freezer. I find that overnight works best because you want the ice cream to really firm up so you can have nice clean wedges when cutting into it,  so what’s really nice is that this can be made one or even two days ahead.

ice cream stuffed panettone You can decorate the top anyway you want, I just melted some chocolate and made a quick frosting and added mini chocolate chips but you can be really creative and make it your own.

ice cream stuffed panettone

This is a pretty holiday dessert, nice and easy that will certainly wow your guests!

Follow me on Instagram to see what I’m cooking up during the week.

5.0 from 1 reviews
Ice Cream Stuffed Panettone
 
You can use any size or shape panettone just use the same principle that I did filling it to the brim with ice cream.
Author:
Ingredients
  • 1 large panettone
  • 2 pints of gelato, one vanilla and one chocolate, softened (feel free to use any flavor of ice cream or gelato)
  • a handful of frozen dark cherries (optional) You can also add nuts or any frozen fruit you like
  • liqueur to brush the interior sides ( like amaretto) also optional, definitely not needed.
Instructions
  1. Take a sharp serrated knife and turn the panettone upside down and slice an inch off the bottom or if you prefer, make the slice on top right under the dome.You can leave the paper on for stability.
  2. Then cut around the inside of the bread to hollow it out leaving ½ inch base and sides ( save the bread pieces to munch on).
  3. Take your softened ice cream and fill the cavity to the top packing it down firmly, then re-attach the lid or bottom securely.
  4. Wrap the whole panettone in foil or plastic wrap and stick it into the freezer. Best if overnight or even 2 days before so that ice cream is nice and hard.
  5. Remove from the freezer, unwrap it, removing the paper that's attached to the panettone also, then place on a serving platter and decorate the top..
  6. Slice into wedges and serve, you can serve with whipped cream, maybe a chocolate sauce, or just as is.


Signature

Homemade Cucidati a Sicilian Fig Cookie Tradition

cucidati fig cookies When I think of holiday baking the first cookie that comes to my mind is cucidati, a Sicilian fig cookie filled with a mixture of nuts, dates, figs, raisins, spices and a few different flavorings and all that goodness is wrapped in a tender buttery dough that’s baked, frosted and sprinkled.

In my family this is a cookie that has memories attached to it, just the smells alone evoke fond thoughts of a mother long gone who lovingly made these for her family throughout their childhood for special occasions and holidays.

It’s about wanting to keep up that tradition and then handing it down to generation after generation.

cucidati Italian fig cookies So for that reason when I make them I go big and it’s a family affair. We start early in the morning and it becomes a whole day of baking. I think the most we made in a one day was 600.

Every one brings their own containers to take their cookies home, many will be gifted out to other family members and friends who look forward to our baking lollapalooza.

I like finding different tins to put them in and I always layer the cookies between wax paper.

fig paste

We have it down to a science now and everyone has their own jobs to do that they’re comfortable with, from making the filling, rolling the cookies, watching the oven, frosting them and adding the sprinkles. I always prep the dough the night before so that job is out of the way, I make at least ten batches.

cucidati Italian fig cookies I line my dining room table with sheets of wax paper and by the time we’re finished every inch gets covered and then some!

cucidati Italian fig cookies The one rule we have is that no one takes any home until the frosting has completely hardened, otherwise they’ll just get ruined when you’re packing them up.

cucidati Italian fig cookies

We even made some with white on white for a more classic look, wouldn’t these would look nice set out at an Italian wedding?

cucidati Italian fig cookiescucidati Italian fig cookies The smell of them baking lasted for days in my house!

cucidati Italian fig cookies

Because of the overwhelming requests for this recipe, I’ve posted it below along with all my tips.

Happy Baking! 

CUCIDATI

The Dough
TIP: (My handed down family recipe used Crisco because that was very common then, but today all I use is butter in the dough and we like it so much better!)
 4 cups all-purpose flour
 2/3 cup sugar
 1 teaspoon baking powder
 1 teaspoon salt
 8 ounces cold unsalted butter or 2 sticks, cut into pieces
 4 large eggs
Put flour, sugar, baking powder, and salt in a food processor fitted with the metal blade; pulse just to mix. Add the butter pieces and pulse. Add eggs and pulse until dough forms a ball on the blade. Remove from processor and knead briefly on a lightly floured work surface until smooth. Shape dough into a log shape and wrap in plastic and put into fridge overnight or use after it chills well.

TIP:(It’s great to work with when it’s chilled, if you leave it on the counter which I’ve done in the past the butter warms up and rolling it is a nightmare of stickiness, so take out one batch at a time. You might have to whack it with the rolling pin to break it down a bit but believe me it works and rolls much better. Making the dough ahead is especially good when making large amounts like I do, plus it will free up your food processor for the filling.
The Filling
 One 12-ounce package dried Calimyrna or Mission figs, snip off the hard end of stem
 ½ cup of dates, remove pits
 1/2 cup un-blanched almonds, toasted and coarsely chopped
 1/3 cup apricot preserves or orange marmalade
 ½ cup plump golden raisins
 1/4 cup candied orange peel, diced ( you can find this on line if you can’t find it in the baking isle, or just used grated orange peel and more marmalade, but I love this addition)
 1/3 cup of honey if you want it sweeter
 1/4 cup dark rum or whiskey
 1 teaspoon cinnamon
 TIP: ( My advice is to taste as you go along maybe adding more or less of the ingredients, my favorite is using whisky)
Instructions for filling
Remove stems from figs and cut the figs into medium-size dice. Put figs and remaining filling ingredients into the food processor and pulse with the metal blade until finely chopped; if you want to do this the day before go right ahead, it gives the flavors a chance to meld together.
To assemble the cookies
Cut your log of dough into 12 pieces and try to roll it out into a 3” by 12” rectangle. Then take the fig filling and scoop it out or make a fig log right down the middle onto the rectangle of the dough and roll it up placing it seam side down.
Cut cookies into 1 1/2 inch pieces, you can cut them into a square or on an angle, then place the cookies on parchment lined cookie sheets and bake at 350 for 15 minutes, till bottoms are nicely golden.
The Frosting
One whole bag of confectioners’ sugar mixed with milk to get the right consistency, sort of thick, not watery.
Non-perils for sprinkling

This recipe makes 4-5 dozen.
Make icing but don’t ice them until the cookies are completely cool from the oven,(important!) Spread a little icing onto each cookie, I like to use a pastry brush instead of dipping which gives me more control and it controls some of the sweetness because the filling is sweet also, then sprinkle the nonpareils on the top of the wet frosting but over a bowl otherwise you’ll see them all over your floor.

Pack them into tins only when frosting is completely hardened between wax paper layers, I repeat, let them dry completely!!

These can be made ahead of time to freeze but please do not frost then until you’re ready to serve. I don’t freeze mine I store then in the tins like I said between wax paper and keep the tins in a cool place, like my garage.
Happy Holiday Baking!

Follow me on Instagram to see what else I’m cooking up daily in my kitchen!


Signature