Healthy Fresh Salmon Cakes

salmon cakes

January is the month that everyone wants to do a reset in the eating department, we’ve enjoyed all our goodies during the holidays and now it’s time for some healthier eating.

If  eating salmon is on your regular meal rotation I encourage you to change things up and make these salmon cakes instead of the usual filets.

salmon patties

If you’re a salmon lover these cakes will soon win you over. Tender, juicy chunks of salmon on the inside, lightly crunchy on the outside with no heavy fillers that mask the actual salmon taste and oh so flavorful, they are amazing!

chopped up salmon

The reason these salmon cakes are so scrumptious is that they’re made with fresh salmon, not canned, it really makes a big difference in taste and over all texture. If you check out some recipes on the Internet you’ll find that many salmon cakes are made with cooked, fresh salmon. I prefer forming them in the raw state, like you would a burger, I feel they retain their juiciness that way.

salmon cake ingredients

The added ingredients which are vegetables are diced small, sautéed then mixed into the fresh chopped salmon. You can do this all ahead of time getting your prep work done because they take no time at all to cook.

Stick with wild caught salmon rather than farmed, I can always find it available here. I once discussed this topic with my fish monger at Whole Foods because they do sell farm raised there, but he went into deep length saying that their farm raised salmon is sustainable and ethical and raised the right way so that might be another option for you.

mixed ingredients

After the sautéed veggies cool down they get gently mixed into the salmon along with some added spice and binding agents with no need for eggs.

formed salmon cake

A key tip is to form all the salmon cakes then refrigerate them for at least 2 hours, even overnight if you wish. This firms them up and they’re able to keep their shape when cooked. I would not recommend forming them and cooking immediately, they won’t be sturdy enough.

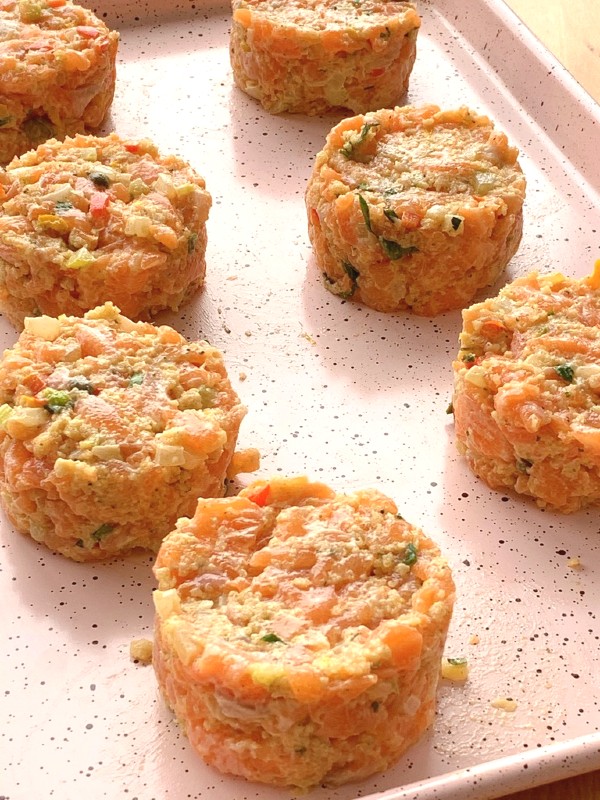
tray of salmon cakes

I like to use a three inch biscuit cutter that I have to form the salmon cakes. I place the form on the pan I’m going to stick in the fridge, spoon the mixture inside filling to an inch deep, press it compact then I lift the biscuit cutter right off and a perfect shape is formed.

formed salmon patties

After they’re chilled they lift off easily with a spatula.

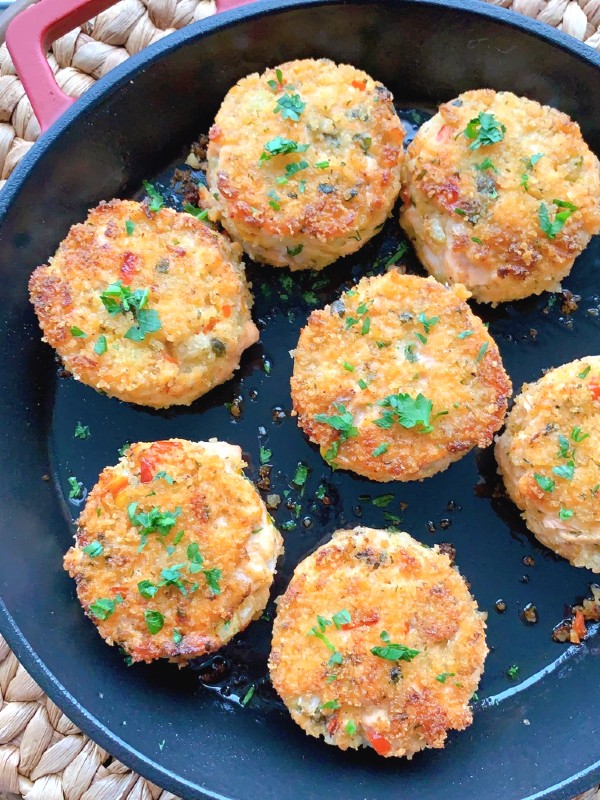
cooked salmon patties

I like to crisp up the top and bottom on the stove top first, then finish them off in the oven.

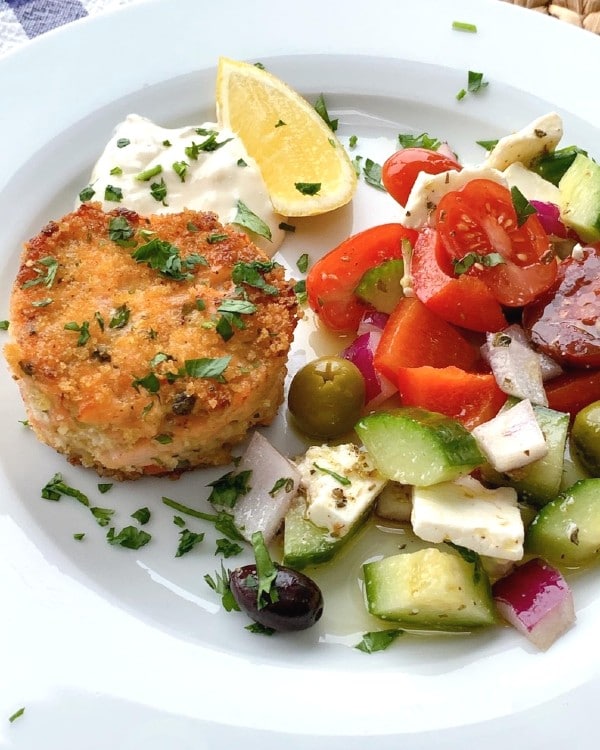
plated salmon cake

All you need is the a little tartar sauce, a squeeze of lemon and a nice salad on the side and you’re on your way to a healthier and very tasty January!

5.0 from 2 reviews
Healthy Fresh Salmon Cakes
 
Author:
Ingredients
  • 1-1/2 lbs. fresh salmon or 4 filets, skin removed. hand chopped into small chunks ( I was able to make 7 cakes with that amount)
  • 1 celery stalk, small dice
  • ¼ onion, small dice
  • 2 green onions, sliced small
  • 2 small mini red peppers or half of a large red pepper, small dice
  • 1 yellow mini pepper or ¼ of a large, small dice
  • zest of 1 lemon
  • 1 tablespoon capers, rinsed
  • a pinch of cayenne
  • ½ teaspoon Old Bay seasoning
  • 1 large garlic clove, chopped fine
  • 1 heaping tablespoon chopped parsley
  • ⅓ cup full fat mayo
  • ⅓ cup panko bread crumbs and a little extra to coat the top and bottom of the cakes
  • 1 heaping tablespoon of Djon mustard
  • olive oil
  • salt and pepper
Instructions
  1. Drizzle the bottom of a small sauté pan with olive oil and toss in all the diced veggies, onions, peppers, celery and garlic, cooking until translucent. Turn off heat and let them cool down completely.
  2. Into a bowl add the chopped salmon, the cooled down veggies, the mayo, zest, breadcrumbs and Djon and a little salt and pepper to taste.
  3. Gently toss well to incorporate ingredients.
  4. Form your salmon cakes into 3x1 inch deep patties. Note: I use a biscuit cutter to form mine as stated in the post.
  5. Refrigerate the salmon cakes for at least 2 or more hours for best results, I would not form and then cook them right away.
  6. When it's time to cook, heat the oven up to 450F.
  7. Drizzle the bottom of an oven proof skillet with olive oil.
  8. Pour some panko breadcrumbs on a flat plate and press the bottom and top of each salmon cake into it then into the heated skillet.
  9. When each cake is lightly golden on each side place the oven proof skillet into the oven and finish it off, anywhere to around 6 or 8 additional minutes, oven vary so you be the judge.
  10. Serve with a squeeze of lemon and tartar sauce, or an aioli of your choice.
  11. NOTE; I had some leftover and the next day I heated them at 350 just until warm and they were still great.


Signature

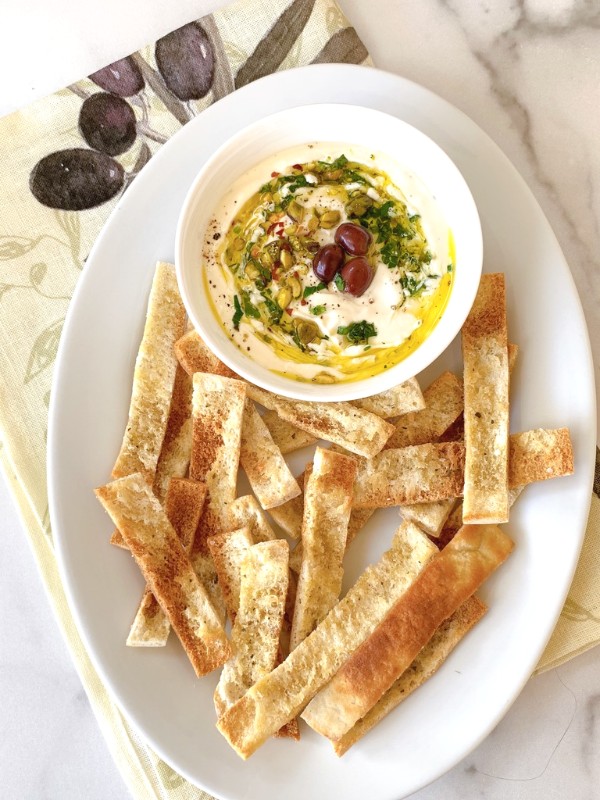
Creamy Feta Dip with Toasted Pita Chips

feta and pita

Everyone needs a go-to dip to have for a special occasion, one that requires little work but tastes like a million bucks! NYE is a couple of days away and then game day will be right around the corner, so I thought it would be the perfect time to introduce this creamy feta dip with toasted pita chips.

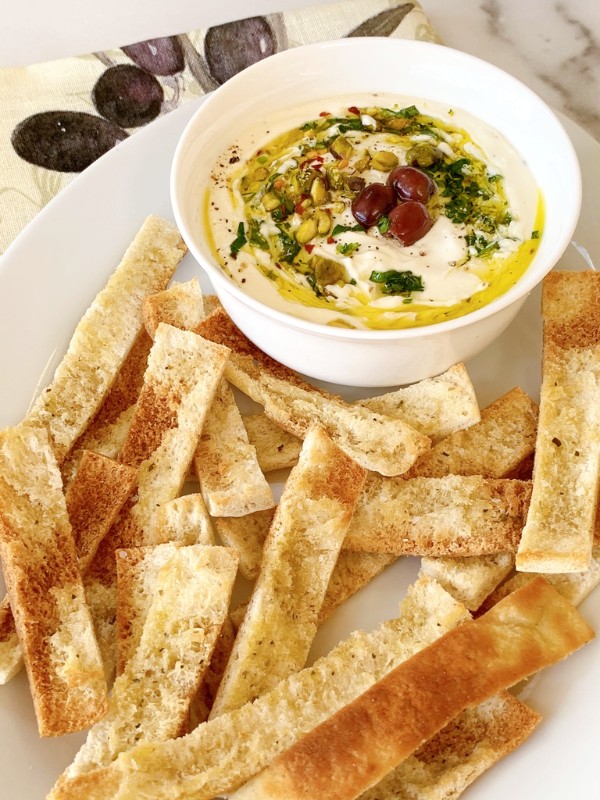
dip

This dip is so creamy and full of flavor, a little swipe goes a long way. Feta cheese is the shining star along with Greek yogurt and some cream cheese, it’s the perfect blend for a nice smooth dip.

The feta dip itself can be served with an array of fresh sliced veggies, for a healthier version or with my favorite dipper, these toasted pita chips.

cutting pita

I was introduced to this way of preparing the pita chips by a friend of mine years ago, she made it for a girls lunch and we just couldn’t tear ourselves away from them. The chips are thin and crispy but yet sturdy enough to hold up well when dipping.

I’ve made them many times since and they’re always a hit!

One bag of pita yields so many chips! You’re going to cut the pita into 6 or 8 strips with scissors, then snip the tops and end off so you can open it up.

separate. pita

One strip will give you 2 thin pieces. So for 1 whole pita you can get 12 to 16 chips out of it, so if you do a whole bag that’s quite a few chips!

brushed olive oil

Then place the inside rougher side up on a baking sheet and brush each strip with oregano infused olive oil.

pita crackers

I think what makes these so special is definitely the shape and the thinness, as opposed to the thicker triangle shaped ones, and of course the olive oil flavor coming through. I can’t say enough about these dippers, they’re amazing!

They’re the perfect accompaniment to the creamy feta dip. But don’t get me wrong, honestly they go well with any dip! Think crab, shrimp, hummus, white bean, onion, spinach artichoke, I could go on and on.

feta dip

I garnished the top of my dip with olive oil, parsley, red pepper flakes, pistachios and olives but be creative and do what you like.

can of pita

I would encourage you to take the time and make these chips, you won’t be disappointed, it’s the ultimate combo along with the creamy feta dip.

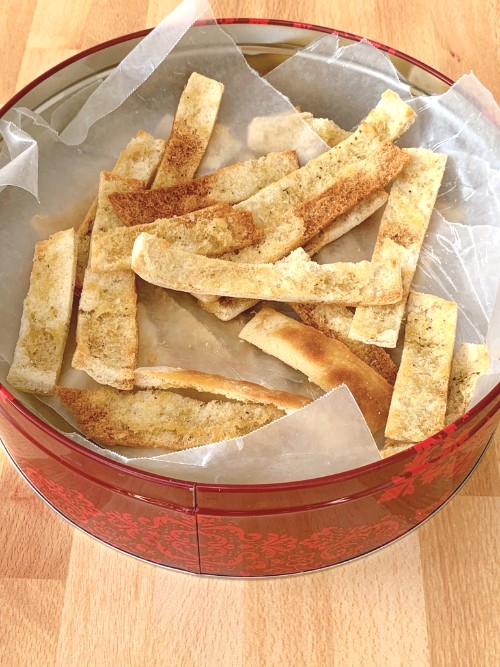
They can be made well in advance and they stay perfect for up to 3 weeks, that is if they last that long! Once you put them out you’ll see them disappear!

I like to store them in a tin can layered between wax paper.

Enjoy!

Creamy Feta Dip with Toasted Pita Chips
 
This dip recipe can be doubled because it stays very well in the fridge, and the dipper chips can be made well in advance.
Author:
Ingredients
  • 8 oz. feta, good quality Greek in brine, patted dry
  • 4 oz. full fat cream cheese, room temp
  • ¼ cup full fat plain Greek yogurt
  • 2 teaspoons of oregano infused olive oil
  • 1 teaspoon lemon juice
  • 1 small garlic clove, grated
  • FOR THE TOASTED PITA CHIPS
  • 1 bag of fresh, Greek pita
  • ¾ cup of olive oil
  • 1 teaspoon of dried oregano
  • a light sprinkling of kosher salt to top the chips before toasting
Instructions
  1. In a small bowl add the oil and oregano together and let it sit for 15 minutes to infuse.
  2. Then in food processor first add the feta to break it down, then add in the cream cheese, yogurt, lemon juice and garlic.
  3. Give it all a whirl until it's nice and creamy.
  4. Remove from processor and place into a serving bowl and garnish with a little of the olive oil, parsley, lemon zest, olives or whatever you like.
  5. If making the pita chips, take 1 pita at a time, with a scissor cut 6 to 8 strips then snip the top and bottom off of each strip so you can gently open up the pita and have 2 pieces. (See blog post for example)
  6. Continue cutting the pita into chips then brush each one on the inner rough side with the oregano infused olive oil.( see blog post for visual)
  7. Place onto a rimmed baking sheet, sprinkle them all lightly with a little kosher salt, then into a 400 degree oven for 7 or 8 minutes until golden. Ovens vary so watch closely, you want them golden not burnt, they cook fast.
  8. Remove chips and place on a rack to cool.
  9. Chips can be stored in a tin can layered between wax paper for up to 3 weeks.


Signature

Luxurious Pasta With Vodka Cream Sauce

pasta and vodka cream sauce

If you want mid week rave reviews on a dinner served or if you just want to wow your guests with something special, this is the dish for you! Serve them this luxurious pasta with vodka cream sauce.

This sauce tastes like you spent hours cooking it on the stove, but you really didn’t. It has a deep, rich flavor with a silky and luxurious texture that coats the pasta inside and out in every groove.

Speaking of pasta I recommend using mezzi rigatoni, it’s the shorter version of traditional rigatoni, go for the one with the ridges.

Don’t get me wrong you can use other shapes, I’ve made it with penne pasta before, but my heart belongs to mezzi!

vodka sauce ingredients

Get yourself a bottle of vodka that has a nice smooth character to it, you don’t want to use anything too harsh. Right now I’m enjoying Trader Joe’s TX vodka it’s 6 times distilled and it really pairs well with this sauce. (not sponsored).

Have your ingredients ready to go and your salted water boiling and you’re on your way to a fantastic meal!

saute onions and garlic

Onions and garlic are the foundation to this sauce but the star of the show is tubed tomato paste!

tomato paste

Triple concentrated tomato paste to be exact, this is the game changer to this recipe! No more cans of tomatoes, no more doctoring up a marinara sauce with cream, no chopped tomatoes added, nothing!

Triple concentrated tomato paste is the secret ingredient!

deglazed

Let the tomato paste cook down a bit, then you’ll deglaze it with the vodka. Now is the time to start cooking your pasta.

heavy cream

You’ll be adding pasta water and heavy cream together stirring and stirring until it reaches a vibrant pink color.


creamy sauce

Like this!

pasta

Now add in your pasta (al dente) and incorporate all that sauce with the pasta really well.
sprinkling cheese

Shut the burner off and sprinkle in the cheese and toss gently.

pasta and vodka sauce

Now get a big scoop so you can fill your plate!

pasta

Add more cheese of course and a sprinkling of parsley, after you take one bite you’ll know exactly what I mean.  This sauce is to die for!

You’ll want to make it often and the best part is that it comes together so quickly, so make sure you have a full bottle of vodka and tubes of tomato paste on hand.

vodka and shrimp

If you want to go all out and show off a little, you can sear up a few scallops or add some shrimp like I did for a special date night meal, it’s over the top delicious.

shrimp in vodka sauce

All I did was added some partially roasted shrimp at 400F to the original recipe below until slightly opaque then tossed them in the sauce to finish cooking and to soak up all that goodness!


penne pasta with shrimp vodka sauce

I chose some thin and long penne pasta for this and it was quite elegant tossed around with the shrimp.

Trust me, you need this in your life!


5.0 from 2 reviews
Luxurious Pasta With Vodka Cream Sauce
 
Recipe adapted from Bon Appetit
Author:
Ingredients
  • ½ lb. mezzi rigatoni with ridges, or penne with ridges
  • 1 medium onion, chopped
  • 4 garlic cloves, sliced
  • 3 oz. triple - concentrated tomato paste in a squeeze tube
  • ¾ cup of grated parmesan cheese, more for plated garnish
  • 2 oz. vodka ( smooth character )
  • ¾ cup heavy cream
  • 1 cup or so of reserved pasta water
  • pinch of red pepper flakes
  • olive oil
  • parsley for garnish
Instructions
  1. Start your water boiling for the pasta, make sure it's salted
  2. Have all your ingredients ready to go.
  3. Drizzle olive oil into a heavy bottomed pan.
  4. Saute the onion and garlic until the onion starts to brown around the edges, could take 5 or so minutes.
  5. Squeeze tomato paste in along with red pepper flakes.Sir well until the paste coats the onion.
  6. Continue stirring until the paste reaches a deep red color and starts to brown on the bottom of the pan, around 5 or so minutes.
  7. Add the vodka and deglaze the pan, stirring to incorporate, reduce heat to low.
  8. Using a heatproof measuring cup scoop ¼ cup of the boiling water from the pot, then add all the cream to the hot water, this will temper the cream so it doesn't break when added into the sauce.
  9. Slowly add the warm cream into the pot, stirring to incorporate.
  10. Remove from heat for a few minutes.
  11. Add the pasta to the pot of boiling water and cook it al dente according to box instructions.While pasta is boiling, add a little pasta water so it's not so thick.
  12. Reserve a good cup of the pasta water to add to sauce to thin out later if needed.
  13. When cooked, transfer the pasta into the sauce pot using a spider (as pictured in post).
  14. Toss everything together, adding pasta, then the grated cheese, plus enough of the pasta water to have the right consistency.
  15. Sauce should be smooth, glossy and coating each piece of the pasta, not runny.
  16. Toss in some chopped parsley.
  17. Garnishing each plate with a drizzle of olive oil, cheese and more parsley.
  18. Enjoy!


Signature