
Here’s a quick mid week meal that comes together really fast, it has just a few ingredients, uses only one pot, and you don’t even have to turn on your oven.
What makes this recipe stand out a little more than the traditional sausage and beans was the fact that this time I used a specialty sausage, you know the ones behind the case that the butchers stuff with unique combinations.
The base was a standard pork Italian sausage that was stuffed and filled with hot giardiniera and provolone cheese, don’t get me wrong you can certainly use your favorite Italian sausage, with or without a specialty filling, but why not change it up a bit and try something a little different, there are so many different varieties of sausages.
You’ll use canned beans in this dish which is the reason the cooking process is so speedy and of course the beans of choice are cannellini. 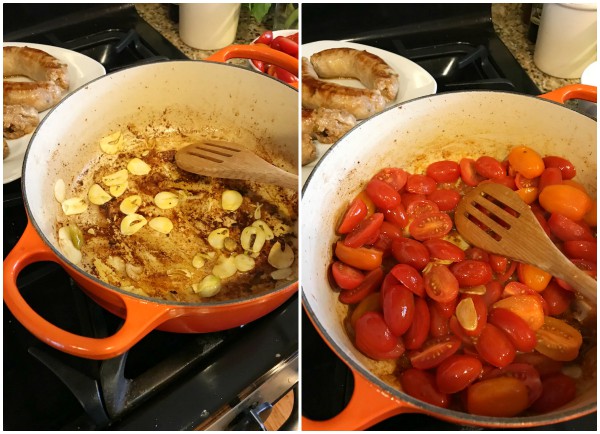
Browning the sausage is your first step, that process will leave you with nice brown bits that will form at the bottom of the pan, perfect to saute the garlic and tomatoes in and eventually creating a delicious sauce. 
Canned beans go into the pot along with the browned sausage, then all you have to do is let all the flavors simmer and meld together.
Finish it off with some fresh torn basil and a side of crusty bread and this meal is complete!
Follow Proud Italian Cook on Instagram to see what else Im cooking up during the week.
- 4-6 Italian sausage links, either traditional or to try something different using the specialty, gourmet kind that the butcher stuffs with various combinations of ingredients.
- 1 lb. of cherry tomatoes, sliced in half lengthwise
- 2 15 oz. cans of cannellini beans that have been drained and rinsed
- 4 large garlic cloves, shaved
- basil leaves
- olive oil
- Heat a heavy bottom high sided saute pan, cast iron pan or a smaller size dutch oven, drizzle the bottom with olive oil.
- Place the sausage links into the hot pan and brown both sides, then remove and set aside.
- Add the shaved garlic, moving it around until it's nice and golden.
- Toss in the sliced cherry tomatoes along with the shaved garlic, toss to coat the tomatoes.
- Now add the drained beans to the pot, stirring to make sure they get coated with the garlic and tomatoes.
- Drizzle some olive oil on top, a little salt and pepper.
- Add back the sausage and nestle them into the pot.
- Throw some torn basil leaves in.
- Simmer with a lid on until the sausage is all cooked through and the tomatoes break down and thicken.
- Add fresh torn basil leaves for garnish and added flavor.
- Enjoy with some crusty bread!


 I’m Marie, a wife, mother, mother-in-law, and gramma of two beautiful girls. My passion is food, clear and simple but especially Italian food, hence the name of my blog, Proud Italian Cook. I want you to feel right at home here so grab a cup of coffee, I’ll get the pastries, take a look around and enjoy your visit! {


