
This recipe is summer freshness at it’s best, and the great thing about it is that the preparation is nice and simple but yields the most amazing results!
What you’re looking at are strands of spaghetti intertwined with juicy, cherry tomatoes that have burst and blistered in the oven to create the most luxurious tomato and garlic flavored sauce with the special addition of sweet, fresh corn kernels and burrata cheese.

Fresh summer flavors are what makes this dish such a hit, there’s no special skills you need in making it because the ingredients speak for themselves.
Do a search and you’ll see roasted tomatoes and pasta all over the place, but I make this every summer and this is my way of doing it and what works for me. So rather than a recipe at the bottom of the post I’ll just walk you through the steps now.

I use a quarter sheet pan that has a rim on it. Heat the oven to 425F and line the pan with foil. Lining it with foil helps to gather and hold on to those precious, silky juices, plus it helps prevents the juices from burning off.
I really don’t measure the amount of tomatoes I use, I just load the pan from rim to rim, single layer with cherry or grape tomatoes, you could use all red or colored.
I leave the tomatoes whole so they can burst on their own when ready.
Add in four cloves of crushed garlic, torn basil, salt, pepper and dowse it generously all over with extra virgin olive oil.
When you start to see the tomatoes split pull the pan out of the oven and with the tip of a small paring knife pierce each tomato to let the hot juices release, word of caution, lean back because sometimes the juice will squirt out at you, then before it goes back into the oven add the fresh kernels of two ears of sweet corn, continue cooking until you see the tomatoes wrinkle and all the juices mingling together with the olive oil, garlic and corn.
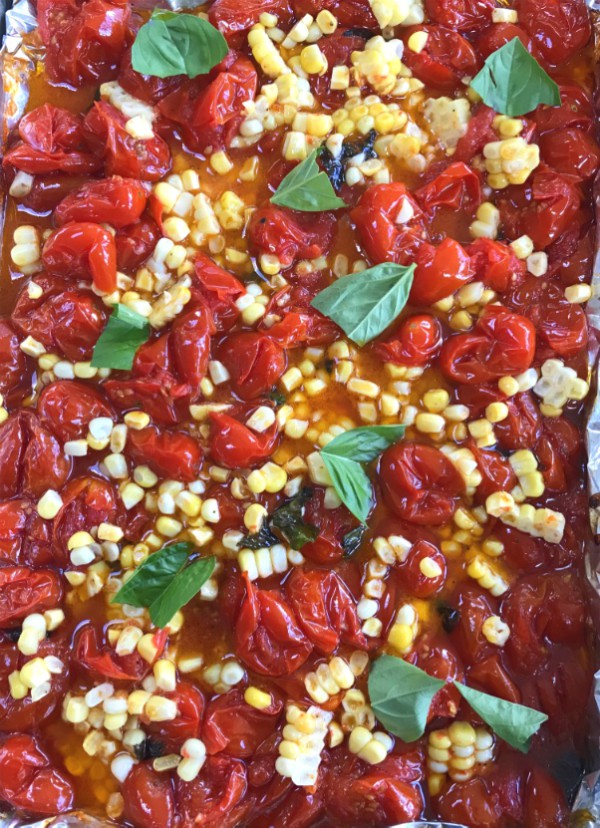
It should look like this. Now all you have to do is cook up your spaghetti or pasta of your choice and then toss everything together, make sure you get every bit of that juice incorporated, use a rubber spatula to make sure you scrape off all that glorious juice. For this amount of saucey goodness I used twelve ounces of pasta.

When all the silky sauce is mixed in break open your burrata cheese, (as much as you want) and spread it on top, it will start to melt slightly, then adorn it with more basil, grated Parmigiano Reggiano and a quick drizzle of olive oil to finish it off.

That’s it, dig in and enjoy summer tasting at it’s best!
Follow me on Instagram to see what else I’m cooking up during the week.


 I’m Marie, a wife, mother, mother-in-law, and gramma of two beautiful girls. My passion is food, clear and simple but especially Italian food, hence the name of my blog, Proud Italian Cook. I want you to feel right at home here so grab a cup of coffee, I’ll get the pastries, take a look around and enjoy your visit! {


