I don’t know what it is but as soon as the weather turns cold I get the urge to make homemade pasta of some sort. Once a year I usually make my traditional ravioli, two different kinds, a meat and cheese version which is a family recipe that has been handed down to me.
This time I wanted to change it up by making a four cheese ravioli with a twist on the dough.I’ve always loved the look of herbs embedded in pasta dough. In fact I’ve done two different posts regarding that technique way back in my early days on this blog. One was a guest post I did for a blogger friend, it was known as silhouette pasta, stained glass pasta and windowpane pasta but now you see it described as laminated or embedded dough.
When I did the guest post and created the recipe I just cut the dough it self into ravioli sized noodles, I never actually made filled ravioli with the dough as I did here on this post.

If you follow me you know that I have several posts on making ravioli on this blog, when I first started out making ravioli they were all made by hand, I even used only a rolling pin to roll the dough. Then as time went on I used a crank style pasta machine which is a staple in many homes along with ravioli forms.
We would get together as a family and make hundreds for holiday parties and by using the forms it helps you get a more uniformed shaped ravioli which has it’s place when you’re cranking out so many and there’s different people with their own techniques.
Fast forward to today, I have graduated to using my Kitchen Aid attachment for rolling the dough and I’m never going back, I love it! No fatigue in cranking, it’s hands free and it puts the perfect amount of pressure on the dough and it comes out perfectly smooth every time. I can easily make a couple of hundred myself and never get tired!
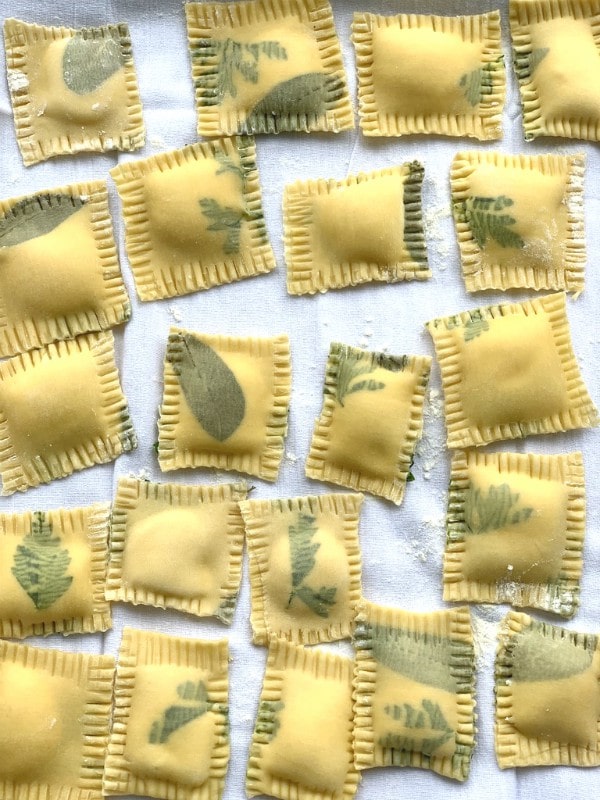
For this herb embedded batch I tried using my ravioli forms but didn’t like the way they looked, the dough didn’t lay right when placed over the holes because of the shape of the herbs I guess, so freeform was the way to go, besides I think the imperfectness of doing them freeform makes them look just perfect!
You can read and see the ravioli forms and the machines I use, how I prep the dough and the fillings in this post, it will help you get a visual when doing this version here on this post.

To embed your pasta dough with herbs you’ll want to roll out two pieces the same size, keeping it thin but not completely see-through. Pick herbs of your choice, make sure they’re clean and dry and pull the stems off. I used parsley and sage here. You would never want to use a woody herb like rosemary or thyme they will break through the dough, stick with the more leafy herbs like cilantro, basil and the ones I used.
Lay your clean herbs just on one sheet of the two sheets you rolled out, covering the area of the pasta sheet up nicely filled with the herbs.
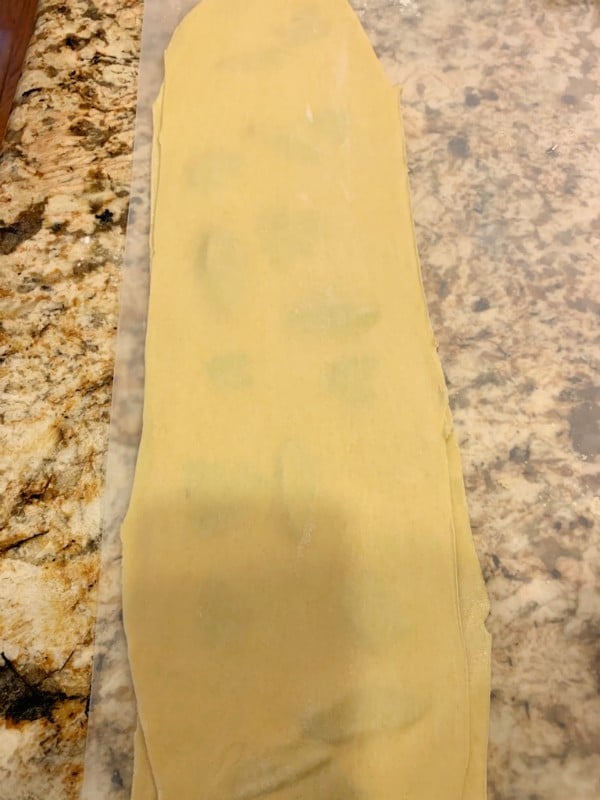
Then you’re going to take the other piece with no herbs on it and gently place it on top, pressing down gently all over with your hands to help the herbs stick to the dough underneath.
Now take that whole sheet and roll it through your pasta machine, maybe on number three of the roller. You don’t want it to be too see -through so much so that the herbs rips through, but you don’t want it too thick either, you can be the judge on that as you’re doing it in your own machine.

One thing to keep in mind is that the herbs will stretch as you put the sheet through the rollers and that’s fine, you just don’t want it to rip.

Now you’re dough is ready to fill. I always use a disposable pastry bag when piping out my fillings, the post that I linked above will show you a visual.
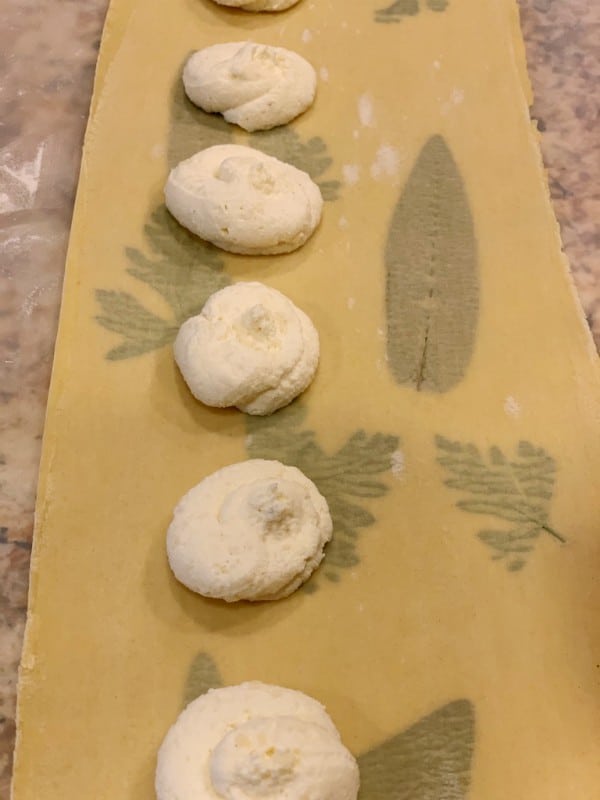
I used a mix of four cheeses for my filling this time, ricotta along with fontina, parmesan and romano. Then place your dollops along one side of your sheet of herb embedded dough that you ran through the rollers.
Take a mini brush and lightly brush the edges with a touch of water to ensure sticking and that no cheese mixture will leak out when boiling.

Next fold the other half over the dollops of cheese pressing the edges down and pressing in between the cheese mounds with your fingers. Then take a ravioli cutter and slice between the mounds to create the individual ravioli.
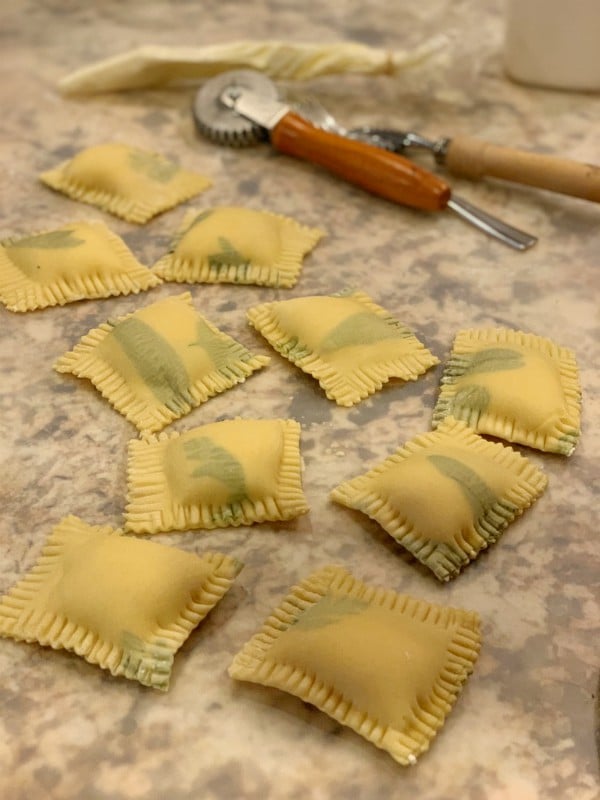
Once that’s finished you’ll want to crimp all four sides with a fork that you keep dipping in flour so your crimping it won’t stick.

And that’s it! You’ve now created you own special ravioli, each one different in it’s own special way.

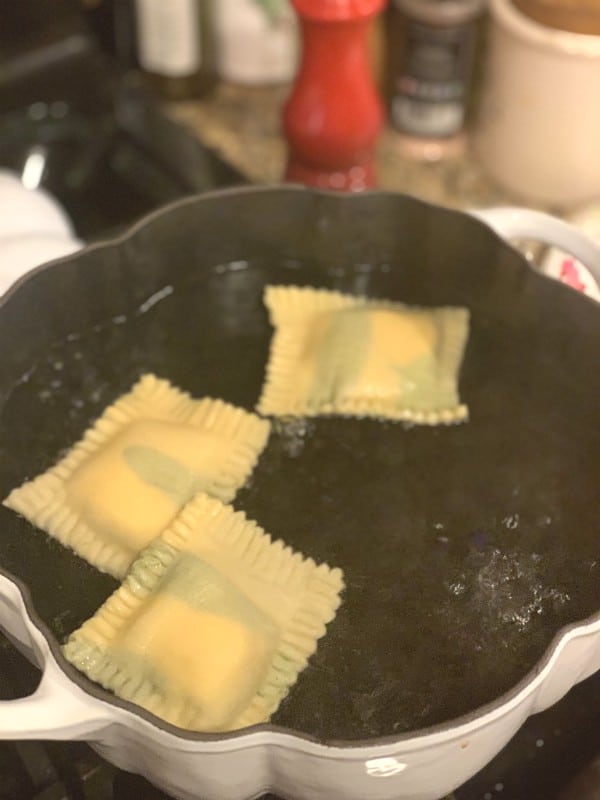
You can cook them as is immediately or you can place them single layer on a cookie sheet and freeze until hard then transfer to a freezer proof container.
I normally freeze mine, after we sample some of course! They cook up beautiful from either the fresh or frozen state, just add a couple more minutes when frozen.
I do around eight minutes in the frozen state but honestly it depends on how thick yours turns out, my best tip is to take one out of the water, snip a bit of the edge off and taste if you think it’s finished or if it needs another minute or two.
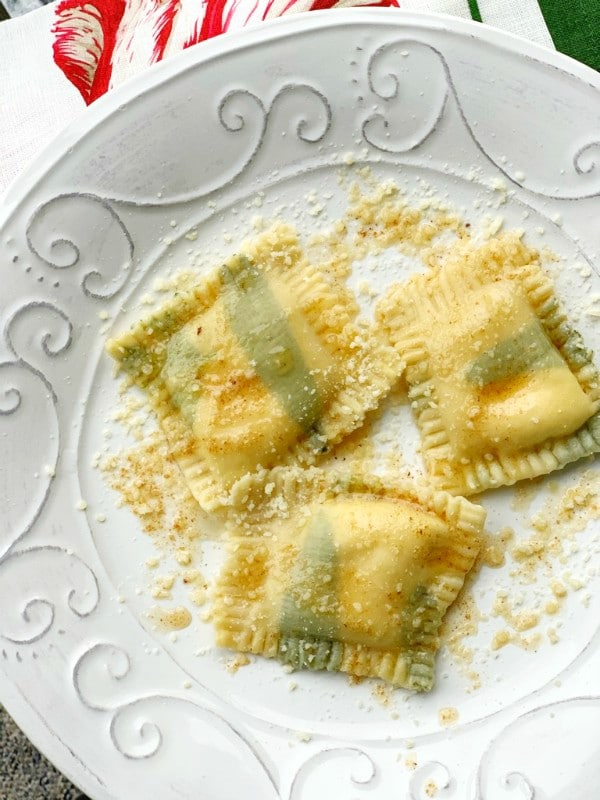
With the herby pasta dough the best sauce to serve them with is a simple browned butter sauce, then shower the ravioli with some good Parmigiano Regggiano cheese! That’s honestly all you’ll need because you’ll taste the subtle flavor of the herbs coming through along with the cheese in every delicious bite!
Spend some time in the kitchen, have your favorite music playing in the background and I promise you once you get going you’ll get into a Zen- like mood and before you know it you’ll have a bunch of ravioli formed in front of you!

Making homemade pasta of any sort is truly a labor of love but worth every bit of the time and effort it takes, no store-bought pasta can ever compare, and besides you can taste the love!
Follow me on Instagram to see what else I’m cooking up during the week.
- PASTA DOUGH
- 2 cups of unbleached flour, my favorite brand is Ceresota
- 2 eggs
- ½ teaspoon salt
- 1 Tablespoon, olive oil
- enough water just to get the dough together to form a ball
- 4 CHEESE FILLING
- 1 cup good quality ricotta, drained of all liquid ( I usually drain mine overnight) or buy it on the drier side
- ½ cup grated fontina cheese
- ½ cup Parmigiano Reggiano
- ⅓ cup grated romano cheese
- salt and pepper to taste
- 1 egg beaten
- FOR THE DOUGH, in a food processor add the flour and salt, pulse, then add the 2 eggs and and olive oil and process for a minute or two.
- As the machine is running slowly dribble water down the tube, keep processing until the dough forms a ball.
- It could be ¼ cup or water, maybe less, maybe more. Give it time to process, you will know when it's coming together.
- Open top of processor, dough should be moist and a little sticky, not dry with bits of flour, if so add a tiny bit more water and process again.
- If it's too watery just add a bit more flour and reprocess.
- Pull the dough out and onto a floured board, knead it a few times then form it into a ball and wrap it with plastic wrap and leave it on the counter for ½ hour before starting to roll it.
- The dough can be made 1 day ahead and at this point you can place it into the fridge, but you need to take it out and get it to room temp before using it the next day.
- Divide dough into 4 pieces and work with 1 piece at a time rolling it through the pasta machine.
- Then refer to tutorial above in the post on how to add the herbs and cheese.
- CHEESE MIXTURE
- Add the ricotta and all of the cheese into a bowl, mix well by hand, then add salt and pepper and taste it, you might want more grated cheese, do it to your liking.
- Then mix in the beaten egg and make sure everything is combined well.
- I like placing my ricotta mixture into disposable pastry bags for a clean and easy way of piping out the cheese, but you can use a tablespoon as well. ( I usually do a heaping tablespoon)
- Just like the dough this cheese mixture can be made a day ahead of time, this way you can be all prepped and ready to actually start forming the ravioli the day of.
- PLEASE REFER TO THE TUTORIAL IN THE POST TO SEE THE PROCEDURE IN FILLING AND FORMING THE RAVIOLI AS WELL AS BOILING AND FREEZING THEM.
- BROWN BUTTER SAUCE
- Melt 1 stick of unsalted butter over medium heat, gently swirl as butter melts, turn down if butter sputters too much, let it foam up and then the color will deepen with brown bits on the bottom and have a beautiful nutty taste.
- Spoon warm butter over cooked ravioli and shower with more Parmigiano Reggiano cheese, enjoy!


 I’m Marie, a wife, mother, mother-in-law, and gramma of two beautiful girls. My passion is food, clear and simple but especially Italian food, hence the name of my blog, Proud Italian Cook. I want you to feel right at home here so grab a cup of coffee, I’ll get the pastries, take a look around and enjoy your visit! {


