Fresh Strawberry Pie

fresh strawberry pie

It’s strawberry season, and one of my favorite ways to showcase them is in this fresh strawberry pie, it’s the perfect summer dessert!

fresh strawberry pie recipe card 
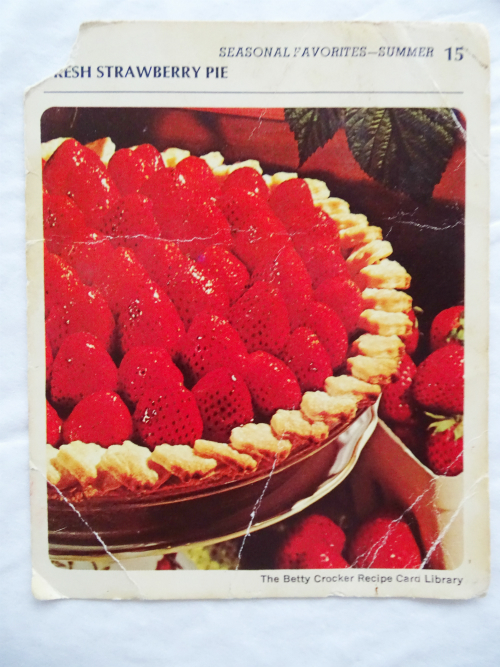
I have to admit I’ve been making this for years, it goes way back to the seventies, yes, the seventies’ when I was a young mother and wife. I would get so excited when I received my new batch of recipe cards from Betty Crocker, I would quickly file and categorize them into my lime green recipe box. Today that recipe card library is considered “vintage” or retro and I’ve even seen them show up on ebay every now and then.

When I look at those cards now I have to laugh at what use to be considered popular dishes back then, lots of saucy things, aspics, jello molds filled with everything under the sun even meat!

Times sure have changed but this recipe has always been a favorite, every time we had a summer cookout I would proudly serve this up for dessert and it was a hit each time, to this day I still make it at least a couple of times during the summer and you know what? It’s still a hit!

making fresh strawberry pie

The ingredients are classic and simple and still relevant for today,  fresh berries, a baked pie crust and a glaze made with the berries along with some sugar to sweeten and cornstarch to thicken it, that’s it!

fresh strawberry piefresh strawberry pie Serve it up nice and cold with fresh whipped cream floating on top, hello summertime!

fresh strawberry pie

You’ll be dreaming about this when there’s four feet on snow on the ground, I promise.

Follow me on Instagram to see what else I’m serving up weekly.

5.0 from 2 reviews
Fresh Strawberry Pie
 
Author:
Ingredients
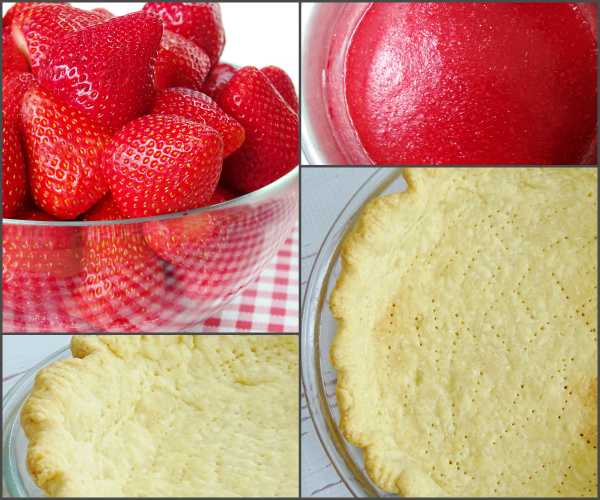
  • 1 9" baked pie shell, either homemade or store-bought, cooled
  • 7- 8 cups of fresh strawberries, stems cut off
  • FOR GLAZE
  • ⅔ cup sugar
  • 3 tablespoons of cornstarch
  • possible extra water
  • 2 drops of natural red food coloring, optional
  • whipped cream for serving
Instructions
  1. Blind bake your pie shell. prick it and place some parchment and pie weights on top so pastry doesn't shrink down on you, then set it aside to cool.
  2. Make your glaze by placing a heaping cup of strawberries into a small food processor or blender, process until it turns into a puree, then pour it into a measuring cup, it should measure 1¼ cups total, if not add some water.
  3. In a small sauce pan on medium heat add the sugar, cornstarch and berry puree and optional food coloring, stir until it thickens then let it bubble for 2 more minutes continuing to stir then take pan off the heat and let it cool down for 15 minutes.
  4. ASSEMBLY;
  5. Spread half of the glaze onto the bottom and sides of the cooked pie shell, then place fresh berries all around, cut side down filling the bottom, then take the rest and fill in the gaps on top of the berry base, piling them high, always cut side down for presentation.
  6. Spoon the remaining glaze all around and on top of the berries, then refrigerate for at least 2 hours so the glaze can set and it will be easier to cut.
  7. Be gentle when cutting it, then serve with fresh whipped cream.


Signature

Pastina Timbale with Zucchini

pastina timbale with zucchini

This dish is called  pastina timbale , a timbale is is a mold and food can be cooked or placed inside it. A pasta timbale is great for entertaining and it’s such a fun way to serve up little tiny pasta, or pastina as we call it in my family.

Even though you can make this in individual ramekins I prefer the more dramatic presentation using one large bowl, and it’s easier!

pastina timbale with zucchini This is my version of Michael Chiarello’s recipe for pastina timbale, he used a pound of diced Italian sausage folded into the pasta and sauce, I prefer using zucchini  instead of meat, it’s lighter and I think it pairs well with the delicate pastina, but you can be creative in using your favorite ingredients.

You want to sautee the zucchini first getting it to a nice deep golden brown color, then fold it into the mixture of cooked pasta, cheese and a some marinara preferably flavored with garlic and basil, I always opt for homemade but if you can get a good store bought one go ahead, make your life easier!

This is perfect for a summer buffet because you don’t have to worry about it sitting out at room temperature because nothing will spoil.

pastina timbale with zucchini Line a bowl with crispy and flavorful breadcrumbs, then press the pasta mixture into your mold.

pastina timbale with zucchini Let it sit for fifteen minutes and then it’s time to un-mold.

pastina timbale with zucchini TA-DA! Isn’t she pretty and how easy is that? It’s all about the presentation here.

pastina timbale with zucchini

And it tastes crazy good!

Proud Italian Cook is also on Instagram follow me to see what I’m cooking up during the week.


Pastina Timbale with Zucchini
 
Author:
Ingredients
  • 1 lb of tiny pasta, I like the round shape
  • 4 medium zucchini, all seeds removed and then diced small
  • olive oil for sauteeing zucchini, crisping the breadcrumbs and for brushing
  • 1 cup of good bread crumbs
  • 2 garlic cloves, diced small or grated
  • ½ cup of chopped fresh parsley
  • ¾ cup of grated romano or parmesan cheese
  • a sprinkle or 2 of pepperoncino, (optional)
  • 3 full cups of prepared marinara sauce, garlic and basil flavored, homemade or an exceptional store bought
  • 1 tablespoon of butter
  • salt and pepper to taste
  • basil and parsley leaves for decorating
Instructions
  1. In a skillet drizzle 2 tablespoons of the olive oil,add the garlic over medium heat till golden then pour in the breadcrumbs stirring until lightly toasted, 3 to 5 minutes. remove from heat, let it cool then add ¼ cup each of parsley and the grated cheese, then drizzle 2 more tablespoons of oil, toss and mix.
  2. Brush a large round bowl with olive oil, mine was 8 inches.
  3. Press breadcrumb mixture along the sides and bottom of the bowl evenly. Set aside.
  4. In a large skillet, drizzle 2 tablespoons of olive oil and on high heat cook your diced zucchini until nice and golden, keep stirring and watching it only takes a few minutes, set aside.
  5. Boil your pasta according to package directions, don't overcook it,then drain.
  6. Heat your sauce at the same time.
  7. Get a different bowl then add the drained pasta, the sauce, the tablespoon of butter, the ½ cup of grated cheese and the additional ¼ cup of parsley, toss together then fold in the sauteed zucchini.
  8. Taste and adjust the seasoning.
  9. Spoon mixture into breadcrumb lined bowl, evenly distribute it along the sides and bottom, pressing down lightly.
  10. Let it rest for 15 minutes.
  11. Un-mold onto a platter then decorate with basil and parsley leaves.
  12. Enjoy!


Signature

Grilled Seafood Salad

summer seafood salad This grilled seafood salad is one of my all time favorites for light casual summer eating, it’s a combination of shrimp, scallops and calamari which lay on top of mixed greens and crunchy vegetables, it’s all tossed in a lemon vinaigrette that’s spiked with a little limoncello, which gives the dressing that extra zing!

All the seafood can be grilled ahead of time and then the salad can be composed at the last minute so it’s perfect for entertaining. Add some crusty bread and a bottle of wine and I promise you’ll be in for a scrumptious treat!

Lagostina round grill pan

I used this beautiful new grill pan I got, but any grill pan will do.

stove topped grilled seafood Quite honestly I don’t like grilling delicate seafood directly on top of the grates on my out door grill unless it’s on a plank or something to hold them secure, because with out fail something always falls between the grates and I have to try and pick it out before it burns, so I’ve always used an indoor grill pan for this grilled seafood salad.

I already own a heavy cast iron grill pan with a popular name that I thought I would use much more than I do, but it’s a pain to clean. I end up boiling water in it to loosen up the food that gets stuck between the grates then I have to take my time using a plastic scraper to try and remove it all, like I said it’s a pain!

stove topped grilled seafood .

summer grilled seafood salad Fresh, easy and pretty enough for a summer party, picnic or any get together of friends or family!

summer grilled seafood salad Arrange everything on a big platter with crusty bread all around and some of the grilled lemons and you’ll be sure to impress your guests.


Proud Italian Cook is on Instagram, follow me there to so see what else I’m cooking up daily.

4.9 from 71 reviews
Grilled Seafood Salad
 
Author:
Ingredients
  • Amounts will very according to your seafood preference, this is just an estimate on what I used for 4 servings.
  • SEAFOOD
  • 8 large shrimp, tails off
  • 8 oz. sea scallops
  • 1 lb. of calamari ( I leave the bodies whole and cut into rings later, it's easier
  • SEAFOOD MARINADE
  • 4 cloves of chopped garlic
  • the zest of 1 big lemon
  • a handful of chopped parsley
  • salt and pepper
  • drizzled olive oil to coat seafood
  • 2 lemons, cut into slices for grilling
  • SALAD
  • 2 fennel bulbs, sliced thin
  • 1 bunch of celery hearts with the leaves, chopped
  • 5 radishes, sliced thin
  • a handful of capers
  • assorted olives, sliced
  • cherry tomatoes, sliced
  • For the greens I used a mix of water cress and arugula,(mostly arugula)
  • LEMON AND OLIVE OIL DRESSING
  • 1 part lemon juice ( with a splash of limoncello, optional) to 3 parts extra virgin olive oil
Instructions
  1. Make sure all seafood has been padded dry before you marinade them, you should have no added moisture.
  2. Place all seafood in a glass bowl with all the marinade ingredients, toss and let it sit for 40 minutes.
  3. Grill all your seafood, which can be grilled up to a day ahead, let it cool down then refrigerate them separately, if you're doing them ahead, not all mixed together. Either way seafood should not be warm or hot for this salad, room temp or cold.
  4. Whisk up your dressing and set aside.
  5. When you're ready to compose your salad slice the scallops into quarters or in half according to their size.
  6. Cut calamari bodies into rings.
  7. Leave shrimp whole and the calamari legs.
  8. In a separate large bowl toss all salad ingredients together except for the seafood, you can add more or less or any other ingredient you would like to add, there is no exact rule with a salad.
  9. Add and toss your dressing, less is more, don't drench it, taste as you go.
  10. Grab a huge platter, place salad on top, arrange all the seafood on top of the greens, add in some grilled lemons slices.
  11. Don't forget toasted or grilled crunchy bread, it's a must!


Signature