Easy Summer Limoncello Tiramisu

limoncello tiramisu

I can’t think of a more luscious dessert that’s easy to make and serve during the summertime, than this limoncello tiramisu.

Ladyfingers soaked in limoncello liquor and layered between a combination of mascarpone and whipped cream that’s streaked with lemon curd. The more it sits the better it gets, so make it hours before your guests arrive or better yet let it sit overnight so all the flavors can infuse and mingle together.

I love to serve this tiramisu in individual glasses, anything pretty and see-through is best, use your favorite glassware something four to six ounces is enough especially after a large meal.

limoncello tiramisu

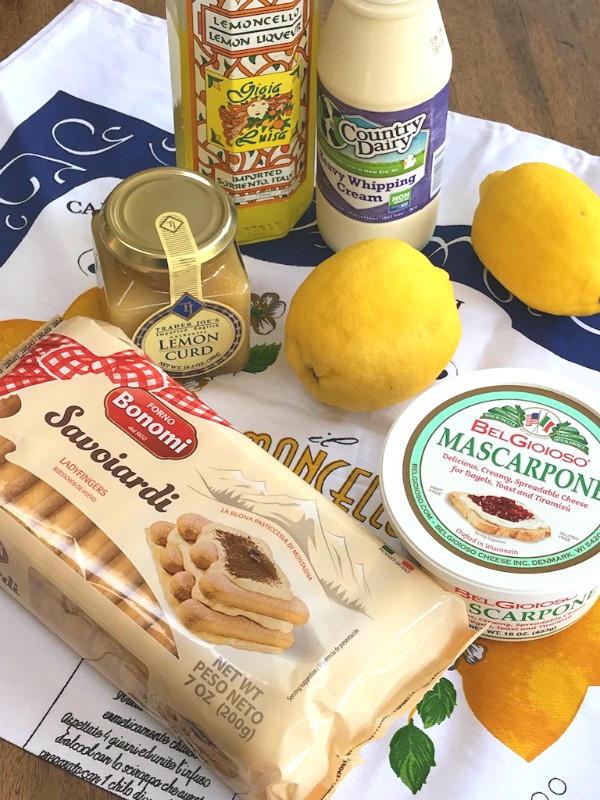
This is so easy to put together, there are no raw eggs involved like in the classic tiramisu which always makes me a little squeamish anyway, and there’s no need to make the lemon curd either, just pick up a jar at the store, every brand I’ve bought always tastes decadent to me, just make sure it’s pure lemon curd.

The key ingredient is the Savoiardi Italian ladyfingers, they’re the crispy ones not the soft ones and hold up to the limoncello when soaking them.

whipped mascarpone

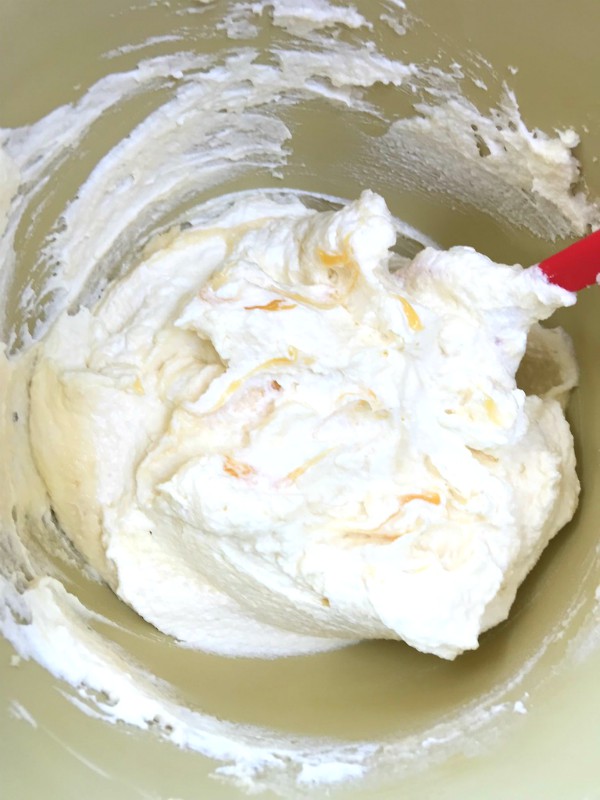
The heavy whipped cream gets folded gently into the cheese and lemon curd mixture, seriously just that alone is to die for!

limoncello tiramisu

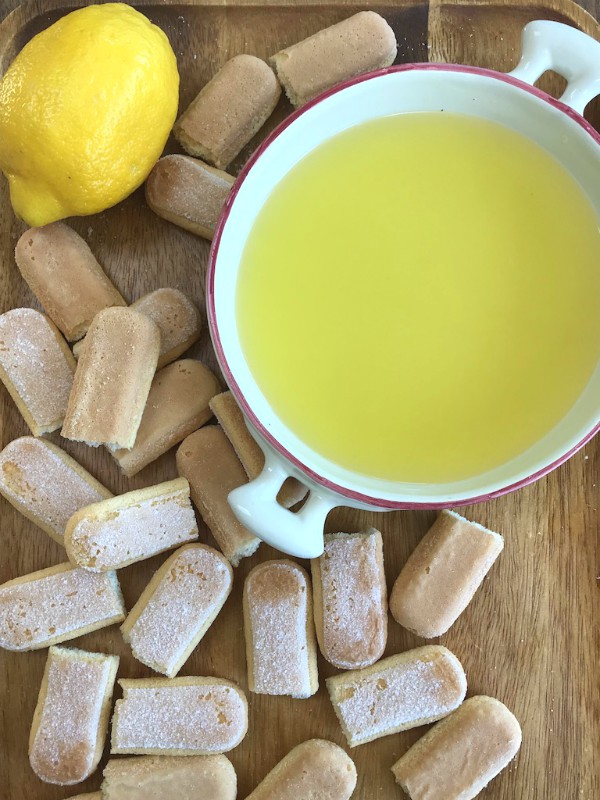
I’ve made this many ways, sometimes I’ll use just straight up limoncello for the dipping, but sometimes you’ll find that there are bottles of limoncello that might be stronger than others especially homemade, so in that case I add a little water and a bit of sugar with lemon juice to tone down the strength of the alcohol a bit, taste it to your liking and your guests and adjust accordingly.

Cut your lady fingers in half and then in a shallow dish do a quick dip on both sides of the cookie, one at a time, being careful not to over soak too much because they could easily fall apart.

If you prefer not to use limoncello liquor you can use straight up lemon juice to replace it adding a little sugar and water to cut the tartness if need be and then you’ll have a lemon tiramisu!

limoncello tiramisulimoncello tiramisulimoncello tiramisuslice of tiramisu

If you like to forgo the small individual servings, just double the recipe, make everything the same way layering it into a 9 x 13 inch glass pan with the cream, curd and whole lady fingers instead of sliced.

Rich and creamy, sweet and tart, anything lemon just screams summertime to me, easily one of my top favorite desserts to serve during the summer and honestly as soon as spring arrives. Think Easter!

I hope I’ve inspired you to make this incredible tiramisu with a boozy twist of limoncello for your next dinner party, I think you’ll love it!

5.0 from 1 reviews
Easy Summer Limoncello Tiramisu
 
Makes 6- 4 oz. individual serving size. I recommend using a pretty see-through glass vessels of some sort. If you're making more or have larger glassware just double the recipe.
Author:
Ingredients
  • CREAM MIXTURE
  • 1- 8 oz. tub of mascarpone cream, room temperature
  • 1 cup of heavy cream
  • 1- 10 oz. jar of lemon curd
  • 2 tablespoons powdered sugar
  • zest of one lemon
  • 1- 7 oz. package of Savoiardi ladyfingers, half of the bag with each cookie cut in half
  • DIPPING MIXTURE
  • ¾ cup of limoncello
  • ¾ cup of warm water
  • 3-4 tablespoons, lemon juice
  • a couple tablespoons of granulated sugar to taste dissolved into it
  • Garnish
  • lemon zest and raspberries
Instructions
  1. LIMONCELLO MIX
  2. In a shallow bowl mix up your limoncello for dipping, either straight up or cut it with the water, lemon juice and sugar if alcohol content is too high for your taste.
  3. CREAM MIXTURES
  4. In a bowl with an electric hand mixer, add the mascarpone cream, the zest of one lemon, and two tablespoons of powdered sugar, mix until smooth and creamy.
  5. Fold in ¾ of the 10 oz. jar of lemon curd into the cheese mixture.
  6. In a separate bowl whip up the heavy cream until you have stiff peaks.
  7. Fold the heavy cream gently into the mascarpone and lemon curd mixture until well combined.
  8. LAYERING
  9. Start with a little cream on the bottom then add the dipped ladyfingers on top, arranging it to fit your glass, then more cream mixture.
  10. Just keep repeating til you get to the top of the glass.
  11. Garnish with lemon zest, a drizzle with the remaining lemon curd and a raspberry.
  12. Cover gently with plastic wrap and refrigerate hours before serving or preferably overnight.


Signature

How To Make Grilled Artichokes Italian-Style

grilled artichokes


Today I’m going to show you step by step how to make grilled artichokes, a must for summer entertaining. This is my favorite side dish and sometimes appetizer to make during the the grilling season. Present a big platter of these smoky grilled artichokes to your guests and watch them disappear quickly. I’m certain you’ll be making them over and over throughout the season.

These lovelies are lightly stuffed, not with the traditional breadcrumb mixture but with the pronounced flavor of grated parmesan, or pecorino cheese, fresh parsley and lemon zest. The grill adds a smoky dimension and the cheese mixture when melted through the layer of leaves, takes the flavors over the top!

grilled artichokes


And if that’s not enough to rock your world you can dip each leaf into a simply made bright and citrusy lemon and garlic aioli. The recipe for the aioli will be provided at the end of the post, but first lets get these artichokes prepped because you can’t put them straight on the grill raw, they have to be pre-cooked by either steaming or boiling them first.prepping artichokes

Choose a nice medium sized fresh artichokes, you’ll want to cut the very end of the stem off, then if the stem is long enough use a veggie peeler and peel the top layer off of the stem, because that’s edible too.

Remove and tear off the small leaves at the bottom of the artichoke by hand then turn it on it’s side and with a sharp serrated knife cut about a third of the top off all the way through, then immediately rub all the cut surfaces with a raw lemon, because artichokes oxidize fast.

If you see any remaining outer leaves that have a pointy top just snip the tip off with a pair of scissors, remember rub all cut surfaces with lemon.

Now turn the artichoke cut side down and slice it right through the middle like I did in the photo above leaving the choke and spiny thistle fuzz in tact. It’s so much easier and neater to remove it all after they’ve been cooked and become tender throughout.

I like to steam my artichokes in water in a pot that has a lid. I throw in a few slices of lemon, whole garlic cloves, salt, pepper and a good drizzle of olive oil. Get the water to a boil then simmer it down and put the lid on.  The cooking time varies according to the size of the artichokes that you have, but a good rule of thumb is if you can tug at a leaf and it comes off easily with no effort they’re pretty much done, but taste it to make sure.

Take the cooked artichokes out with tongs making sure the water is drained out by turning them upside down, then set aside and let them cool down.


prepping artichokes

To clean the insides of all the spiny chokes I like to use a grapefruit spoon to gently scrape it out, like I said it comes out really easy after the artichokes are steamed.

Now at this point if you were making them for a party the prep is done, you could refrigerate them as is ready to be stuffed for the day you’re going to be grilling them.

Try not to be intimidated by the steps above, it’s really pretty easy and once you get the hang of it everything else is a breeze.

stuffing artichokes

As for the cheese mixture there are no specific measurements, again it all depends on how many artichokes you’ll be making, just grab a bowl put a handful or two of grated parmesan, pecorino or even a mix of both, the zest of one lemon and a handful of chopped parsley, if you need more, make more as you go, there’s no set rule here.

Take a spoon with some of the cheese mixture on it and stuff it into the layered artichoke leaves, you don’t need to over stuff it, a little on each leaf layer is fine.

Finally drizzle olive oil all over the top with a few grinds of black pepper, you won’t need salt because the cheese is salty enough.

grilled artichokes

Get your grill nice and hot, I put mine on high, then place them cut side down and don’t move them until you see deep golden char marks. The cheese mixture will also be melty and slightly crispy, at this point they’re done just take them off  because you don’t need to flip them over, remember they’re already cooked through.

grilled artichokesgrilled artichokes

Cheesy goodness with a nice smoky dimension all throughout, delicious warm or at room temperature.

grilled artichokes

If you haven’t had a grilled artichoke yet I promise you you’re in for a special treat!

grilled artichokes

Now for that citrusy aioli for dipping that I promised you, go grab a bowl and add a few big tablespoons of good quality mayo, one smashed or grated garlic clove, lemon zest and enough fresh lemon juice to thin it out into a dipping consistency with some salt and pepper to taste, I told you it was easy!

Now go ahead and make some grilled artichokes, happy grilling!

Signature

Party Worthy Roasted Potato Salad

roasted potato salad

This roasted potato salad is a must for summer parties, graduations and backyard BBQs. It’s healthy, vibrant in color with lots of crunch with a much lighter take on the classic potato salad because this one is not ladened down with heavy mayo.

Another benefit of no mayo is that it can sit out on a warm sunny day and you won’t have to worry about it going bad.

roasted potatoes

Look for the petite sized potatoes, when cut in half they’re a nice bite size. I used red and white, but the tri-color with the purple potatoes would be nice as well

Make sure you don’t over roast them, or dowse them with too much olive oil, they’ll be coated with the dressing later, just toss them into a bowl with a little drizzle to coat them, add in salt and pepper then put them on a sheet pan in a 425F oven.

Mine took about fifteen minutes turning them over once, you want them tender but on the firm side.

roasted potato salad

The crunch factor comes from sliced rainbow colored mini peppers, sliced radishes, red and green onion along with fresh arugula, olives, chives and parsley.

roasted potato salad

You don’t really need exact amounts for this depending on how big your platter will be and how many potatoes you’ll be making. I like to mix everything together in a big bowl first, slicing the veggies and adding the rest as I go along making sure it looks balanced with color and crunch, adding the arugula last by handfuls.

The dressing is made with equal amounts of olive oil and fresh lemon juice, a squeeze of dijon and 1 garlic clove, whisked together and spooned over the top.

roasted potato salad

The potatoes can be roasted the day before or the morning of, they should be at room temp or chilled before adding the other ingredients, not hot from the oven.

It’s colorful and vibrant and it makes the perfect party dish and side to almost anything you’ll be grilling up this season.

Follow along on my Instagram to see what else I’m cooking up during the week.

5.0 from 3 reviews
Party Worthy Roasted Potato Salad
 
You don't need exact ingredients for this, it depends on how many potatoes you roast, just add the veggies and herbs to your liking making sure it's balanced with everything.
Author:
Ingredients
  • mini petite potatoes, drizzled with olive oil, salt and pepper, cut in half roasted in a 425F oven for about 15 minutes turning once and making sure they are fork tender but still firm. Let them cool down.
  • sliced rainbow colored mini peppers
  • thin sliced radishes
  • small nicoise olives, drained
  • chopped red and green onion
  • fresh arugula
  • chives and parsley
  • salt and pepper to taste
Instructions
  1. Place the roasted potatoes and everything else into a big bowl, add all the other ingredients, tasting as you go along and making sure you have enough to make it look balanced.
  2. Carefully toss with your clean hands and place the salad onto a pretty platter.
  3. Spoon the dressing all over it.
  4. THE DRESSING;
  5. Equal parts of olive oil, fresh lemon juice, one garlic clove, a squeeze of dijon, salt and pepper.
  6. Whisk it up to incorporate.
  7. NOTE: The potatoes can be done the morning of or day before, then mix with everything else shortly before serving.


Signature