Time to Make the Pesto!

Our basil this year was the best ever! It was so nice to have it available whenever I needed it this summer, but now that the nights are getting cooler I thought it was time to cut it down and make some pesto before it starts to shrivel up because that would be just too sad!

UPDATE!
Since I wrote this post back in 201o I thought it would be nice to do an update on my beloved basil, it is now 2020, ten years later and I’m still going strong with my love for all things basil!

basil plants
My husband is still the gardener and he’s the one that grows it for me every year. We use to grow it in the ground but now we grow it in pots and the quality and taste seems even better!
picking basil
I make pesto many times during the season, I also freeze it, recently I bought some cubed silicone ice cube trays which I fill with my finished pesto, when totally frozen I then pop the cubes out and stick them into a container and tuck it back into the freezer. I can’t wait to defrost some to use in the dead of winter!
pesto ice tray

I personally do not like when pesto starts to turn brown, but years ago I found that just by blanching the leaves into boiling water for less than a minute and then submerging them quickly into ice water keeps their vibrant green color.

It’s been said that you can’t freeze pesto with the cheese in it, I’ve done it both ways and I see no difference, so I freeze mine completed with the cheese.

prepping pesto

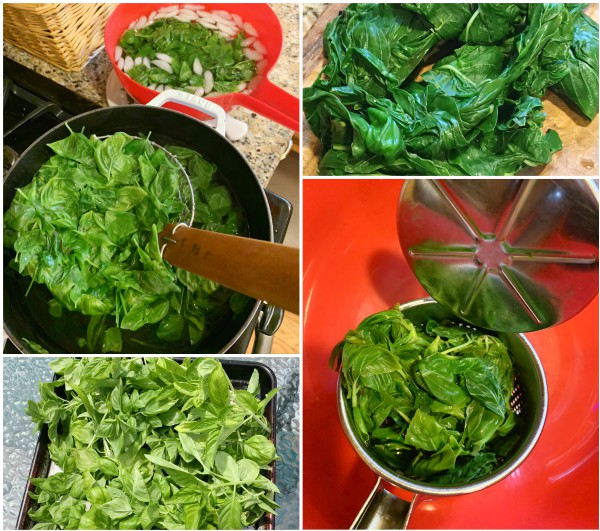
So after picking the leaves off the branches I wash them first then get a pot of water boiling. When the water is boiling blanch the leaves for less than a minute, then into ice water which you will then squeeze dry.

An excellent tip I got years ago from a fellow blogger was to squeeze the water from spinach using a potato ricer and so I thought why not squeeze the water out of the blanched basil the same way using a potato ricer, and let me tell you it works like a charm!

When I’ve purchased store bought pesto’s in the past I find them way too garlicky or just too oily for my taste, but when you make your own you can add or subtract any of the amounts that you put into it. My advice is keep tasting it as you go along mixing it to get the right balance for you.

processor pesto

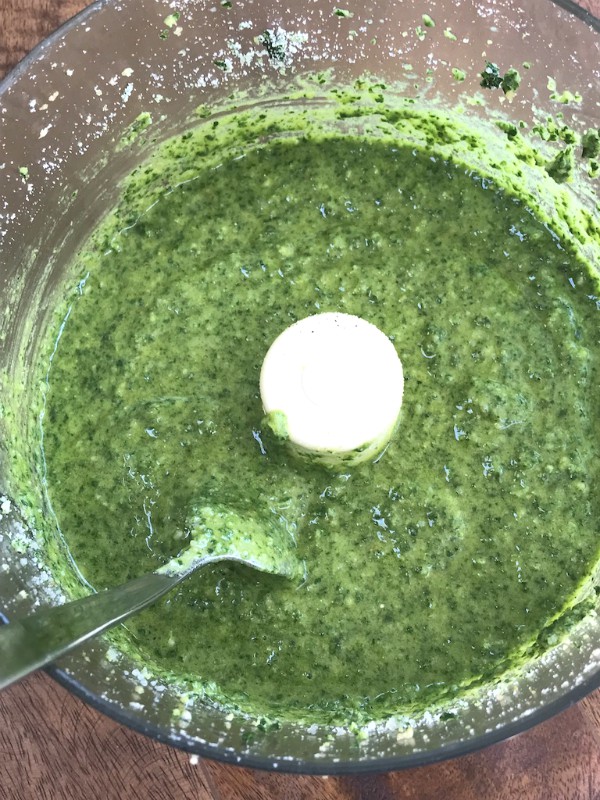
I stopped using pine nuts years ago, they’re just too expensive and then there was that whole “pine mouth” thing going around where badly produced pine nuts if eaten would take away your sense of taste and I didn’t want that to happen, so toasted walnuts it is, and you know what we love the flavor!

pesto ingredients
Good cheese like Parmigiano Reggiano,or even Pecorino Romano I have used, quality olive oil, fresh garlic and toasted nuts is all you need to make a fabulous basil pesto.

Delicious folded into warm pasta, so much flavor! Great with meats, salads, veggies, seafood and sauces, basil pesto is so versatile!

pesto recipe

Remember to keep tasting it, you might want to add more cheese, oil, salt, garlic or nuts whatever suits your own taste buds

ANOTHER TIP:

If you have an over abundance of basil leaves like I do you might want to try Lidia’s way of preserving them.

“Pluck the whole leaves and set them in a small paper cup, fill with water until the herb is submerged, then freeze. When frozen solid, pop the block of ice with the embedded herbs out of the paper cup and into a ziplock bag. The herbs, once the ice melts will be fresh and ready to use.”
 I hope you will give this a try it was so simple to do and you can pack quite a few leaves into the paper cups, another way to preserve your beautiful basil bounty!

Signature

Asiago, Romano and Black Pepper Biscotti

Savory biscotti, excellent on their own, even better when you’re sipping a glass of wine, also the perfect companion with all your homemade soups, chili’s and salads.
Just like its cousin the sweet biscotti, the combinations you could use here are endless and left only to your imagination!
These are so flavorful and perfect for entertaining, with every crunchy bite you’ll taste the bold flavors of cheese, the spiciness of the black pepper and just a hint of whatever herb you use.
Hard and semi hard cheeses are best, think parmesan, chedder, gouda, provolone to name a few, for nuts you could use pistachio’s, pine nuts, walnuts, almonds or pecans, herbs such as thyme, basil, oregano and rosemary, like I said the possibilities are endless!

Now go and create a batch, here’s the basic recipe. Feel free to switch out the cheese and herbs of your choice, I did!

Ingredients:
4 cups flour
1 1/2 tablespoons coarsely ground black pepper
2 teaspoons baking powder
2 teaspoons kosher salt
1 cup grated Asiago cheese
1 cup grated pecorino Romano
12 tablespoons (1 1/2 sticks) cold unsalted butter, cut into 1/2-inch pieces
1 cup thinly sliced almonds

Snipped fresh thyme, not too much
A healthy pinch of cayenne pepper, (optional)
3 large eggs lightly beaten, plus 1 large egg, lightly beaten, for brushing the dough
1 cup whole or 2 percent milk

Directions:

Combine the flour, peppers, baking powder, salt and cheeses in the bowl of a food processor; pulse to combine. Add the butter and pulse briefly. Add the almonds but do not process.
Combine the 3 beaten eggs and the milk in a measuring cup, then add to the food processor bowl, pulsing as you pour. Process just until the egg mixture and nuts are incorporated and the dough begins to form a ball.

Turn out the dough onto a large piece of wax paper, patting it into a disk. Wrap the disk in the paper and refrigerate for at least 2 hours and up to overnight.
Position oven racks in the middle and lower third of the oven; preheat to 350 degrees. Line 2 rimmed baking sheets with parchment paper or silicone liners.
Remove the dough from the refrigerator; if it is very firm let it sit at room temperature for about 15 minutes. Divide into 4 equal pieces. Roll each piece into a log about 11 inches long, 2 inches wide, and 3/4-inch to 1-inch thick. Place 2 logs on each baking sheet, spaced at least 1 inch apart. Use a pastry brush to lightly brush the tops of the logs with the remaining beaten egg, if using.
Bake for 15 minutes, then rotate the baking sheets from top to bottom; then bake for 15 minutes so the logs are golden on top and springy to the touch. Use a wide spatula to transfer the logs to a wire rack to cool for 20 minutes; keep the baking sheets at hand because they will be used to bake the sliced biscotti. (Wipe the paper or liners clean as needed.)

Reduce the oven temperature to 325 degrees. Working with one log at a time, place it on a cutting board and use a serrated knife to cut crosswise on the diagonal with a slow, sawing motion into 1/3-inch-thick slices, arranging them closely together on the baking sheets as you go. Bake both sheets for 15 minutes (on the middle and lower racks), then rotate them from top to bottom and front to back; bake for 15 minutes, until the biscotti are golden and crisp. Transfer to a wire rack to cool completely.
Recipe makes approximately 7 to 8 dozen.
MAKE AHEAD: The dough needs 2 hours rest in the refrigerator, or overnight. The dough can be made in advance and refrigerated for up to 3 days or frozen in a food storage bag for up to 3 months. Baked biscotti will keep at room temperature for up to 2 weeks in an airtight container.
Recipe adapted from The Washington Post 2009
Buon Appetito!
Signature

Melrose Peppers, It’s a Chicago Thing!

I couldn’t let summer fade away without posting about Melrose Peppers, a local variety of peppers that are at their peak right now. Back when I started my blog three years ago I think my second post was about Melrose Peppers, since then I have gotten numerous emails from fellow and former Chicagoans expressing their love for this humble pepper, just a couple of days ago I received this touching email from a man who pretty much sums up the feelings of so many regarding this delectable pepper, my family included!

“Oh Memories of “Ma” Josephine Selefski I have been having a craving for a few weeks now. Quietly searching and coming up empty. Feeling waves of anticipation, Similar to planning a wedding, birth of a child, your 21st birthday …Alas today. Today was the day! I found at the local grocery store “Melrose” peppers. Fresh succulent vine ripened tomatoes, fresh, still warm crispy crusty bread.

Sharp provolone cheese and pan oil roasted Melrose peppers, topped with a drizzle of vinegar and oil with Italian seasoning.Those of you who know the deliciousness … be aware the peppers are in season. As for those who don’t … I have to say my vocabulary is not large enough to explain. Think perhaps mouth- gasms. Ma turned this then young Polish kid into a Melrose pepper eating machine.

As I tore into this wonderful Sandwich, all I could do was close my eyes, savor the flavor and bow my head in thanks for that sweet woman that created so many great memories and introduced me to these flavors.

Thanks Ma, God bless you and keep you in his heart.”

Everyone has their own special way of making and preparing them that is near and dear to their hearts, my husband loves them simply sauteed in olive oil with a little red sauce added, he will make a whole meal out of them with some good crusty bread and a few hunks of provolone cheese!

On how they originated here the story goes like this, an Italian family immigrated to Melrose Pk, Il, which is a western suburb of Chicago, they brought with them the seeds of these tender and sweet thin skinned peppers.
They quickly became very popular among gardeners in the Italian community and then a local and very well loved fruit and vegetable market started selling them and made them extremely well known, and the rest is history!
Sometimes I like to change it up and stuff them, even though it’s time consuming it’s so worth it!
But ever since I discovered this seed and stem remover it’s made my life alot easier, it’s my new favorite gadget and I only payed $4.00 for it! Not only does it do a great job seeding and coring peppers, I use it to clean out the gills from portobello mushrooms, also great for seeding cucumbers and tomatoes and steming strawberries.

There are many ways to stuff Melrose Peppers, in the past I’ve used Italian sausage and fontina cheese, in this case I used Italian sausage as well as a mixture of ricotta, mozzarella, grated romano cheese, eggs and basil. I usually alternate between the cheese mixture and the sausage as I’m stuffing the pepper. I like to use a zip lock bag with the tip cut off for ease in doing the ricotta mixture, also a quick saute of the peppers beforehand makes them easier to handle.

Place them single layer in a baking dish with a light marinara sauce spooned over top , cover loosely with foil and bake at 375F until tender and the cheese and egg mixture is cooked through.


You might have come across this type of red pepper in your market sometimes refered to as Ancient Sweets red peppers, typically they are very long about 10 inches, since they’re so big they’re great for stuffing with whole pieces of sausage, nice and sweet and very tender similar to the Melrose Pepper.
Hope you’re enjoying all the local and seasonal produce in your areas as summer winds down.
Buon Appetito!
Signature