Paella, With An Italian Twist

Italian style paella I make no claims to be an expert in paella making, in fact I’ve only attempted to make an authentic version once, and it turned out just ok. I much prefer to put an Italian twist on my own version of paella. You see I’m not such a big fan of saffron, which so happens to be one of the star ingredients in traditional paella. It’s not that I dislike it, I just hardly ever cook with it, so it’s not really a “go to” spice for me.

So instead of flavoring my rice with saffron which by the way produces a beautiful color and unique flavor, I like to flavor my rice with a roasted red pepper puree. Not conventional, but it does taste amazing and it creates a beautiful golden red color to the rice.

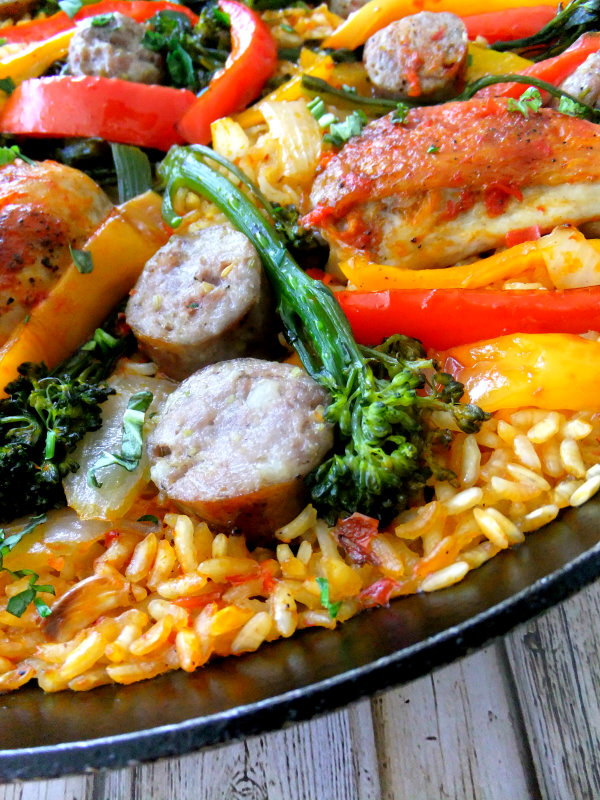
making Italian style paella In the past I’ve made and posted here on my blog, an all Vegetable Paella, a great party dish, main course or side. This time I wanted to change it up and do something different by adding a mix of Italian sausage and chicken, some red and yellow peppers and broccolini.

making Italian style paella After you saute your onions and garlic you add in your rice with red pepper puree and then spread and flatten the rice to cover the bottom of your pan. I use a wide 14″ paella pan with a hard anodized bottom. Now have some fun and place and arrange creatively all your colorful ingredients around the pan.  The last thing you do is carefully ladle warm broth on top of everything.

Italian style paella The end result is a spectacular pinwheel of color, delicious rice, a one pan meal that has a WOW factor with really not much effort at all, providing you do a little prep work beforehand.

Italian style paella Paella is the perfect party dish, put it in the middle of your table and everybody digs in! I can’t wait until the snow melts because the next one I make will be out on my grill. maybe with some seafood.

Italian style paellaItalian style paella I hope you try my Italian version of paella, I think you’ll love it as much as we do!

Paella, With An Italian Twist
 
Ingredients
  • 2 chicken legs, skin on, browned
  • 2 chicken thighs, skin on, browned
  • 3 big pieces of Italian sausage links, browned then cut into 1 inch chunks
  • 1 red and yellow pepper, cut into strips and pre-roasted (400 F. Drizzled with olive oil)
  • 1 bunch of baby broccolini, pre-boiled for 5 minutes then placed in an ice bath to retain color
  • 1½ cups of rice, a short grain like carnaroli or arborio
  • 4 cups of chicken broth, warmed
  • 1 cup roasted red pepper puree, store bought or made by using 4 red peppers, blistered, peeled, cored and then placed into a food processor until pureed.
  • ¼ cup dry white wine
  • 1 medium onion, large diced
  • 4 large cloves of garlic, shaved
  • grated parmesan or romano cheese
  • olive oil
Instructions
  1. Start out by browning your chicken pieces in the paella pan, get a nice crust on both sides and almost cooking it through but not quite, set aside.
  2. Wipe out the pan of excess oil, then do the same for the sausage links removing excess oil as well.
  3. Drizzle olive oil in pan then add in your shaved garlic and onion, saute until soft and golden.
  4. Toss in the wine and let it cook down for a minute.
  5. Add all of the rice and half, or a little more, of your red pepper puree. Toss until coated then flatten rice mixture on to the bottom of the pan.
  6. Sprinkle rice with a handful of the grated cheese, some salt and pepper.
  7. Take sausage chunks and arrange around the pan along with the chicken pieces.
  8. Creatively arrange the rest of the veggies all around the meat.
  9. Carefully ladle all 4 cups of warm broth on top.
  10. Take a pastry brush and brush the top of the chicken with more red pepper puree for added flavor and dotting a little more all around if you want to.
  11. Cook medium low, covered loosely with foil until moisture disappears.
  12. Place covered pan in the oven at 375 for 15- 20 minutes to make sure the meat is cooked through.
  13. Finish on top of stove until rice is desired tenderness.
  14. Total time, around 45 minutes or so.
  15. Let it rest for a few minutes.
  16. Garnish with chopped fresh basil and parsley.
  17. Feeds 4 generously.


Signature

Colored Cauliflower Frittata with Red Pepper, Onions and Brie

colored cauliflower frittata Last week my daughter stopped by and dropped off a huge bag of fresh, different colored cauliflower, the bag was so big I had to shared it with three people!

I couldn’t decide what to make with it, I wanted something that would showcase all their vibrant colors, and then I thought, why not a frittata?

raw colored cauliflower Have you tried the different colored cauliflowers? Basically they taste the same as their white cauliflower cousin but actually they have much more health benefits. The purple variety has the same amount of antioxidants that you would find in red wine and blueberries. The green version is high in vitamin A and C and the orange is filled with beta-carotene. So not only are they colorful and pretty to look at, they’re super good for you.

colored cauliflower frittata I love to make frittatas, you can eat them for breakfast, lunch, brunch or dinner. You can serve them with a salad or a nice steamy bowl of soup for a hearty complete meal.

colored cauliflower frittata

I pre- roasted all my cauliflower before I put the frittata together and I was pleasantly surprised to see how all the colors intensified even more in the roasting process. I added some creamy brie to heighten all the flavors.colored cauliflower frittata With a crisp salad on the side, it was the perfect Yin and Yang!

Colored Cauliflower Frittata with Red Pepper, Onions and Brie
 
Ingredients
  • 10 inch oven proof skillet
  • 6 eggs
  • a healthy handful of grated romano or parmesan cheese
  • 1 red pepper, large dice
  • 1 medium red onion, large dice
  • pre-roasted colored cauliflower, enough to spread around a 10 inch pan ( eat the extra)
  • pieces of brie cheese,scattered on top, rind removed
  • olive oil
  • salt and pepper, to taste
Instructions
  1. Pre- roast cauliflower at 400 F. on a baking sheet drizzled with olive oil, salt and pepper until soft and slightly caramelized.
  2. Beat 6 eggs along with the grated romano or parmesan.
  3. In 10 inch skillet drizzle olive oil and saute the onion and red pepper together until soft.
  4. Add the egg mixture on top, medium low heat and let eggs set a bit..
  5. After it sets, place roasted cauliflower all around. By letting the eggs set first the cauliflower will sit on top and not sink into the egg mixture.
  6. Dot with pieces of brie.
  7. Now place the whole oven proof skillet under the broiler until golden brown and brie has melted.
  8. Don't walk away! Stay close to the broiler and keep checking, it doesn't take long.
  9. Let pan cool down for 10 minutes then cut into wedges.
Signature

Round Veggie Lasagna

round veggie lasagna Let’s throw tradition out the window today and make a round lasagna, yes you heard me, a round lasagna! It makes for a great presentation especially when placed on a raised cake platter, all the ingredients are nicely contained within and the best part is it can be cut into picture perfect wedges without any cheesey mess.

I’ve been making round lasagna’s for quite a while because they’re fun and not the norm, here’s an old blog post I did way back in 2008. Do you have a special occasion coming up? Change things up and make a round lasagna, your guests will be impressed!

Making a round veggie lasagnaI decided to do a veggie version this time instead of the classic with roasted eggplant, zucchini, yellow and red peppers and onions, my cheese of choice was ricotta, romano and fontina, but honestly you can do any version you want, your own favorite combination of ingredients that you and your family love in lasagna.

This recipe is really all about the pan, you have to use a spring form pan!

round veggie lasagna A spring form pan will give it the perfect shape plus it has an easy to release clasp on the side with a removable bottom so it does all the hard work for you, just don’t be in a hurry to release it, let it rest when it comes out of the oven, a lasagna stays hot for a good hour.

round veggie lasagna I always make sure to have extra warm sauce to spoon on each wedge.

round veggie lasagna You can use fresh pasta sheets or dry that you boil yourself, you can’t use the preboiled kind in making this because it’s all about shaping your pasta sheets around the pan and you can’t do that with those thin precooked kind.

round veggie lasagna slice Step out of your oblong comfort zone and make a round lasagna next time!

Below I’m giving just tips and tricks to ensure a nice clean release of your lasagna, the ingredients you can make your own, have fun!

Tips on Making a Round Lasagna
 
Ingredients
  • These are just suggestions for an 8 or 9 inch spring form pan with removable bottom
  • Have a pot of sauce ready to go like marinara or a bechamel, plus extra for spooning on top of each cut wedge..
  • ½ lb or more depending on what size pan you have of boil your own pasta sheets, cooked al'dente.
  • Ingredients of your choice for layering, if using veggies cut them on the flat side instead of diced and have them pre-roasted and ready to go, or stick with a more classic version.
  • roughly 1½ lbs of ricotta cheese mixed with generous amounts of romano or parmesan, 2 eggs, salt, pepper and fresh herbs like basil or parsley.
  • A nice shredded melting cheese like fontina or mozzarella.
Instructions
  1. Cover the bottom of a baking sheet that has sides with tin foil, you'll thank me for this because there might be some leakage of juices.
  2. Brush or spray olive oil on the inside and bottom of your spring form pan.
  3. Start layering. Sauce first, then pasta sheets, cutting to form around the pan, more sauce, ricotta cheese mixture, other ingredients like veggies,sprinkle the shredded cheese and more romano on top.
  4. Repeat for three layers total, ending with sauce and some cheese on top.
  5. Place filled pan on the foil lined baking sheet and bake at 375 F. for 45 minutes.
  6. Cool on a rack so air gets on the bottom and let it rest for ½ hour, take a knife and go around the sides of the pan before you release it.
  7. Release clasp and place the whole lasagna on a nice platter.
  8. Make sure it's not steaming hot when you cut into it.


Signature