Making Marinara From Scratch

making marinara

Marinara is often called The Mother of Italian Red Sauces and I can see why. Marinara can be the base for so many dishes, think lasagna, stuffed shells, manicotti, meatballs, eggplant and chicken parmigiana, eggs in purgatory, dipping sauce for fried veggies, pizza, seafood stews, I can go on and on.

Marinara can be slightly altered to create other sauces such as arrabiatta, roasted red pepper and vodka just to name a few. Needless to say marinara is an important staple in any kitchen.

If you’ve never made your own now is the time to start. There are so many ways to make marinara and each family has their own special way, this is mine. You won’t find any butter and onions in mine, no wine, meat or tomato paste but you’ll always find fresh basil and garlic.

saute garlic

Over the years I’ve used many different brands of tomatoes, some have come and gone but the thing that is consistent is that I always use the San Marzano variety, specifically the cans that are stamped with the D.O.P. ( Protected designation of origin ).

D.O.P. Certification guarantees that a tomato is of the San Marzano variety, and the taste in my opinion is far superior than other canned tomatoes. Smooth with no acidity, pronounced flavor, dense with fewer seeds and slightly sweet, you’ll never need to add any sugar to your sauce.

When you use quality ingredients all your dishes will be superior tasting with little effort, and you just can’t get that from a jar. In my opinion they are well worth the higher price tag.

whole tomatoes

Look how thick and dense those tomatoes are!

immersion blender

Making your own marinara really takes no time at all, it’s quick and easy to make and you definitely won’t find that fresh taste in any store bought jar. You can make it ahead of time, it’s freezer friendly and you can double or  even triple the recipe if need be.

simmering sauce

There’s nothing like the smell of homemade marinara simmering on the stove.

large canned tomatoes

If you’re making a large amount look for those big cans which are around six pounds, I find they’re usually a pretty good price and perfect for making big amounts before the holidays and special occasions.

large pot of sauce

Just make sure you have a big enough pot!

cooking with kidsfreezer ready

Quart containers that you can purchase that are  food safe and freezer friendly are perfect for storing your surplus of sauce if you’re making a lot.

empty pot

Good to the last drop!

pasta girl

Making your own marinara is great to have on hand for a quick dinner, when unexpected company stops by or when your grandchild has a taste for some pasta with YOUR sauce. It’s like money in the bank!

Making Marinara From Scratch
 
There are many different versions of homemade marinara, this is my family favorite.
Author:
Ingredients
  • 3 - 28 oz. cans of San Marzano whole tomatoes with the D.O.P. stamp on the can
  • ¼ cup olive oil
  • 3 large fresh cloves of garlic per can ( 9) crushed ( please don't use bottled garlic!)
  • 1 teaspoon of salt per can (3)
  • pepper to taste
  • a generous handful of fresh basil, plus extra
Instructions
  1. Add your oil to a heavy bottomed pot.
  2. Toss in the. crushed garlic and cook on medium until you start to smell it and it's very lightly golden, if it burns start over.
  3. Pour in the whole tomatoes.
  4. Take an immersion blender and mix until smooth, the immersion blender will infuse all the garlic pieces into the sauce that were crushed.
  5. Toss in the generous bunch of basil and submerge it into the sauce.
  6. Simmer low for 1 to 1½ hours.
  7. NOTE;
  8. If you want your sauce a little thicker I sometimes add half a bottle of passata which is a strained tomato puree, readily available in most stores. Never use paste for this.
  9. When sauce is finished, remove basil bunch inside and discard.
  10. To finish add in some torn fresh basil leaves.
  11. NOTE:
  12. You can double, triple this recipe and you can freeze your marinara for up to 2 months. It freezes well.
  13. This recipe makes 3-4 quarts depending if you use a bottle of passata.


Signature

Mushroom Galette With Roasted Garlic And Thyme

galette

A galette is a rustic, freeform pie/tart which can be savory or sweet. They’re super simple to make and the finished results are very impressive!

This savory tart is filled with roasted cremini and oyster mushrooms with a bulb of roasted garlic smashed into it with hints of fresh thyme. There’s also a three cheese mix of asiago, parmesan and mozzarella melted into it.

Keep in mind you’re free to use any mix of mushrooms you like as well as any mix of cheese you prefer, that is the fun thing about making galettes, do your own thing, make your own combo, this is just a guideline for what I used, which happened to be very successful and delicious!

You can make your own pie crust or even buy a good quality one to make life easier. I’ll let you in on a little secret…  I used a Trader Joe pie crust for this, but every time I use it I make sure to ball up the dough first then I roll it out to the size I want, I never just take it out of the package and use it as is.

If you prefer to make a homemade crust, here’s one that I make that would go very well with this mushroom galette.
roasted mushrooms

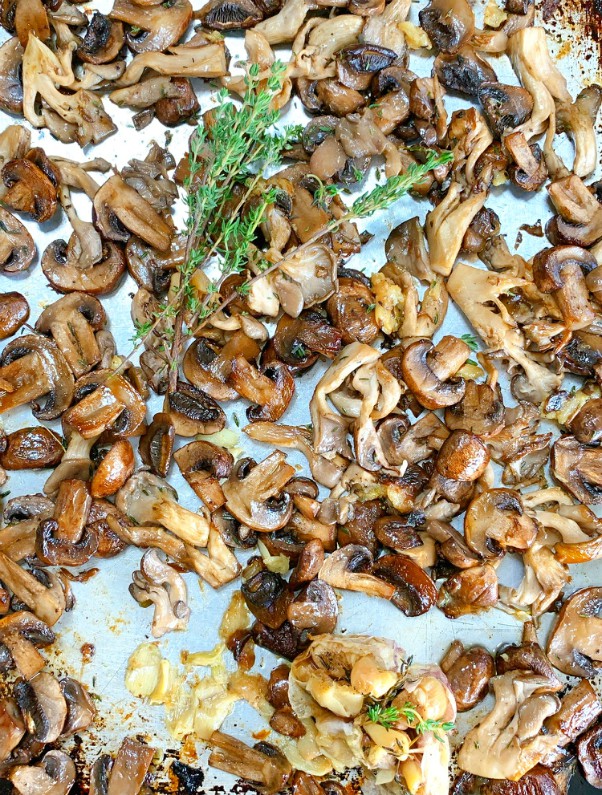
Roasted mushrooms always produce great flavor and even more so when you squeeze and smash roasted garlic into the mix.

roasted garlic

The garlic you can roast ahead of time, keeping it in the fridge and using it for multiple dishes as well as this one, it’s a nice treat to have tucked away.

mushroom galette

Another reason I’m such a fan of galettes is that you always get a nice, crispy crust all the way around and on the bottom with each and every slice.

sliced galette

The flavor combination of this rustic, stress free dinner is out of this world good, so good we couldn’t wait to have the leftovers the next day!

I hope you make this heavenly mushroom galette, it’s the perfect fall meal!

5.0 from 2 reviews
Mushroom Galette With Roasted Garlic And Thyme
 
Rustic, freeform and super impressive!
Author:
Ingredients
  • 1 pastry pie crust, either homemade or good quality store bought
  • 1- ½ lbs. of cremini mushrooms, sliced and roasted
  • ½ lb. oyster mushrooms, sliced and roasted (Can use all of one kind or a mix of others)
  • 1 whole bulb of roasted garlic
  • 1 cup shredded mozzarella
  • ½ cup shredded asiago
  • 2 heaping tbl. grated parmesan, plus a little extra for garnishing
  • thyme sprigs
  • olive oil
  • 1 egg for egg wash
Instructions
  1. Pre-roast your garlic ahead of time by cutting off the top portion of a whole bulb, placing it in tin foil and dowsing it with olive oil, some salt and pepper and a couple of thyme sprigs. Wrap it up and place into a 350F. oven around 30- 40 minutes or til golden and soft.
  2. Pre-roast mushrooms in 400F. oven sprinkled with thyme leaves and drizzled with olive oil, roast until all the moisture is out and they start to caramelize.
  3. When mushrooms are done and while the pan is still hot, squeeze and smash in the whole bulb of roasted garlic, tossing gently til incorporated, taste if salt and pepper is needed.
  4. On a piece of parchment that will fit a baking sheet, roll out your pastry to around 12 inches, then place the whole thing onto a rimmed baking sheet.
  5. Sprinkle the cheese mixture on the bottom of the pastry leaving an inch and a half border all around, reserve 2 tablespoons of the cheese mixture to dot on top of galette.
  6. Spread the mushrooms all around the top of the cheese mixture, covering it completely.
  7. Fold up the edges of the dough all around the filling.
  8. Put reserved tablespoons of cheese on top of mushrooms dotting it in sections. ( it just makes it look pretty when finished).
  9. Whisk egg then brush the folded up edge with it, you'll have leftover egg for sure.
  10. Sprinkle some thyme on the crust edge along with grated parmesan and black pepper.
  11. Top galette with 2 or 3 sprigs of thyme and pop it into a 400F. oven for around 30 to 40 minutes or until deep golden on bottom and crust, all ovens do vary.
  12. Serve warm or at room temp.
  13. Enjoy!


Signature

Parmesan Crusted Rainbow Carrots on Cheesy Baked Ricotta

roasted rainbow carrots

Gorgeous rainbow carrots! I have to admit they’re much more exciting than plain carrots and I’m drawn to them whenever I see their vibrant colors and pretty shapes.

I love roasting them because roasting creates caramelization and we all know that caramelization equals intense flavor, especially so when dowsed with grated parmesan and infused garlic oil.

The baked ricotta is a flavorful base that showcases the vibrant colors of the rainbow carrots and takes this lovely side dish to another level!

rainbow carrots

When I saw this huge bundle at the farmers market I just couldn’t resist, they get me every time!

roasted carrots

Tossing the carrots into a garlic infused olive oil is a nice savory contrast that goes well with the sweetness of the carrots as they roast.

roasted carrots

Halfway through the roasting process you sprinkle in a generous amount of grated Parmigiano Reggiano which will create a yummy crust all over as it bakes on.

ricotta spread

The ricotta gets prepped before it’s baked with grated Parmigiano, garlic, herbs and lemon zest. Both elements of this dish, the carrots and the ricotta are roasted separately then brought together as one.

roasted carrots

The ricotta becomes a heavenly pairing when eaten together with the cheesy carrots, and I must say it makes a dynamite presentation!

glazed carrots

I posted this version a couple of years ago, rainbow carrots roasted with balsamic and thyme, and again I placed it on a bed of baked ricotta, it’s crazy good as well!

carrot salad

And this pretty rainbow carrot ribbon salad, posted a few years ago, it’s crunchy, delicious and filled with so much flavor. I told you I can’t resist them!

Follow me on Instagram to see what else I’m cooking up during the week.

5.0 from 2 reviews
Parmesan Crusted Rainbow Carrots on Cheesy Baked Ricotta
 
Author:
Ingredients
  • 1 bundle of rainbow carrots, (preferably the long slender ones, if they have tops, snip them off,
  • (although if you can't find them you can use the plain orange ones but pick the thinner ones.)
  • 1½ cups of whole milk ricotta, liquid drained
  • 1 egg
  • 1 generous cup or so of grated Parmigiano Reggiano, half for the ricotta mixture and the other half for sprinkling on the carrots. ( you can sub grated pecorino)
  • 1 small smashed garlic clove
  • zest of a lemon
  • chopped basil and parsley
  • salt and pepper
  • infused garlic oil for roasting the carrots, but can sub regular olive oil
  • olive oil for drizzling
Instructions
  1. Toss the carrots with the olive oil, salt and pepper, then place them single layer on a rimmed baking sheet or parchment.
  2. Place the carrots into a 400 degree oven turning them until the bottom starts to look golden, you don't want mushy carrots, aim for a little bite to them.
  3. Halfway through the roasting process pull the pan out and generously sprinkle the grated cheese and some of the chopped herbs all over the carrots, return to the oven to let them finish cooking and a little crust forms on the carrots.
  4. When carrots are finished remove and set aside.
  5. Turn oven down to 375.
  6. In a small bowl add the ricotta, egg, salt and pepper, smashed garlic clove, lemon zest and some of the chopped herbs, mix well til all combined.
  7. Oil the bottom of a casserole dish.
  8. Spread your ricotta mixture on the bottom.
  9. Place casserole dish into oven and bake for around 20 minutes, ovens vary so check to see if ricotta is set, if it looks too pale, place it under the broiler for just a couple of minutes so it looks lightly golden, but don't leave the scene!
  10. Then arrange the cooked carrots on top of the cooked cooked ricotta, garnish with more grated cheese and fresh herbs and a drizzle of olive oil all over.
  11. Both can be done early in the day then warmed up later before eating.


Signature