 The spring weather reached havoc here in the midwest with major flooding all around us last week. As I drive through my neighborhood I see piles and piles of peoples belongings in dumpster after dumpster, many homes are uninhabitable just a few blocks from me, one of them a close friend of mine. For some reason my house was spared and not a drop of water came in. I feel guilty and grateful all at the same time.
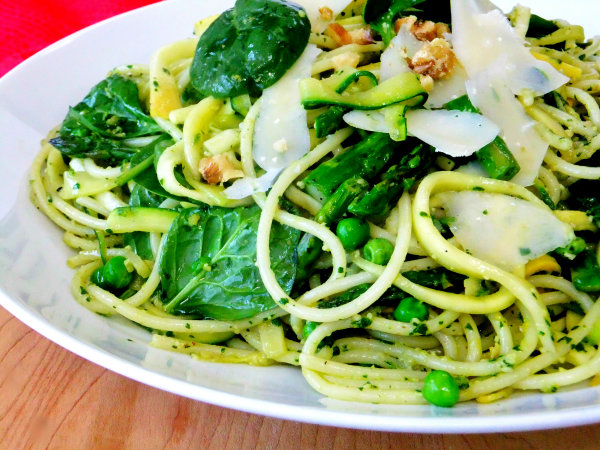
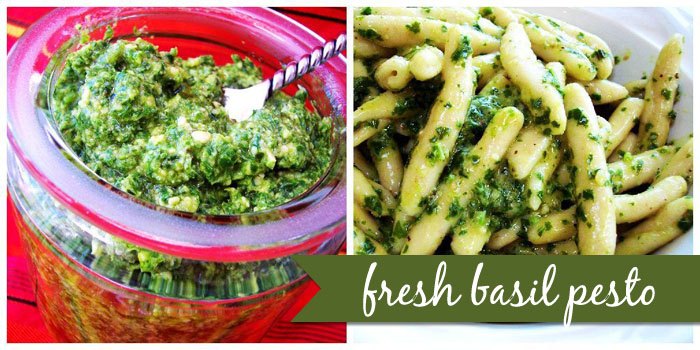
 Yesterday was a comfort food kind of day, something simple and easy but full of bright flavors. The key to this pasta dish is the parsley walnut pesto. Fresh parsley, toasted walnuts, grated parmesan cheese, garlic, lemon zest and juice all swirled with extra virgin olive oil, you could slather this on anything and it would be good!
 I decided to slather it all over spaghetti along with strips of yellow squash and zucchini, peas, asparagus and spinach. This is what I call cozy and delicious spring comfort food!
 The pesto clings to the warm pasta, every bite has intense flavor!
 Toasted walnuts and shaved parmesan tops this dish off, all you’ll need is a bowl and a fork!
- For the Parsley Walnut Pesto
- 2 cups fresh parsley
- ½ cup toasted walnuts
- ½ cup grated parmesan or romano
- 2 garlic cloves
- zest of 1 lemon
- juice of ½ lemon
- pinch of salt and pepper
- ½ to ¾ cup of olive oil
- For the Pasta
- ½ lb. spaghetti or linguine
- 2 medium zucchini julienned
- 1 yellow squash julienned
- 1 lb. small asparagus cut on the diagonal
- ½ cup of peas
- a good handful of fresh baby spinach
- reserved ½ cup of pasta water
- For the Parsley Pesto, place parsley, garlic and toasted walnuts in food processor bowl, pulse until well incorporated. Add in remaining ingredients and process until you get a nice smooth consistency
- For the pasta, prepare your squash first by making thin strips julienne style, you can do this with a mandoline, a julienne vegetable peeler, or by hand cutting planks and then making the strips with the tip of your knife like in the photo above. When finished, quickly saute until slightly wilted, a minute or two.
- Saute the peas and asparagus together in a little olive oil just until al`dente tender. set aside.
- Cook pasta and reserve some of the pasta water. When finished, toss hot pasta into a large bowl along with all the other vegetables, the peas, asparagus, squash and spinach. Add 2 or 3 heaping tablespoons of the pesto, adding more if needed and to your taste. If you want to thin it out add some of the pasta water.
- The leftover pesto keeps well in the fridge.


 This past weekend the weather finally felt like spring so it was time to clean the grill and fire it up for the first time since winter.
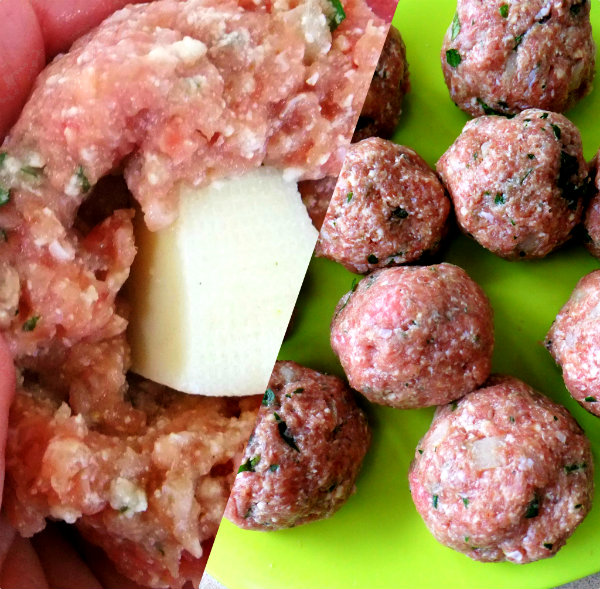 I decided I was going to try grilling meatballs, I’ve been wanting to try it, something different. I mixed them up the way I always make them minus the breadcrumbs. I cubed up some Fontina cheese and placed a hunk right in the middle. For my grilled meatballs I used ground turkey because that’s what I had, but you could use any ground meat mixture that you like.
 Just make sure your grill is nice and clean, rub some oil on the grates and because I used ground turkey I sprayed my meatballs beforehand with olive oil. I had no fancy gadgets I just plopped them right onto the grill, but here’s the thing, don’t get anxious and start moving them, let them form a crust on the bottom. For extra precaution I checked the bottom using a sharp edged spatula before I flipped them over.
 I made a roasted tomato and garlic sauce to serve with my meatballs, a great combination that enhanced all the flavors of the entire dish. We loved how they tasted! The slightly smokey flavor the grill added was a plus along with the nice crispy outer crust that formed. Moist and flavorful inside with gooey Fontina cheese oozing out. This would be great for a party, you could even make them as kabobs!
 And now for my exciting news! I wrote an ebook/cookbook! I can hardly believe it myself but I really did! Within a couple of days I will be releasing it here on my blog. So please come back and read all about it, I can’t wait to share it with you!
 I’m Marie, a wife, mother, mother-in-law, and gramma of two beautiful girls. My passion is food, clear and simple but especially Italian food, hence the name of my blog, Proud Italian Cook. I want you to feel right at home here so grab a cup of coffee, I’ll get the pastries, take a look around and enjoy your visit! {


