Pistachio Tiramisu No Eggs Required

Pistachio dessert

Tiramisu is a beloved Italian dessert. It’s elegant and rich with luscious creamy layers and coffee soaked ladyfingers, usually spiked with a little liqueur. It’s surprisingly easy to make because there’s no baking involved. This recipe replaces the raw eggs with whipped cream which sometimes makes people leary of eating it and making it, myself included.

I can assure you it tastes just as decadent as the classic.


Pistachio cream

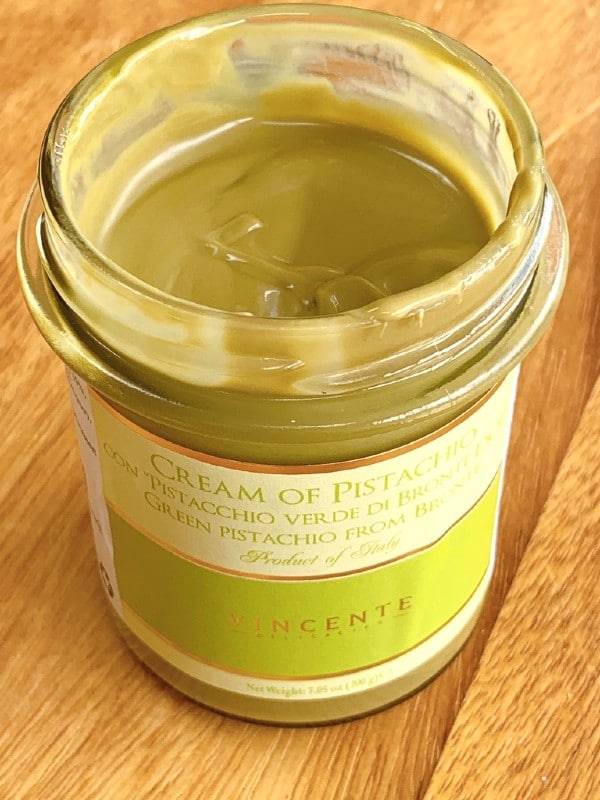
There are so many versions of tiramisu but pistachio is on the top of my list! I recently bought this jar of cream of pistachio ( not sponsored) and have been saving it to make a tiramisu and it was worth the wait, just look how dreamy it is!

On a side note there are many recipes on the internet that shows you how to make your own pistachio butter. I might give that a try next time if I get energetic. Keep in mind jarred pistachio cream can be quite pricey but in my opinion it’s still worth it in the convenience factor and the exceptional taste.

Besides, this is a special dessert, not something you make every day but for special occasions, so go ahead and splurge!

tiramisu mixture

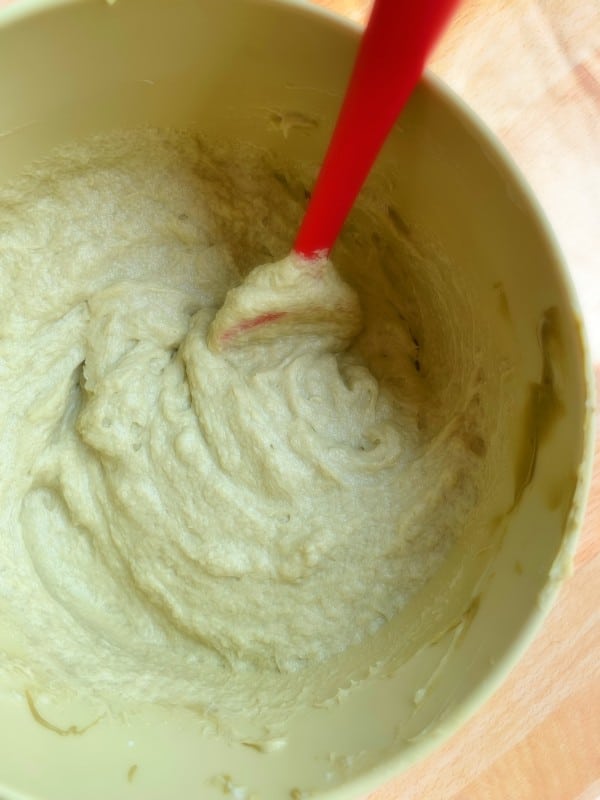
Cream of pistachio swirled into mascarpone cheese along with fluffy whipped cream is beyond heavenly!

making espresso

To add to the amazing flavors of this tiramisu a robust espresso spiked with a fancy pistachio liqueur ( not sponsored) that I love and adore, brings the taste to another level!

If you don’t have pistachio liqueur you can use some coffee or amaretto liqueur or even a sweet marsala, but if you want to splurge a little go for the pistachio.

lady fingers

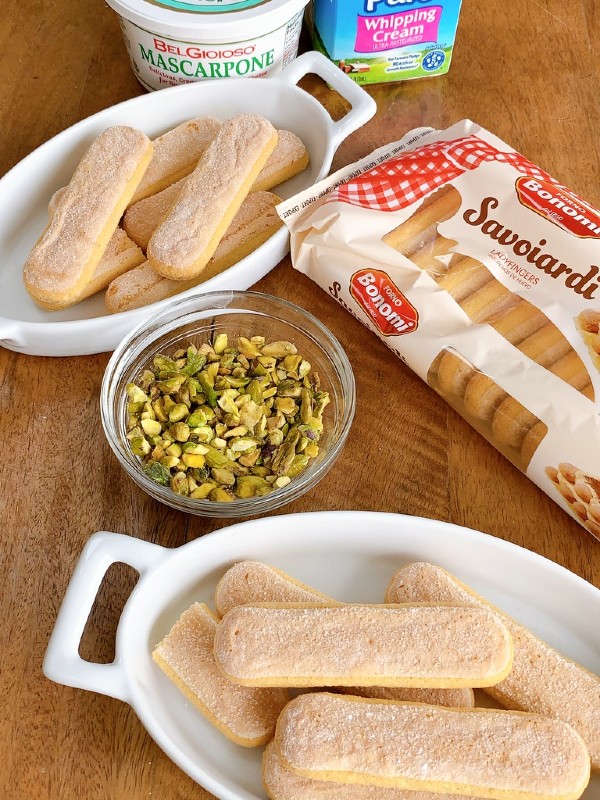
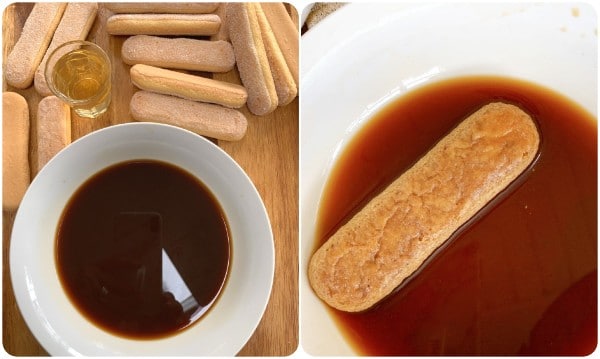
Savoriardi ladyfingers are a sweet and fairly dry finger shaped sponge cake, perfect for dipping into the spiked espresso mix.

ladyfingers dippedtiramisu

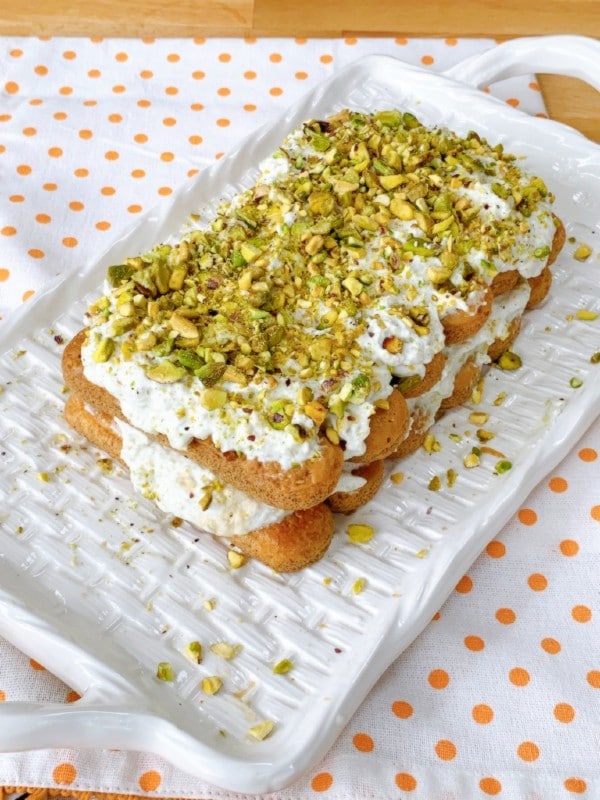
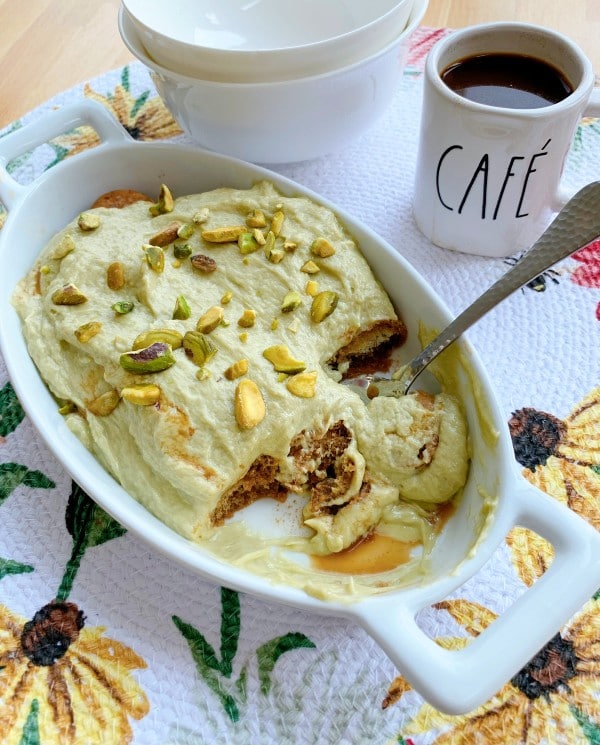
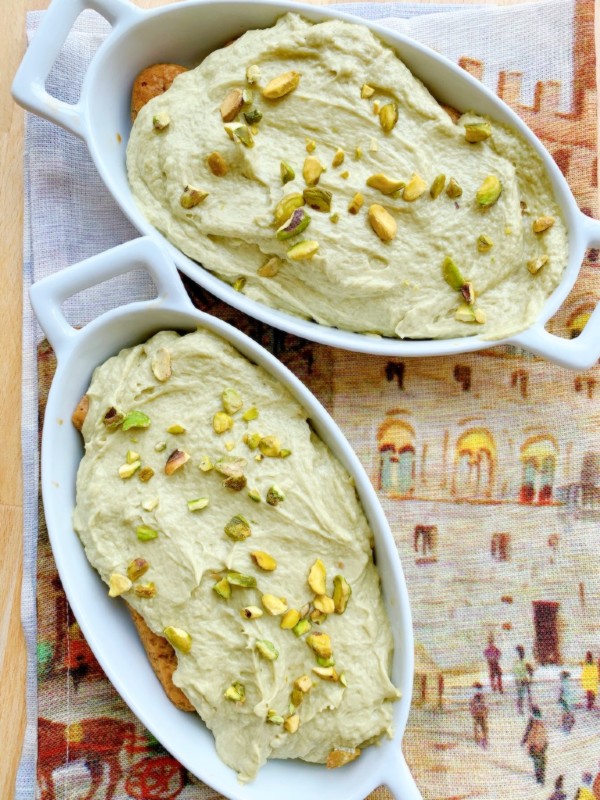
You can free form your tiramisu right onto a platter using two layers like I did above or assemble them into individual glasses, you can place and layer your tiramisu into oval dishes, square, rectangle, even gratin dishes like I did below.

individual tiramisu

Sometimes for fun I like to make just one layer of the soaked savoiardi and smear the creamy mixture right on top. Which ever way you assemble it you’ll never go wrong!

Pistachio Tiramisu No Eggs Required
 
Present this special tiramisu into individual glasses, freeform style, small serving dishes, oval, square or rectangle 9x9 serving dishes.
Author:
Ingredients
  • 1 7 or 8 ounce jar of cream of pistachio ( if making your own you'll need to add a little sweetener otherwise the jarred cream is sweetened enough.)
  • 1 cup of heavy whip cream, whipped to medium
  • 1 8 oz ounce container of mascarpone cream, room temp
  • 1 7 oz. package of savoiardi biscuits/ ladyfingers
  • 2 cups brewed espresso
  • 3 tablespoons of pistachio liqueur or one of your favorites like amaretto, coffee or sweet marsala
  • Chopped pistachios for garnish
Instructions
  1. Brew the espresso, when it cools down pour it into a shallow bowl and add the liqueur, set aside.
  2. Combine the mascarpone with the cream of pistachio, mix well. NOTE: Sometimes if purchased in a jar the pistachio cream may be really thick, you can let the jar sit in warm water for 15 minutes or so or add a little milk to it to make it looser, don't let it seize up. The mascarpone and the pistachio cream should blend well together.
  3. In another bowl whip up the heavy cream until medium peaks.
  4. Fold the whipped cream into the mascarpone cream mixture until well combined.
  5. TO ASSEMBLE:
  6. One by one dip lady fingers into coffee mixture quickly then place onto the bottom of your serving dish, suggestions are stated in my post and above in my summary.
  7. Cover with a layer of the pistachio cream mixture, then repeat.
  8. Let your tiramisu chill for at least a few hours or even overnight for maximum flavor.
  9. For a lighter version just do one layer of dipped savoiardi and spread the cream mixture on top.
  10. Enjoy!


Signature

Pistachio Crusted Scallops with Winter Citrus Salsa

pistachio crusted scallops

I’ve been craving citrus lately, maybe it’s because January is such a cold and gloomy month and all that colorful citrus just brightens my day, I don’t know but I’m sure loving all the different varieties that are available right now. I recently made this salsa using my favorite cara cara, blood and navel oranges, the vibrant flavors pair wonderfully with sweet and buttery sea scallops, it was the perfect match, but if you’re not a fan  of scallops I’m sure any firm white fish would work just as well.

The scallops are crusted with finely chopped pistachio’s, a little butter and parsley, and I can only describe the two combinations as luxurious, and both the salsa and the scallops are ridiculously simple to make!

winter citrus salsa You can make your salsa earlier in the day and have that all ready to go, it takes a little time cutting the segments and removing all the pith, but other than that this whole meal comes together very quickly.

pistachio crusted salsa I only buy dry packed sea scallops and I still press them on paper towel to make sure they’re as dry as possible, dry scallops guarantee a beautiful sear.

pistachio crusted scallops

After your scallops are seared and finished cooking, which is only a couple of minutes, you press your nut mixture on top and spoon that lovely citrus salsa onto the plate.

pistachio crusted scallops

This is an elegant, light, scrumptious meal, like fine dining at home, a contender for Valentine’s Day for sure!

pistachio crusted scallops

I can’t wait to make this again.

(Want to see what I’m cooking up during the week? Check out Proud Italian Cook on Instagram )

5.0 from 1 reviews
Pistachio Crusted Scallops with Winter Citrus Salsa
 
Author:
Ingredients
  • CITRUS SALSA
  • 3 different varieties of orange citrus like cara cara, mineola, navel, blood orange, cut into small segments with pith removed.
  • 2 or 3 tablespoons of red onion, finely chopped
  • 2 green onions, finely chopped
  • half a clove of garlic, grated on a microplane
  • a small bunch of chopped parsley
  • a dash of red pepper flakes, optional
  • salt and pepper to taste
  • olive oil to loosen the salsa up
  • PISTACHIO TOPPING
  • half cup of pistachios, I used the toasted ones from Trader Joes, chop them up small in mini food processor or by hand
  • 1 tablespoon of unsalted butter, melted
  • 2 tablespoons of finely chopped parsley
  • salt and pepper to taste
  • 1 pound SEA SCALLOPS, dry packed, padded dry with paper towel and beard removed
  • additional butter for searing scallops, season with salt and pepper
Instructions
  1. In a bowl mix together all salsa ingredients, set aside.Salsa can be made ahead of time.
  2. For the pistachio topping, chop nuts and place into a small bowl. Melt tablespoon of butter then toss in the parsley, stir, then add butter mixture into the chopped pistachios stirring well to coat all of the nuts completely.
  3. For the scallops, heat your pan nice and hot, do not use a non-stick pan.
  4. Add 1 or 2 tablespoons of unsalted butter or a mixture of olive oil and butter to the hot pan, when fat begins to smoke then add scallops, make sure they are not touching each other.
  5. Do not disturb until the underside is browned and crisp around 2 to 4 minutes then turn over gently with tongs and cook another 2 minutes on the other side,remove to serving plate.
  6. Pat the nut mixture on top of each scallop.
  7. Spoon citrus salsa all around, serve immediately and enjoy!


Signature

Fig and Pistachio Biscotti

packaged biscotti
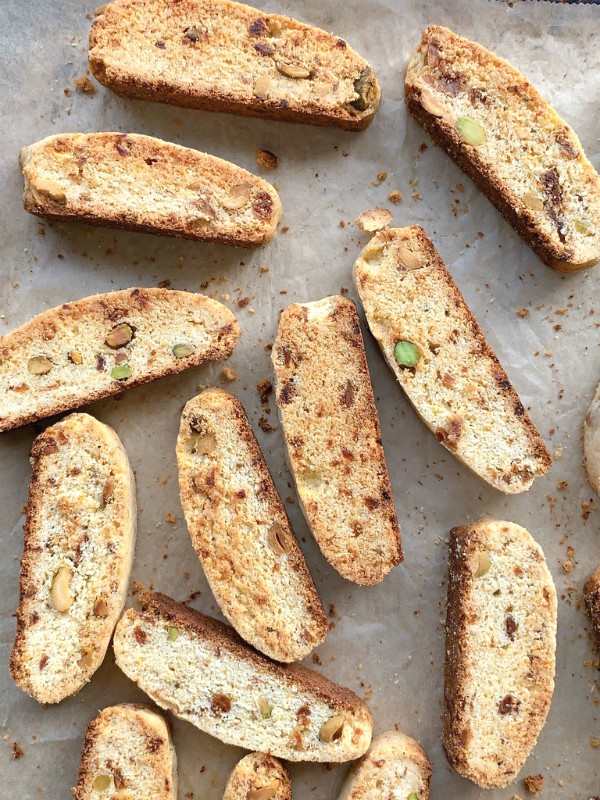
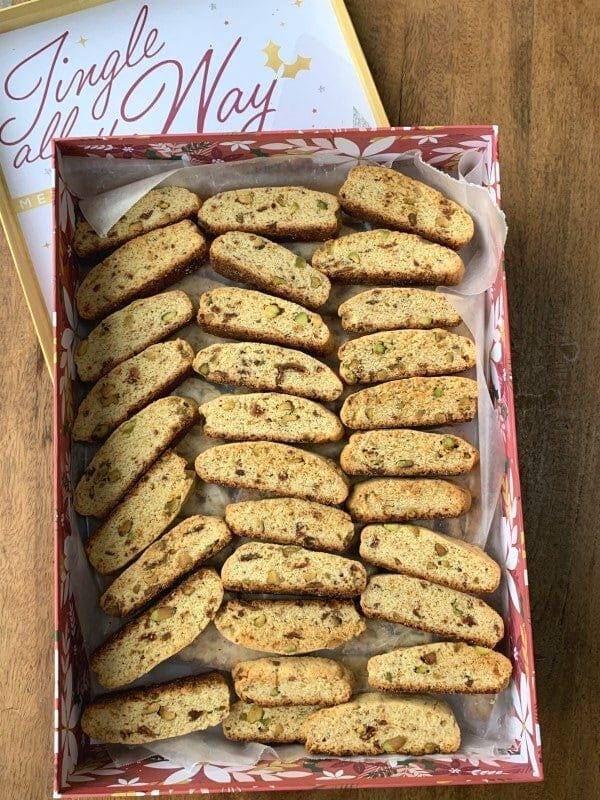
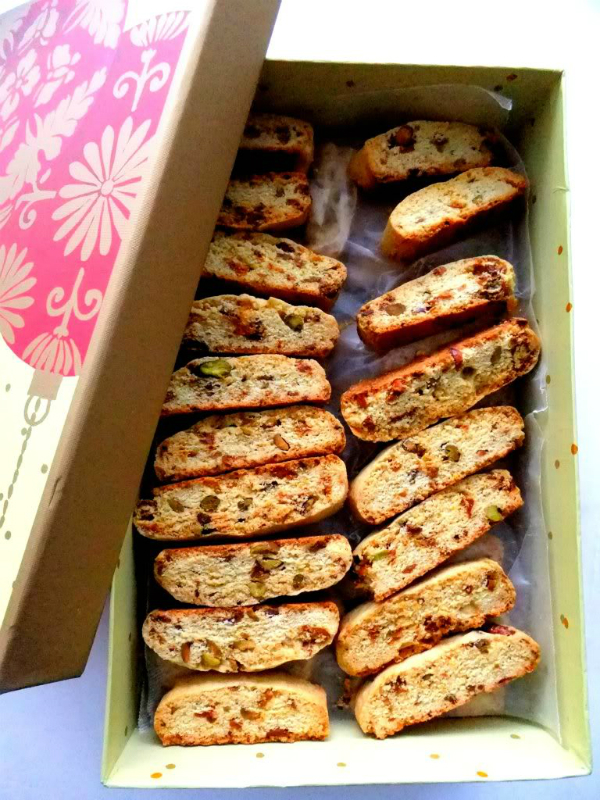
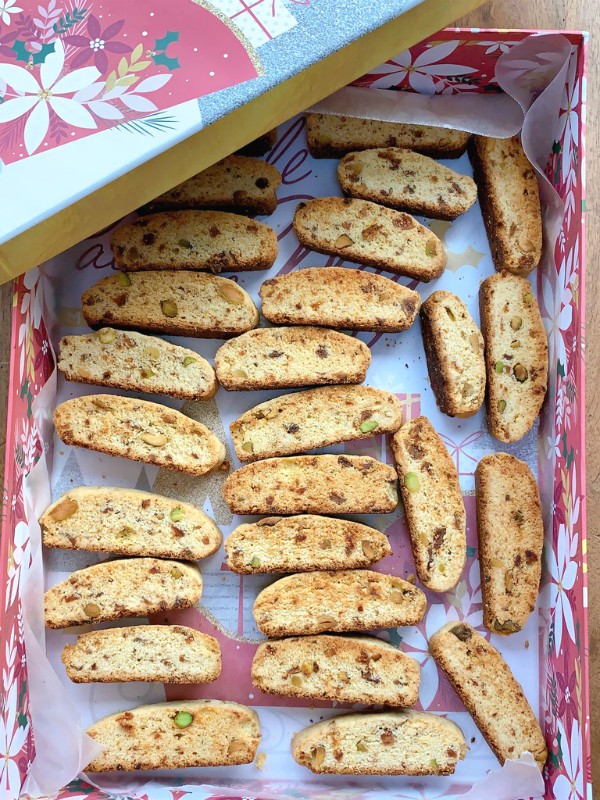
It’s that time of year again. and baking is in full force! Are you ready to bake some biscotti? I think you’ll love these fig and pistachio biscotti. The blending of fig with a hint of warm anise and orange makes this biscotti flavor such a winner, not to mention the pistachio nuts!
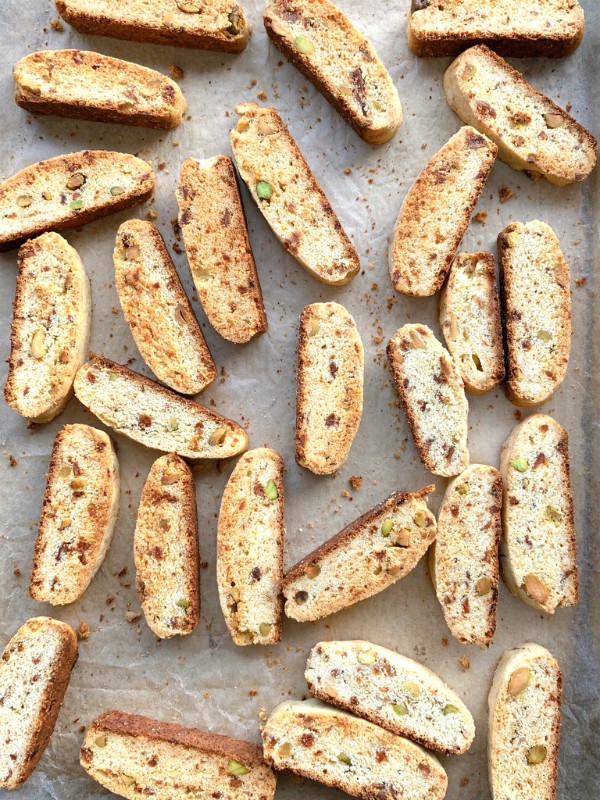
I would encourage you to double or triple the recipe so you can give them out as gifts to friends, family and neighbors.

Biscotti keep very well so you can make them in advance. I like to store mine in boxes or cans with wax paper in between the layers.


baked biscotti
Biscotti are twice baked, crunchy and perfect for those that dip them into coffee, espresso or milk, I’m personally not a dipper, I prefer the crunch all the way!
You’ll love how your house smells when they’re baking, the aroma lingers for days!
chopped figs
Just be sure to pulse your dried figs in a food processor to resemble the size of small peas, and be sure to cut off the hard tips before doing that. Of course you can always chop them up by hand, if you have the patience.
dough log
I like to measure the logs with a ruler, 9×2 inches is what you’re aiming for, but if you like a bigger biscotti size, go for it!
baked biscotti logs
Out of the oven and cooling down!
cut biscotti
Twice baked and ready for ( sampling first) boxing up!
boxed biscotti
There are so many pretty holiday or special occasion boxes, I’m always on the search for them and keep them stashed away.

fig and pistachio biscottiedible gift
These smaller containers I thought would be perfect for a neighbor gift this year ( ordered them on QVC) they can keep the container and reusable bag.
I’ll be making my deliveries soon so they can enjoy!

Happy Baking!

Fig and Pistachio Biscotti
 
Author:
Ingredients
  • ½ cup dried figs like kalamata, measured after pulsed in food processor to the size of peas (remove tips of figs before pulsing as they are hard and inedible)
  • 2¼ cups of all purpose flour, unbleached
  • 1½ t. baking powder
  • ¼ t. salt
  • ½ cup unsalted butter, room temp
  • ¾ cup sugar
  • 2 large eggs
  • 1 t. vanilla
  • 1 t. anise extract (NOTE: if using anise oil only use ¼ t. or a tiny bit more if you like it)
  • 1 t. anise seeds
  • 1t. grated orange zest
  • ½ cup shelled pistachios, unsalted
Instructions
  1. Heat oven to 350F
  2. With your mixer beat butter and sugar on medium high until smooth, about 2 minutes.
  3. Add eggs, extract or oil, zest and anise seeds, beat til light and creamy.
  4. Combine dry ingredients in a small bowl and then incorporate into the butter mixture.
  5. Add figs and nuts on low speed til combined.
  6. Place all the finished dough from mixing bowl onto a parchment lined baking sheet.
  7. Form two 9x2 inch logs apart from each other and bake until lightly browned. Watch your oven, mine took less than 25 minutes.
  8. Remove pan from oven and let it cool for 20 minutes, otherwise they will crumble when cut.
  9. Using a serrated knife, take your time and slowly cut logs into ½ inch thick slices.
  10. Arrange biscotti on their sides on the baking sheet.
  11. Return to oven and bake until nicely golden, for around 5-6 minutes, then flip them over and do the other side, another 5-6 minutes or until it reaches the golden color you like. Ovens do vary.
  12. The longer the second bake the crispier they will be.
  13. Cool on rack.
  14. Makes somewhere around 40


Signature

PANETTONE STUFFED WITH PISTACHIO CREAM!!!

Years ago, I mean YEARS ago, somewhere in a magazine I saw a picture of a store bought Panettone that was stuffed with pistachio cream, I have always keep that in my memory bank for something I wanted to try, since Hubby loves Panettone.

Well today, friends called and I invited them to stop by later for coffee. Of course it’s never just coffee! I had to have something to go with it. So I went into my pantry and there sat a box of Panettone, and I instantly recalled the stuffed one I had seen in an Italian magazine years ago. I even had some shelled pistachios! So I got on my computer and googled pistachio pudding, found something that sounded good ,so I quickly whipped it up, because it had to cool down for a couple of hours. When it finally cooled I folded in some freshly whipped cream!! Oh so sinful!!!
I even got adventurous and spun a little sugar on top, as that is what was in the picture. Never having done that before, it really didn’t turn out, I wanted it to be like thin strands, but mine turned out like thick brittle!!! Oh well, I kept it on for the pictures anyway!

I sliced the Panettone in 5 sections, and lightly brushed some Amaretto on the layers for some added flavor.

It did take a little longer because of the pistachio cream, maybe Cannoli cream would be good with it??? All in all it turned out pretty good!!

Have a great weekend!!!!!

Signature