Christmas Tree Shaped Cheese Ball

cheese ball

Cheese balls, they’re the perfect party food! You can make them into the shape of a round ball, a log, I’ve seen them shaped as footballs, pumpkins, birds, reindeer, snowman I could go on and on.

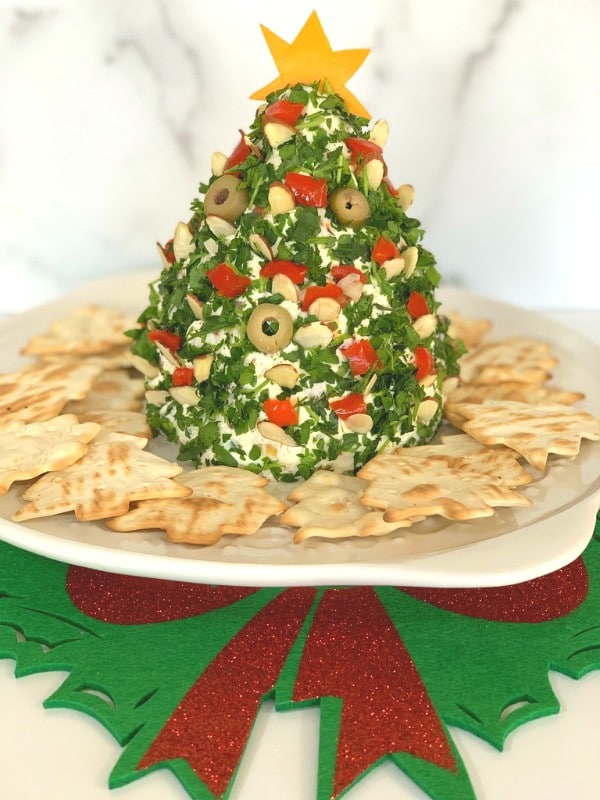
Since we’re deep into the holidays right now I made this festive looking cheese ball that’s shaped into a Christmas tree.

muffuletta salad

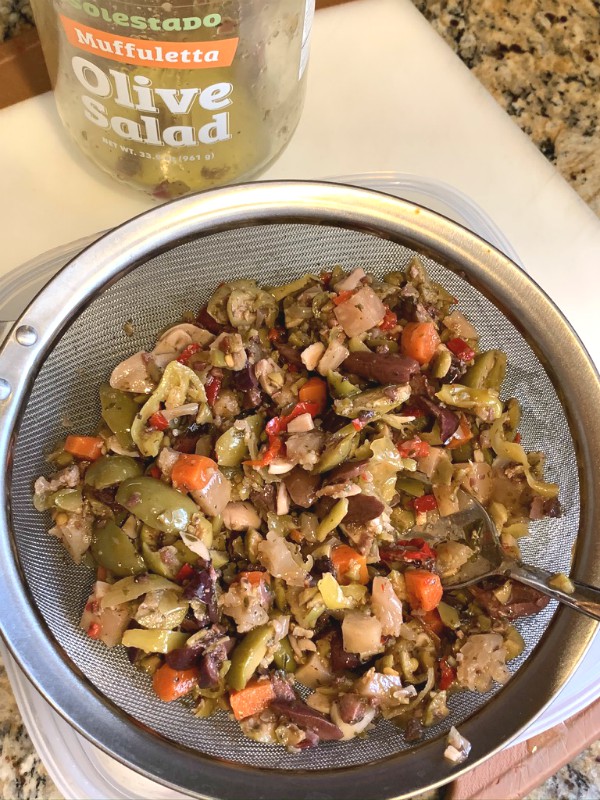
The key ingredient in this cheeseball is muffuletta salad, it comes in a jar and it’s pretty easy to find. Jars may vary ingredients but normally they’re filled with things like Kalamata and green olives, red peppers, cauliflower, carrots, garlic, capers and some spices. If you can’t find muffuletta salad you can sub in an olive salad which is similar and just as good.

cheese ball ingredients

You’ll want to drain the salad of any excess oil really well, then add it to a mix of cream cheese and mascarpone.

Honestly when all is blended together there’s no need to add anything else except some fresh chives if you like.

cheese ball mixturecone shape cheese ball

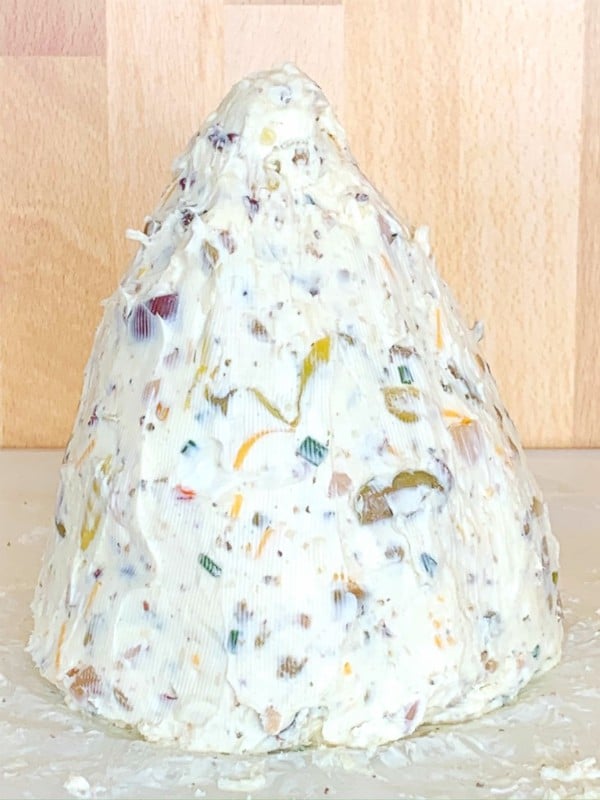
After everything is blended together shape it all into a cone for your “tree”.

Cover loosely with plastic wrap and place it into the fridge for a few hours so it can harden up again. Then you can fine tune your tree with an offset spatula to shape it better and make it smooth all around when it comes out of the fridge.

tree shaped cheese ball

Press chopped parsley onto the cone shape to make it look like a tree, then begin to decorate it by added nuts, peppers or whatever your creative mind wants to do, there’s no set rules, make it your own.

xmas tree cheese ball

I placed a star on top made of cheddar cheese, just do it freehand. At this point if I loosely drape it with plastic wrap it can sit in my fridge for a couple of days ahead to serve at a party and it will be just fine.

One thing to keep in mind is that you’ll want to serve this cheese ball with fairly sturdy crackers to hold up to the dipping, flimsy crackers just won’t do.

Start your holiday party off with this festive Christmas tree cheese ball, it’s a showstopper, it’s fun to eat and you and your guests will love it!

Christmas Tree Shaped Cheese Ball
 
Author:
Ingredients
  • 2 8oz, packages of full fat cream cheese, room temp
  • 1 16oz, container of mascarpone cheese, room temp
  • 1 heaping cup of muffuletta salad or olive salad, drained well of excess oil
  • 3 tablespoons of FINELY grated cheese like cheddar or mozzarella
  • salt and pepper to taste
  • snipped chives, optional
  • chopped parsley, enough to go around the "tree"
  • 1 piece cheddar cheese to make a star shape
  • almond slices, chopped red peppers and whatever else you want to decorate your cheeseball tree with
Instructions
  1. Combine the mascarpone, cream cheese, grated cheese along with the muffuletta salad and chives into a large bowl.
  2. With a hand mixer on low speed blend everything together.
  3. Taste for seasoning or if you want to add more of something else.
  4. on a small cookie sheet or tray place a sheet of wax paper down and then plop the cheese mixture onto that.
  5. Place plastic wrap over your hands and start to form the cone as best you can. Check your hight and width.
  6. Keep the formed cone shape on the pan and place the whole thing into the fridge loosely covered with plastic wrap and let it harden for a few hours or even overnight if you want.
  7. Remove from fridge and on the same tray press in the chopped parsley all over your cone.
  8. Decorate it with the nuts and peppers and make sure you cut out a star with cheddar cheese for the topper.
  9. If loosely draped with plastic wrap this can stay in the fridge for a couple of days before serving.
  10. When ready to serve place a large spatula underneath the tree and lift it onto your serving platter.
  11. Scatter sturdy crackers all around.
  12. Enjoy!


Signature

Strawberry Tiramisu (without raw eggs)

strawberry tiramisu

Strawberry Tiramisu is a twist on the famous classic dessert which contains raw eggs and coffee, this one has neither. It’s a variation where strawberries, creamy mascarpone and whipped cream reign supreme and it’s absolutely delicious!

This dessert is perfect for Valentines Day which is right around the corner, a romantic date night with your special someone, or it can be doubled up and made for your next party.

It’s an easy to assemble, no-bake dessert which can and should be made the day before so all the flavors can meld together in pure harmony.


strawberry tiramisu ingredients

Seek out the freshest and juiciest strawberries you can find, I always buy extra just in case I don’t like the way some look after I bring them home, ripeness is key to the over all flavor in this strawberry tiramisu.

You’ll also need some heavy whipping cream, magical mascarpone cheese and Savoiardi lady fingers which are the crunchy kind not the soft ones.

strawberry tiramisu

For best results stick with an 8×8 or 9×9 inch serving dish or something similar so you’ll have enough ingredients to make 2 layers, of course if you want to double the recipe go with a larger vessel.

strawberry tiramisu

The first layer is the lady fingers that have been soaked in strawberry juice, not quickly dipped but soaked well enough before they fall apart, this will give you the moisture that is needed for the cake.

Next you’ll spread the cream mixture all over the lady fingers and on top of that sliced strawberries scattered all over the top, then you’ll repeat everything one more time.


strawberry tiramisu

As I said before this dessert tastes best made the day before which makes it easy on the host because dessert will be done in advance, all you have to do is pull it out of the fridge and put the coffee on.

strawberry tiramisustrawberry tiramisu

Feel free to add in some liqueur like Kirsch, Framboise to your pureed strawberry juice for an adult version, I had some raspberry liqueur that I used in mine, but if you’re making it kid friendly it’s just as good without.

I hope you make this easy and luxurious dessert for your next party or date night in.

Follow me on Instagram to see what else I’m cooking up during the week!

5.0 from 2 reviews
Strawberry Tiramisu (without raw eggs)
 
Author:
Ingredients
  • 3lbs. fresh, ripe strawberries ( you're going to have extra for sure) 2 full cups will be chopped and pureed in a food processor, some will be sliced for layers and a few whole for optional decorating of the top
  • Savoiardi lady fingers, the crunchy kind, 24 in a package, you'll probably only use one pack but again I always buy an extra package just in case
  • 2 cups heavy cream
  • 8 oz. mascarpone cream, room temperature
  • ¼ cup to ½ cup powdered sugar
  • 1 or 2 tablespoons of granulated sugar (optional)
  • 1 teaspoon vanilla
  • 2 tablespoons liqueur like raspberry, Kirsch or Framboise (optional)
  • ½ cup water
  • mint leaves for optional garnish
Instructions
  1. You'll need a 9x9 inch serving dish or something similar and it should be deep enough to hold two layers. Optional bowl might be a smaller trifle dish.
  2. TO MAKE STRAWBERRY JUICE FOR DIPPING LADY FINGERS
  3. Place 2 full cups of chopped strawberries into a food processor with ½ cup of water and puree until nice and smooth, taste and see if you think it's sweet enough, if not add a tablespoon or 2 of granulated sugar, at this time you can add in the option of a liqueur if you want, taste again adding the amount to your liking. Pour dipping mixture into a small deep dish wide enough so lady fingers can fit while soaking.
  4. TO MAKE THE CREAM MIXTURE
  5. In a bowl add the 8 oz. of mascarpone cheese and with a hand mixer beat until it smooths out.
  6. In same bowl add the 2 cups of heavy cream, the vanilla and the ¼ cup of powdered sugar, blend and beat until it thickens up like a firm whipped cream.
  7. SLICED STRAWBERRIES
  8. Thinly slice up enough strawberries to top the cream mixture on each layer all around
  9. READY FOR ASSEMBLY
  10. One by one soak lady fingers in the strawberry puree, turning and coating each side thoroughly not just a quick dip.
  11. Place single layer on the whole bottom of your serving dish.
  12. Now spread about half of the cream mixture on top of the strawberry soaked ladyfingers making sure all is covered.
  13. Place the thinly sliced strawberries all around the cream mixture.
  14. Repeat next layer with the soaked lady fingers followed by the cream mixture spread all over and then with the sliced strawberries scattered all around.
  15. You can be creative how you want to decorate the top maybe even using some whole strawberries.
  16. Wrap serving dish in plastic wrap and stick it in the fridge overnight for optimal results.
  17. Cut squares or scoop out when ready to serve.
  18. Enjoy!


Signature

Lemon Mascarpone Sorbet Made Quick and Easy

lemon mascarpone sorbet

There are some desserts that are the epitome of summer and this lemon mascarpone sorbet is one of them.  It’s wildly good and so refreshing during these hot summer months. Many years ago when I started this blog I did a post on this dreamy dessert because it immediately caught my attention from a friends blog.  Since then it has become a favorite of mine and I make it every summer so I thought it was worthy of a repeat and I think you will too.
lemon mascarpone sorbet

It’s embarrassingly simple to make, quick and easy with a result that’s so decadent. Just two ingredients blended together, a good store bought lemon sorbet and a container of mascarpone cheese, that’s it, a brilliant concept indeed with no ice cream maker required.
lemon mascarpone sorbet

Everything is done ahead of time, chilling out in the freezer waiting for the perfect ending to your summertime meal.

lemon mascarpone sorbet

It’s light and bright and a wonderful dessert for summer dining al fresco. Actually if you think about it the possibilities are endless, you can easily replace the lemon for maybe mango, strawberry, peach, berry, you see where I’m going? It’s the mascarpone whirled together with the sorbet that takes it over the top.

lemon mascarpone sorbet

Grab some pretty glasses and make this elegant and easy dessert, and a small spoon is required so you can savor every luscious bite nice and slow. I can’t wait til you give this a try!

Follow me on Instagram to see what else I’m cooking up during the week.

5.0 from 1 reviews
Lemon Mascarpone Sorbet Made Quick and Easy
 
Author:
Ingredients
  • 1 pint of lemon sorbet, or your favorite flavor
  • 6 oz. mascarpone cheese
  • 2 lemons for zest only
Instructions
  1. Take your sorbet and set it out on the counter so it can defrost and soften a little.
  2. Mascarpone can be close to room temp for easy no lump blending.
  3. Take out a food processor and put in both the sorbet and mascarpone cheese and give it a whirl until all combined and smooth.
  4. Spoon mixture into your pretty glasses, and refreeze it, depending on their size you might get three to four servings, if you need more just double the recipe.
  5. Do this all ahead of time so it has enough time to set up.
  6. Garnish with the lemon zest when ready to serve.


Signature

LIMONCELLO TIRAMISU !

I know many of you are Chocoholics out there, and rightly so, but if you want something equally as decadent and a little different than the norm, try this sinfully delicious Limoncello Tiramisu!! This is definitely for very special occasions, when you want to Wow your certain someone, friends or family with a special dessert. The one I made was meant to be shared by two, because of its size. But you can certainly make smaller, individual ones. The main characters consist of pound cake that is drenched in Limoncello, a homemade lemon curd, all layered with Mascarpone and whipped cream!! Need I say more??

In a pan place the juice and zest of 3 lemons seeds and all, you’re going to strain it. 1 Tbl. short of a whole stick of butter, 6oz. of sugar, and 3 whole eggs. Whisk everything on med low just till bubbles start to show. Strain with a fine mesh strainer.

Next, take your pound cake and cut it to fit the size of your glass, I used a biscuit cutter.

Now take your bottle of Limoncello, and drench your pound cake pieces, you could use either a homemade, or a good quality store bought one. Just use a basic pound cake recipe if you make it, you want to be sure to taste the Limoncello.


Make sure it’s soaked!!
Finally, start whipping up a small carton of heavy cream, when you have stiff peaks, add a small container of room temperature Mascarpone, beat together just till incorporated.

Assemble it by layering all the components together in a pretty glass, and topping it off with some lemon peel.


Words cannot describe how amazing this is!

Note** You can also layer this in a glass 9×12 pan, or a glass loaf pan instead of individual portions.
 It’s also beautiful placed into a trifle bowl, you’ll will definitely hear lots of ooohs and aaahs when you bring it out of the frig. It makes for a great presentation and what’s really nice is that you can make it the night before.
Just be sure to double everything if you’re using the trifle bowl. A good store bought pound cake is fine, I used 2 for this, slice it into 3rd’s lengthwise, cut strips to go around the edge of the bowl, and bigger pieces to layer up the middle.
limoncello tiramisu


Enjoy!!


Signature